|
Visual Servoing Platform
version 3.6.1 under development (2024-12-03)
|
|
Visual Servoing Platform
version 3.6.1 under development (2024-12-03)
|
The aim of this tutorial is to explain how to use vpImageSimulator class to project an image of a planar scene at a given camera position. For example, this capability can then be used during the simulation of a visual-servo as described in Tutorial: Image-based visual servo to introduce an image processing.
Note that all the material (source code and images) described in this tutorial is part of ViSP source code (in simulator/image folder) and could be found in https://github.com/lagadic/visp/tree/master/simulator/image.
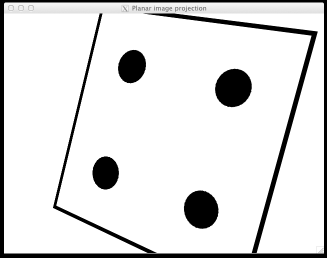
Given the image of a planar 20cm by 20cm square target as the one presented in the next image, we show here after how to project this image at a given camera position, and how to get the resulting image.

This is done by the following code also available in tutorial-image-simulator.cpp:
The result of this program is shown in the next image.
The provide hereafter the explanation of the new lines that were introduced.
Include the header of the vpImageSimulator class that allows to project an image to a given camera position.
Then in the main() function we create an instance of a gray level image that corresponds to the image of the planar target, and then we read the image from the disk.
Since the previous image corresponds to a 20cm by 20cm target, we initialize the 3D coordinates of each corner in the plane Z=0. Each
Then we create an instance of the image I that will contain the rendered image from a given camera position.
Since the projection depends on the camera, we set its intrinsic parameters.
We also set the render position of the camera as an homogeneous transformation between the camera frame and the target frame.
We create here an instance of the planar image projector, set the interpolation to bilinear and initialize the projector with the image of the target and the coordinates of its corners.
Now to retrieve the rendered image we first clean the content of the image to render, set the camera position, and finally get the image using the camera parameters.
Then, if libjpeg is available, the rendered image is saved in the same directory then the executable.
Finally, as in Tutorial: How to create and build a project that uses ViSP and CMake on Unix or Windows we open a window to display the rendered image.
Note that this planar image projection capability has been also introduced in vpVirtualGrabber class exploited in tutorial-ibvs-4pts-image-tracking.cpp. Thus the next Tutorial: Image-based visual servo shows how to use it in order to introduce an image processing that does the tracking of the target during a visual-servo simulation.