|
Visual Servoing Platform
version 3.6.1 under development (2024-07-27)
|
|
Visual Servoing Platform
version 3.6.1 under development (2024-07-27)
|
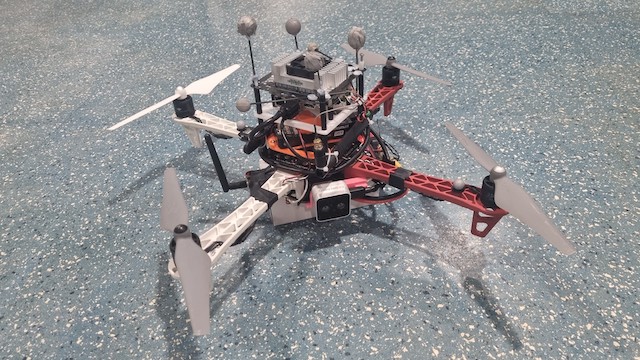
In this tutorial we show how to control indoor a DJI F450 drone equipped with a Pixhawk that communicates with an embedded Jetson TX2 using the USB link. MAVLink is used to communicate between the controller running on the Pixhawk and the other apps running either on the embedded Jetson or the computer that serves as a ground station.
MAVLink or Micro Air Vehicle Link is a protocol for communicating with small unmanned vehicle. It is designed as a header-only message marshaling library. In ViSP we don't use directly MAVLink library, but MavSDK 3rd-party library that is an interface to MAVLink. The use of MavSDK is possible in ViSP through the use of the vpRobotMavsdk class.
In our setup the Jetson retrieves by Wifi the position of the drone from a motion capture system that could be in this tutorial provided by Qualisys or Vicon motion capture systems, thanks to vpMocapQualisys or vpMocapVicon classes.
To perform visual-servoing, an Intel Realsense D405 camera is also mounted on board and connected to the Jetson. Images are acquired thanks to vpRealSense2 class. The visual-servoing control law is implemented on the Jetson using vpServo class and velocities are send to the Pixhawk through MAVLink protocol.
Hereafter you will find a video that illustrates the visual-servoing:
and hereafter the corresponding images captured by the camera and processed by the Jetson:
The following material is necessary for Part 1: Control the drone indoor
If you wish to continue this tutorial with Part 2: Visual Servoing, the following material is also necessary:
Since in our use case we want to navigate indoor, GPS is supposed to be not available. That's why the MoCap is here used to stream the robot position by Wifi to the Jetson. A ViSP based app running on the Jetson is listening the MoCap data in order to convert them to MAVLink messages send to the Pixhawk. This app is implemented in sendMocapToPixhawk.cpp
The following software is necessary for Part 1: Control the drone indoor
MavSDK 3rd party library
MAVLink is the protocol used to communicate with the Pixhawk. To use MAVLink you need to install MavSDK. Instructions to install MavSDK and check the installation are provided here. Notice that you can get the latest binary packages (.deb, .rpm) on their github page.
Below, you will also find instructions to install MavSDK from source on Ubuntu:
  $ mkdir -p $VISP_WS/3rdparty
  $ cd $VISP_WS/3rdparty
v1.4.13. In the next command you need to adapt the version to the last release.$ git clone --recursive --branch v1.4.13 https://github.com/mavlink/MAVSDK $ mkdir MAVSDK/build $ cd MAVSDK/build $ cmake ../ -DCMAKE_BUILD_TYPE=releases $ make -j$(nproc) $ sudo make install
Once MavSDK is installed (either from binary packages or from source) and enabled during ViSP cmake configuration stage, it will enable vpRobotMavlink usage.
QGroundControl software, Ground Control Station for the MAVLink protocol
When using PX4, it is important to install QGroundControl (QGC) following instructions here.
QGroundControl if you experience the following error (occurred with Ubuntu 22.04): $ ./QGroundControl.AppImage dlopen(): error loading libfuse.so.2 AppImages require FUSE to run.you need to install
libfuse2 package: $ sudo apt install libfuse2
This software will provide a complete interface with your PX4 flight controller. In the setup window, accessible directly from the QGC icon, you can flash the firmware on the Pixhawk once it is connected through USB. We recommend flashing the latest stable version of PX4, but it is possible to go for the developper version.
Once the PX4 firmware is installed, the various sensor calibrations must be done. After this, the drone must be configured to fly indoors. In Vehicle Setup, go to Parameters and search the parameter EKF2_AID_MASK. This parameter allows you to control the source of the position data used in the Kalman filter. If we want to fly inside, we need to untick the "use GPS" box (default param) and tick the "vision position fusion" and "vision yaw fusion" boxes. The parameter EKF2_HGT_MODE determines which sensor should be prioritized for altitude estimation. This parameter should be switched from "barometer" to "Vision".
MavProxy software
MavProxy is another useful software, allowing you to easily communicate with the Pixhawk by merging MAVLink instructions coming through different ports. The instruction to install MavProxy on the onboard computer (Jetson) can be found here. Once MavProxy is installed on the onboard computer attached to the drone (in our case the Jetson), you can launch it in a terminal. Then you can run MavProxy generally installed in $HOME/.local/bin folder with different ports opened, as it is shown in this example (by default, QGroundControl will connect through the udp port 14550). In the next example, our ground station with IP 192.168.30.111 will be used to run QGroundControl. The Jetson with local IP address 127.0.0.1 will be used to stream the MoCap data and run our test or IBVS application.
$ ssh nvidia@jetson
$ mavproxy.py --master=/dev/ttyACM0 --out=udpout:192.168.30.111:145510 --out=udpout:192.168.30.111:14551 \
    --out=udpout:127.0.0.1:14552 --out=udpout:127.0.0.1:14553
In the previous command line,
/dev/ttyACM0 refers to the USB link between the Jetson and the Pixhawk--out=udpout:192.168.30.111:14550 is here to run QGroundControl on the ground station--out=udpout:192.168.30.111:14551 is here to run an app on the ground station that communicates with the Pixhawk (typically the one used to Control the drone with a keyboard)--out=udpout:127.0.0.1:14552 is here to run on the Jetson the app that Stream MoCap to Pixhawk--out=udpout:127.0.0.1:14553 is here to run on the Jetson the app that does the visual servoing (see Part 2: Visual Servoing).Qualisys or Vicon Motion Capture System 3rd party SDK
In this tutorial, we suppose that you have either the Qualisys or the Vicon MoCap System. One of them is required to get the pose of the vehicle that will be send to the Pixhawk through MAVLink (see Stream MoCap to Pixhawk).
$ cd $VISP_WS/visp-build
$ cmake ../visp
At this point you should see something similar to the following that shows in our case that MavSDK and Qualisys MoCap SDK are detected by ViSP installed on the Jetson:
  Real robots:
    ...
    Use MAVSDK:                  yes (ver 1.4.13)
    ...
  Mocap:
    Use Qualisys:                yes
    Use Vicon:                   no
If this is the case, you can now build ViSP: $ make -j$(nproc)We recommend also to install the same SDK on the ground station.
If you wish to continue this tutorial with Part 2: Visual Servoing, the following material is also necessary:
In our case, we use MavProxy to allow multiple apps to dial with the Pixhawk (see Software for more details on the next command line):
Our assumptions are the following:
/dev/ttyACM0 device. Our Jetson has IP 192.168.30.155. Port 14552 is reserved for the binary that is streaming MoCAP data, while port 14553 is reserved for the visual-sevoing app (see Part 2: Visual Servoing)DJI-F450 for name.$ ssh nvidia@jetson
$ mavproxy.py --master=/dev/ttyACM0 --out=udpout:192.168.30.111:14550 --out=udpout:192.168.30.111:14551 \
--out=udpout:127.0.0.1:14552 --out=udpout:127.0.0.1:14553
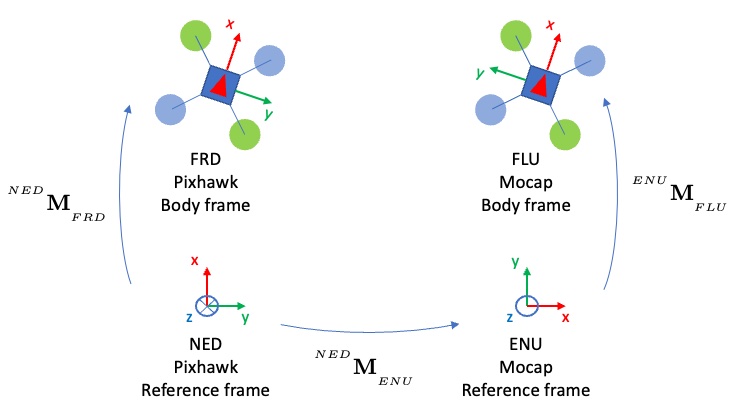
The code sendMocapToPixhawk.cpp allows you to send the MoCap stream coming from a Qualisys or Vicon motion capture system to the Pixhawk using MavLink. This code is based on vpMocapQualisys and vpMocapVicon classes that allows to get the vehicle FLU body frame in the MoCAP ENU reference frame. Then we use vpRobotMavsdk class and more precisely vpRobotMavsdk::sendMocapData() that internally send the FRD body frame pose with respect to the NED reference frame as a MavLink message to the Pixhawk.
In the following command line examples, we suppose that our drone rigid object is identified by the MoCap system with the name DJI-F450. On the Jetson, streaming the pose obtained by the MoCap system to the vehicle can be achieved with Qualisys in this way:
$ ssh nvidia@jetson
$ cd $VISP_WS/visp-build/example/servo-pixhawk
$ ./sendMocapToPixhawk -ob DJI-F450 --mocap-system q -d udp://:14552
If you want to run the code with Vicon, you can do it this way:
$ ./sendMocapToPixhawk -ob DJI-F450 --mocap-system v -d udp://:14552
The parameter '-ob' or '–only-body' tells the application which body is to be selected amongst the packets sent by your MoCap System. If you look at the window of the MoCap system manager, you should be able to look at the bodies' names.

To check the drone behavior you can start QGroundControl on the ground station:
$ ~/Downloads/QGroundControl.AppImage
Before launching the keyboard control test on the ground station or the visual servoing test on the Jetson, we advise you to launch simpler and safer tests beforehand on the Jetson. These tests are, in order :
You can easily launch these tests (below is the example for the takeoff) by connecting through ssh to your Jetson:
$ ssh nvidia@jetson
$ cd $VISP_WS/visp-build/modules/robot
$ ./testPixhawkDroneTakeoff udp://:14553
In testPixhawkDroneKeyboard.cpp you will find the code of an example that allows to control the drone from a ground station using the keyboard. To use this example on the ground station, you may run:
$ ./testPixhawkDroneKeyboard --co udp://192.168.30.111:14551
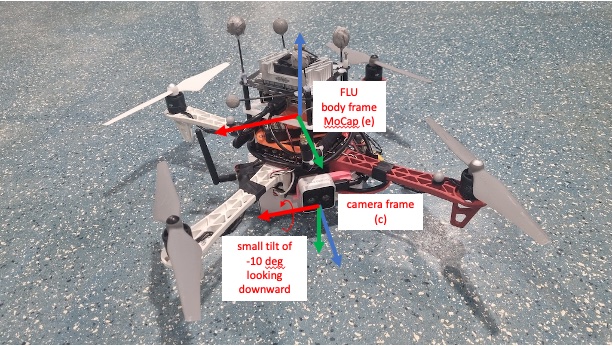
In order to do this part, make sure you add a camera to your drone. We added a intel Realsense D405 connected to the Jetson through USB.
The code servoPixhawkDroneIBVS.cpp is an example that needs to be run on the Jetson and that allows to do visual servoing with the drone. This program establishes a rigid link between the drone (equipped with a camera) and an Apriltag. Depending on where the camera is placed, the matrices expressing the transformation between the FLU body frame of the drone and the camera frame need to be modified. Here is a picture of the drone showing where the D405 camera was attached.
$ ssh nvidia@jetson
$ ./servoPixhawkDroneIBVS --tag-size 0.23 --co udp://:14553 --distance-to-tag 1.3
The next tutorial Tutorial: Visual-servoing with Parrot Bebop 2 drone shows how to embbed a visual-servoing scheme on a Parrot Bebop2 drone.