Introduction
This tutorial will show you how to automatically threshold, binarize an image using different methods:
These functions have been ported from the Auto Threshold ImageJ plugin and you can refer to the corresponding documentation for more information.
Example code
The following example also available in tutorial-autothreshold.cpp will demonstrate on a sample image the result of each of these methods:
#include <cstdlib>
#include <iostream>
#include <visp3/core/vpConfig.h>
#include <visp3/core/vpImage.h>
#include <visp3/gui/vpDisplayFactory.h>
#include <visp3/io/vpImageIo.h>
#if defined(VISP_HAVE_MODULE_IMGPROC)
#include <visp3/imgproc/vpImgproc.h>
#endif
int main(int argc, const char **argv)
{
#if defined(VISP_HAVE_MODULE_IMGPROC) && defined(VISP_HAVE_DISPLAY)
#ifdef ENABLE_VISP_NAMESPACE
#endif
std::string input_filename = "grid36-03.pgm";
for (int i = 1; i < argc; i++) {
if (std::string(argv[i]) == "--input" && i + 1 < argc) {
input_filename = std::string(argv[i + 1]);
}
else if (std::string(argv[i]) == "--help" || std::string(argv[i]) == "-h") {
std::cout << "Usage: " << argv[0] << " [--input <input image>] [--help]" << std::endl;
return EXIT_SUCCESS;
}
}
#if (VISP_CXX_STANDARD >= VISP_CXX_STANDARD_11)
#else
#endif
display->init(I_res);
#if (VISP_CXX_STANDARD < VISP_CXX_STANDARD_11) && defined(VISP_HAVE_DISPLAY)
if (display != nullptr) {
delete display;
}
#endif
#else
(void)argc;
(void)argv;
#endif
return EXIT_SUCCESS;
}
Class that defines generic functionalities for display.
static bool getClick(const vpImage< unsigned char > &I, bool blocking=true)
static void display(const vpImage< unsigned char > &I)
static void flush(const vpImage< unsigned char > &I)
static void displayText(const vpImage< unsigned char > &I, const vpImagePoint &ip, const std::string &s, const vpColor &color)
static void read(vpImage< unsigned char > &I, const std::string &filename, int backend=IO_DEFAULT_BACKEND)
Class that defines a 2D point in an image. This class is useful for image processing and stores only ...
unsigned int getWidth() const
unsigned int getHeight() const
VISP_EXPORT unsigned char autoThreshold(VISP_NAMESPACE_ADDRESSING vpImage< unsigned char > &I, const vpAutoThresholdMethod &method, const unsigned char backgroundValue=0, const unsigned char foregroundValue=255)
@ AUTO_THRESHOLD_INTERMODES
@ AUTO_THRESHOLD_TRIANGLE
std::shared_ptr< vpDisplay > createDisplay()
Return a smart pointer vpDisplay specialization if a GUI library is available or nullptr otherwise.
vpDisplay * allocateDisplay()
Return a newly allocated vpDisplay specialization if a GUI library is available or nullptr otherwise.
These functions are provided in a vp:: namespace and accessible using this include:
#include <visp3/imgproc/vpImgproc.h>
The code to use is pretty straightword:
- Huang:
- Intermodes:
- IsoData:
- Mean:
- Otsu:
- Triangle:
The following image presents the results for each method:
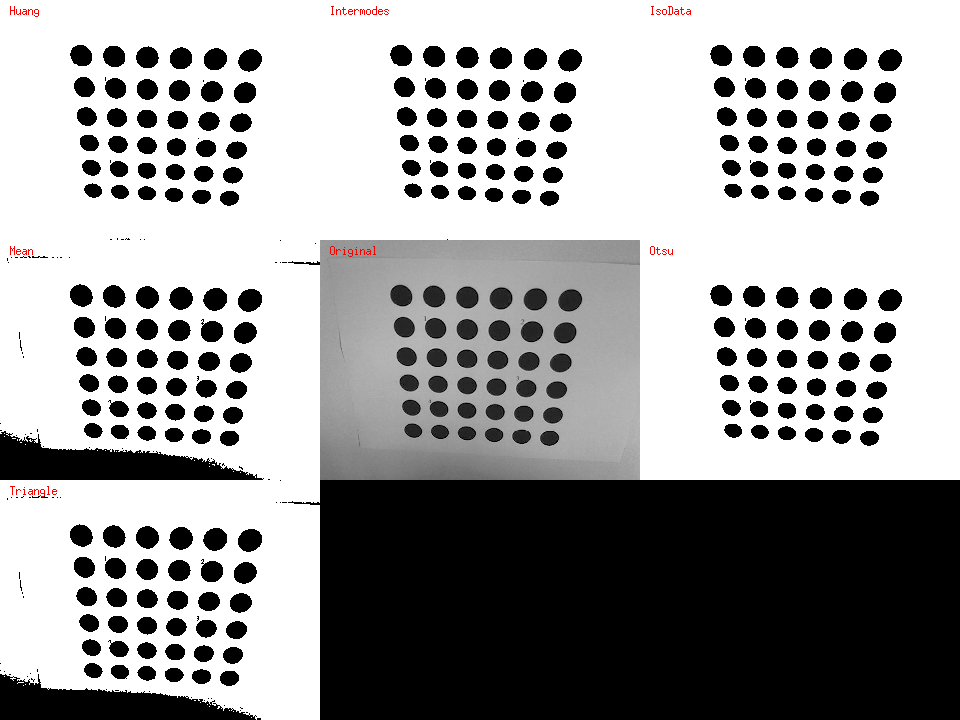
Comparison of different binarizations using the threshold value returned by each method
The function vp::autoThreshold(vpImage<unsigned char> &, const vp::vpAutoThresholdMethod &, const unsigned char, const unsigned char) has two parameters to specify the pixel values to use for the background and the foreground. By default, it is (see vpImageTools::binarise(vpImage<Type> &, Type, Type, Type, Type, Type, const bool)):
![\[ I_{bin}\left ( i,j \right ) = \left \{ \begin{matrix} 0 \text{ if } I_{src}\left ( i,j \right ) < \text{threshold} \\ 255 \text{ otherwise} \end{matrix} \right. \]](form_1390.png)
Next tutorial
You can now read the Tutorial: Contours extraction from a binary image, to learn how to extract the contours from a binary image.