Introduction
This tutorial will show you how to extract the contours from a binary image. The contour extraction algorithm is based on [47] article and most of the implementation has been ported from [18] library.
The function to call is findContours(const vpImage<unsigned char> &, vpContour &, std::vector<std::vector<vpImagePoint> > &, const vpContourRetrievalType &)
- the first argument is the image where '0' pixel value means the background and '1' pixel value means the foreground. Other values are not allowed.
- the second argument is a VISP_NAMESPACE_NAME::vpContour structure that contains the list of contours in a tree
- the third argument is the list of contours
- the last argument is an option to choose the type of contour extraction, see VISP_NAMESPACE_NAME::vpContourRetrievalType
The vpContour structure is composed of:
The different contour extraction methods are:
The next section will provide a concrete example for better understanding.
Example code
The following example also available in tutorial-contour.cpp will demonstrate on a sample image the result of each of these methods:
#include <cstdlib>
#include <iostream>
#include <visp3/core/vpConfig.h>
#include <visp3/core/vpImage.h>
#include <visp3/gui/vpDisplayFactory.h>
#include <visp3/io/vpImageIo.h>
#if defined(VISP_HAVE_MODULE_IMGPROC) && defined(VISP_HAVE_DISPLAY)
#include <visp3/imgproc/vpImgproc.h>
#ifdef ENABLE_VISP_NAMESPACE
#endif
namespace
{
{
std::cout << "\nContour:" << std::endl;
std::cout << "\tlevel: " << level << std::endl;
<< std::endl;
std::cout <<
"\tcontour size: " << contour.
m_points.size() << std::endl;
std::cout <<
"\tnb children: " << contour.
m_children.size() << std::endl;
for (std::vector<VISP_NAMESPACE_NAME::vpContour *>::const_iterator it = contour.
m_children.begin(); it != contour.
m_children.end();
++it) {
displayContourInfo(**it, level + 1);
}
}
{
std::vector<std::vector<vpImagePoint> > contours;
for (std::vector<VISP_NAMESPACE_NAME::vpContour *>::const_iterator it = contour.
m_children.begin(); it != contour.
m_children.end();
++it) {
drawContoursTree(I, **it);
}
}
}
#endif
int main(int argc, const char **argv)
{
#if defined(VISP_HAVE_MODULE_IMGPROC) && defined(VISP_HAVE_DISPLAY)
std::string input_filename = "grid36-03.pgm";
bool white_foreground = false;
for (int i = 1; i < argc; i++) {
if (std::string(argv[i]) == "--input" && i + 1 < argc) {
input_filename = std::string(argv[i + 1]);
}
else if (std::string(argv[i]) == "--white_foreground") {
white_foreground = true;
}
else if (std::string(argv[i]) == "--method" && i + 1 < argc) {
}
else if (std::string(argv[i]) == "--help" || std::string(argv[i]) == "-h") {
std::cout << "Usage: " << argv[0]
<< " [--input <input image>] [--method <0: "
"CONTOUR_RETR_TREE, 1: CONTOUR_RETR_LIST, 2: "
"CONTOUR_RETR_EXTERNAL>]"
" [--white_foreground] [--help]"
<< std::endl;
return EXIT_SUCCESS;
}
}
#if (VISP_CXX_STANDARD >= VISP_CXX_STANDARD_11)
#else
#endif
for (unsigned int i = 0; i < I_bin.getSize(); i++) {
I_bin.bitmap[i] = 255 * I.
bitmap[i];
}
std::vector<std::vector<vpImagePoint> > contours;
drawContoursTree(I_draw_contours, vp_contours);
displayContourInfo(vp_contours, 0);
#if (VISP_CXX_STANDARD < VISP_CXX_STANDARD_11) && defined(VISP_HAVE_DISPLAY)
if (display != nullptr) {
delete display;
}
if (display2 != nullptr) {
delete display2;
}
#endif
#else
(void)argc;
(void)argv;
#endif
return EXIT_SUCCESS;
}
static const vpColor green
Class that defines generic functionalities for display.
static bool getClick(const vpImage< unsigned char > &I, bool blocking=true)
static void display(const vpImage< unsigned char > &I)
static void flush(const vpImage< unsigned char > &I)
static void displayText(const vpImage< unsigned char > &I, const vpImagePoint &ip, const std::string &s, const vpColor &color)
static void read(vpImage< unsigned char > &I, const std::string &filename, int backend=IO_DEFAULT_BACKEND)
unsigned int getWidth() const
Type * bitmap
points toward the bitmap
unsigned int getHeight() const
VISP_EXPORT void findContours(const VISP_NAMESPACE_ADDRESSING vpImage< unsigned char > &I_original, vpContour &contours, std::vector< std::vector< VISP_NAMESPACE_ADDRESSING vpImagePoint > > &contourPts, const vpContourRetrievalType &retrievalMode=CONTOUR_RETR_TREE)
VISP_EXPORT void drawContours(VISP_NAMESPACE_ADDRESSING vpImage< unsigned char > &I, const std::vector< std::vector< VISP_NAMESPACE_ADDRESSING vpImagePoint > > &contours, unsigned char grayValue=255)
VISP_EXPORT unsigned char autoThreshold(VISP_NAMESPACE_ADDRESSING vpImage< unsigned char > &I, const vpAutoThresholdMethod &method, const unsigned char backgroundValue=0, const unsigned char foregroundValue=255)
std::shared_ptr< vpDisplay > createDisplay()
Return a smart pointer vpDisplay specialization if a GUI library is available or nullptr otherwise.
vpDisplay * allocateDisplay()
Return a newly allocated vpDisplay specialization if a GUI library is available or nullptr otherwise.
std::vector< vpContour * > m_children
Children contour.
std::vector< VISP_NAMESPACE_ADDRESSING vpImagePoint > m_points
Vector of points belonging to the contour.
vpContourType m_contourType
Contour type.
These functions are provided in a VISP_NAMESPACE_NAME namespace and accessible using this include:
#include <visp3/imgproc/vpImgproc.h>
The first steps are:
- read an image in grayscale
- threshold / binarize the image, here with the Otsu method. If the object of interest is in white in the image, the formula for the binarization is:
![\[ I_{bin}\left ( i,j \right ) = \left \{ \begin{matrix} 0 \text{ if } I_{src}\left ( i,j \right ) < \text{threshold} \\ 1 \text{ otherwise} \end{matrix} \right. \]](form_1394.png)
If the object of interest is in black in the image, the formula for the binarization is:
![\[ I_{bin}\left ( i,j \right ) = \left \{ \begin{matrix} 1 \text{ if } I_{src}\left ( i,j \right ) < \text{threshold} \\ 0 \text{ otherwise} \end{matrix} \right. \]](form_1395.png)
- extract the contours (by default, it is the VISP_NAMESPACE_NAME::CONTOUR_RETR_TREE method)
std::vector<std::vector<vpImagePoint> > contours;
- draw the contours if wanted
The result images for each step are:
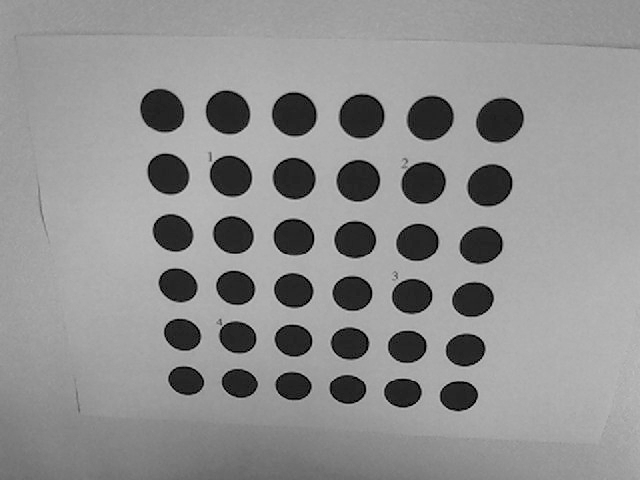
Input image
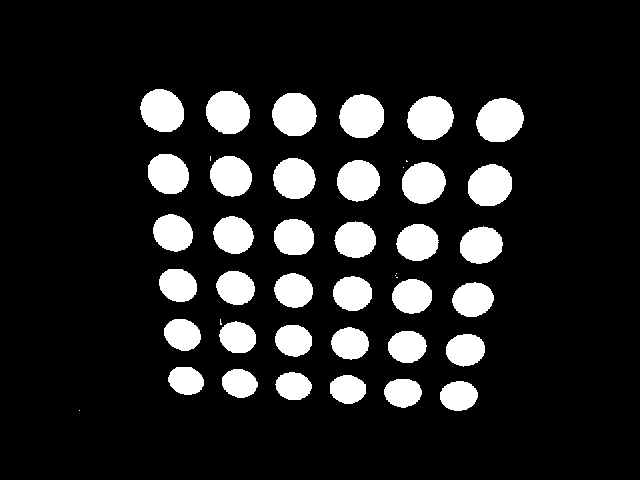
Image after binarization using the Otsu method
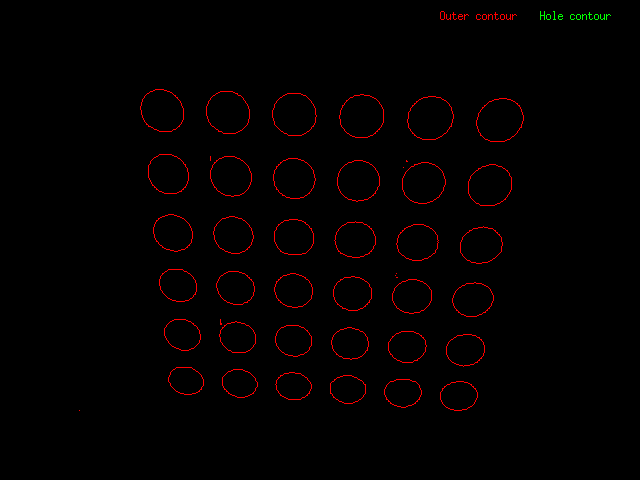
Contours extracted and displayed on a new image
To understand how the hierarchical contours extraction works, let's switch on another example. In a terminal, run:
$ ./tutorial-contour --input Contours_tree.pgm --white_foreground
The image after binarisation:

Image after binarization using the Otsu method
Instead of drawing all the contours with the same color, we can assign a first color for VISP_NAMESPACE_NAME::CONTOUR_OUTER contour and a second color for VISP_NAMESPACE_NAME::CONTOUR_HOLE contour.
The function to navigate in the contour tree is the following:
{
std::vector<std::vector<vpImagePoint> > contours;
for (std::vector<VISP_NAMESPACE_NAME::vpContour *>::const_iterator it = contour.
m_children.begin(); it != contour.
m_children.end();
++it) {
drawContoursTree(I, **it);
}
}
The call to draw the hierarchical contours:
drawContoursTree(I_draw_contours, vp_contours);
The result image is:
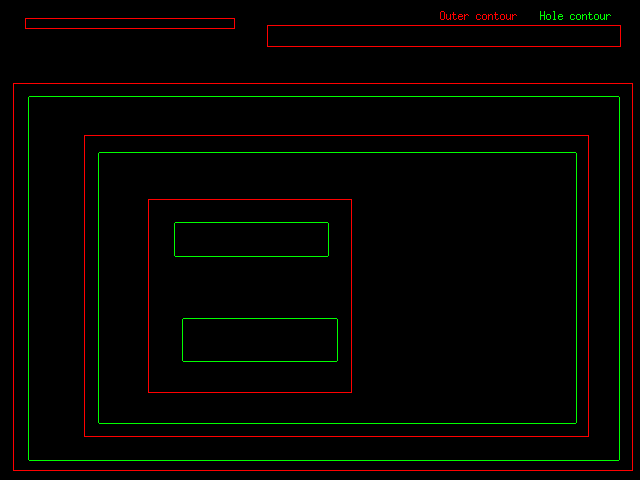
Contours extracted and displayed on a new image, in red outer contours, in green hole contours
To display the hierarchy, we can use this function:
{
std::cout << "\nContour:" << std::endl;
std::cout << "\tlevel: " << level << std::endl;
<< std::endl;
std::cout <<
"\tcontour size: " << contour.
m_points.size() << std::endl;
std::cout <<
"\tnb children: " << contour.
m_children.size() << std::endl;
for (std::vector<VISP_NAMESPACE_NAME::vpContour *>::const_iterator it = contour.
m_children.begin(); it != contour.
m_children.end();
++it) {
displayContourInfo(**it, level + 1);
}
}
For the VISP_NAMESPACE_NAME::CONTOUR_RETR_TREE method, the output is:
Contour:
level: 0
contour type: hole contour
contour size: 0
nb children: 3
Contour:
level: 1
contour type: outer contour
contour size: 438
nb children: 0
Contour:
level: 1
contour type: outer contour
contour size: 748
nb children: 0
Contour:
level: 1
contour type: outer contour
contour size: 2012
nb children: 1
Contour:
level: 2
contour type: hole contour
contour size: 1906
nb children: 1
Contour:
level: 3
contour type: outer contour
contour size: 1610
nb children: 1
Contour:
level: 4
contour type: hole contour
contour size: 1494
nb children: 1
Contour:
level: 5
contour type: outer contour
contour size: 792
nb children: 2
Contour:
level: 6
contour type: hole contour
contour size: 372
nb children: 0
Contour:
level: 6
contour type: hole contour
contour size: 392
nb children: 0
The top level contour is always the root contour with zero contour point and which contains the list of contours.
For the VISP_NAMESPACE_NAME::CONTOUR_RETR_EXTERNAL method, the output is:
Contour:
level: 0
contour type: hole contour
contour size: 0
nb children: 3
Contour:
level: 1
contour type: outer contour
contour size: 438
nb children: 0
Contour:
level: 1
contour type: outer contour
contour size: 748
nb children: 0
Contour:
level: 1
contour type: outer contour
contour size: 2012
nb children: 0
The result image is:

External contours extracted and displayed on a new image
For the VISP_NAMESPACE_NAME::CONTOUR_RETR_LIST method, the output is:
Contour:
level: 0
contour type: hole contour
contour size: 0
nb children: 9
Contour:
level: 1
contour type: outer contour
contour size: 438
nb children: 0
Contour:
level: 1
contour type: outer contour
contour size: 748
nb children: 0
Contour:
level: 1
contour type: outer contour
contour size: 2012
nb children: 0
Contour:
level: 1
contour type: hole contour
contour size: 1906
nb children: 0
Contour:
level: 1
contour type: outer contour
contour size: 1610
nb children: 0
Contour:
level: 1
contour type: hole contour
contour size: 1494
nb children: 0
Contour:
level: 1
contour type: outer contour
contour size: 792
nb children: 0
Contour:
level: 1
contour type: hole contour
contour size: 372
nb children: 0
Contour:
level: 1
contour type: hole contour
contour size: 392
nb children: 0
Next tutorial
You can now read the Tutorial: Connected-components labeling, for a similar method to extract the connected-components in a grayscale image.