Visual Servoing Platform  version 3.6.1 under development (2024-11-21)
Tutorial: Visual servoing with FLIR Pan Tilt Unit

Introduction

This tutorial explains how to do an image-based visual-servoing with a FLIR PTU-46 equipped with a FLIR camera (in our case a FLIR PTU-5 and a Grashopper3 GigE camera with a 300 mm lens).
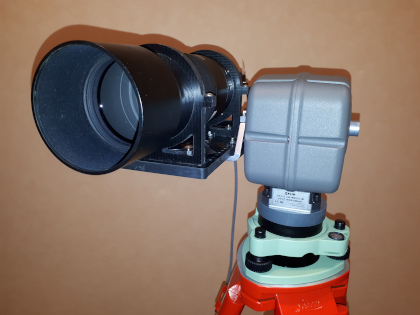
In this tutorial the considered target is an AprilTag.

The goal of the servoing is to center the target in the middle of the image despite PTU and target motion.

Prerequisites

Hardware

We suppose here that you have:

  • a FLIR PTU that will be controlled throw vpRobotFlirPtu class. To this end you need to Install FLIR PTU SDK. Note that FLIR PTU-46 factory settings are:
    Pan pos min/max [deg]: -167.99 168
    Tilt pos min/max [deg]: -89.99 90
    Pan/tilt vel max [deg/s]: 120 120
  • a FLIR camera attached to the robot end-effector. Images will be acquired with vpFlyCaptureGrabber class. Here you need to Install FLIR FlyCapture SDK.

    Note
    We strongly recommend to communicate with the PTU using network interface. We experienced communication issues using serial communication.

Install FLIR PTU SDK

In order to control FLIR PTU you need to build the corresponding SDK. Here we give the steps to build sdk-2.0.2 or sdk-2.0.4.

On Linux platform

  • Unzip the SDK in $VISP_WS
    $ cd $VISP_WS
    $ unzip sdk-2.0.4.zip
  • Modify $VISP_WS/sdk-2.0.4/cpi.c line 809
    // error = abs(CPI_EMASK(error));
    error = labs(CPI_EMASK(error));
  • Modify $VISP_WS/sdk-2.0.4/config.mk line 13
    # CFLAGS=-g -Wall -Werror -DLITTLE_ENDIAN
    CFLAGS=-g -Wall -Werror -DLITTLE_ENDIAN -02 -fPIC
  • Build the SDK
    $ cd $VISP_WS/sdk-2.0.4
    $ make clean
    $ make cerial libcpi.a
  • Terminate installation setting FLIRPTUSDK_HOME enviromnent variable to help ViSP finding FLIR PTU SDK
    $ echo "export FLIRPTUSDK_HOME=$VISP_WS/sdk-2.0.4" >> ~/.bashrc
    $ source ~/.bashrc

On Windows platform

  • Unzip the SDK sdk-2.0.4.zip in VISP_WS%
  • Open VISP_WS%\sdk-2.0.4\build\visual_studio_2008\CPI2.sln with Visual Studio C++
  • Modify VISP_WS%\sdk-2.0.4\build\visual_studio_2008\port\vc2008.h file to comment line 44
    //#define snprintf(s,n,fmt,...) _snprintf(s,n,fmt,__VA_ARGS__)
  • Modify VISP_WS%\sdk-2.0.4\build\visual_studio_2008\port\stdbool.h to comment line 34
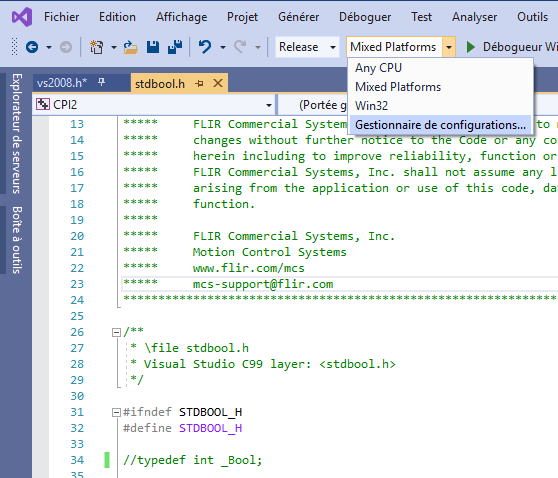
    //typedef int _Bool;
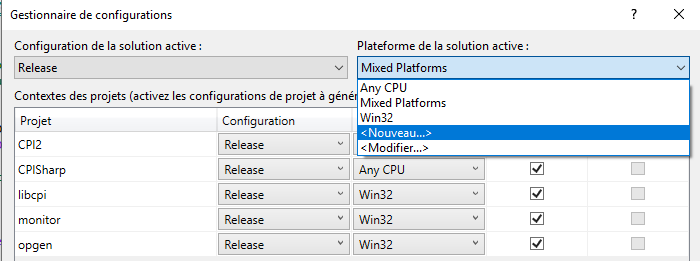
  • Modify build type to "Release" and launch the configuration manager.
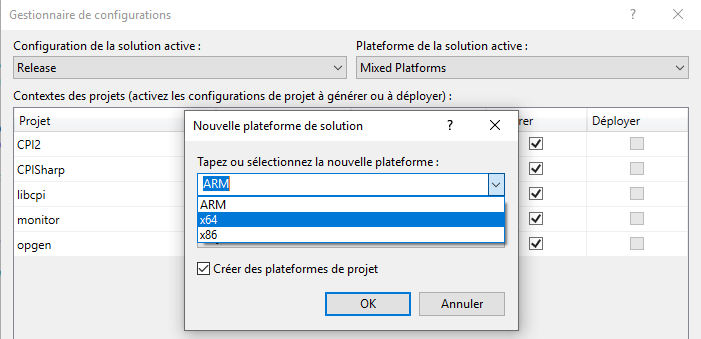
  • In the configuration manager, for active configuration "Release", create a new configuration entering new menu
  • Select configuration "x64"
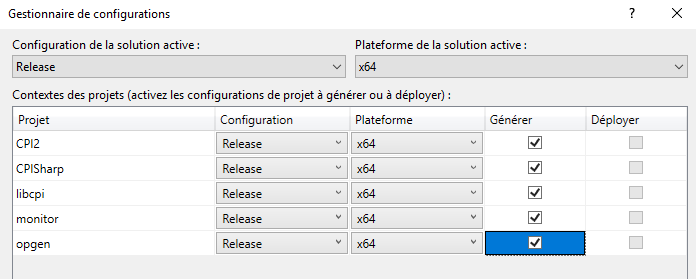
  • Check all the project to build in x64 configuration
  • Close configuration manager
  • Active configuration is now modified from Win32 to x64
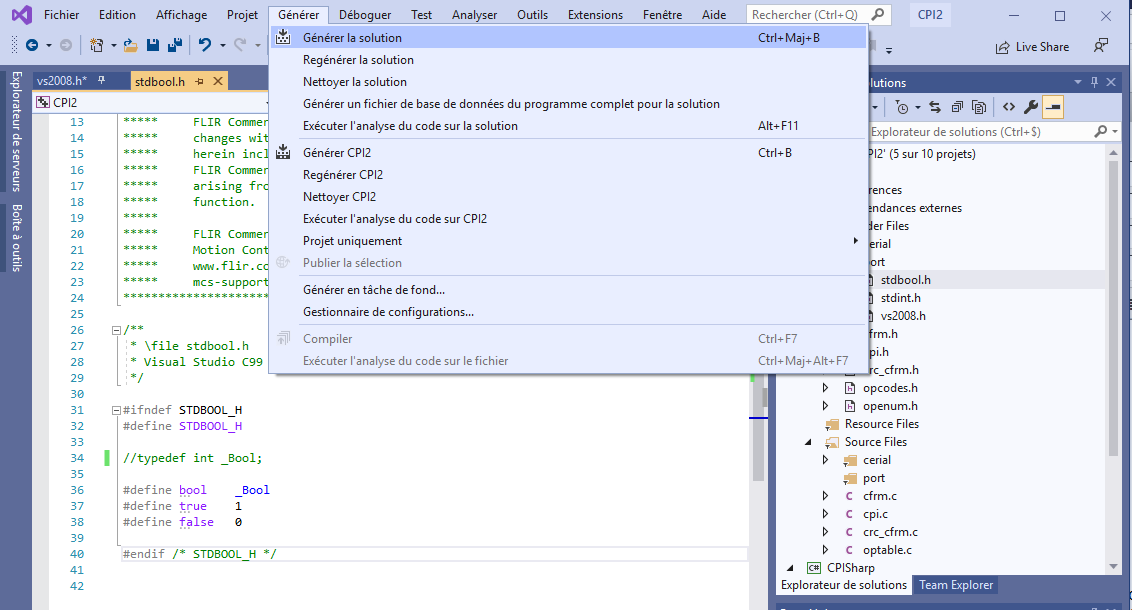
  • Generate solution
  • There will be warnings that could be ignored. At the end of the build process you should find licpi.lib and libcpi.dll files in VISP_WS%\sdk-2.0.4\build\visual_studio_2008\x64\Release folder
  • Terminate installation setting FLIRPTUSDK_HOME enviromnent variable to help ViSP finding FLIR PTU SDK
    C:\> setx FLIRPTUSDK_HOME "%VISP_WS%\sdk-2.0.4"
    C:\> exit

Install FLIR FlyCapture SDK

This SDK is used to get images acquired by a FLIR Camera, in our case a Grashopper3 GigE camera.

On Linux platform

On Windows platform

Print an Apriltag target

We provide a ready to print 36h11 tag that is 12 by 12 cm square [download] that you may print.

If you are interested to get other tags, follow the steps described in Print an AprilTag marker.

Configure and build ViSP

Since you have just installed FLIR PTU SDK and FLIR FlyCapture SDK 3rd parties, you need to configure again ViSP with cmake in order that ViSP is able to use these SDKs.

On Linux platform

On Windows platform

Image-based visual servoing

Setup material

Before starting visual-servoing example, you need to:

  • Attach your camera to the robot end-effector
  • Put an Apriltag in the camera field of view
  • Connect FLIR PTU to an Ethernet switch using an Ethernet cable
  • Connect FLIR Grashopper GigE camera to the Ethernet switch using an Ethernet cable
  • Connect your computer to the Ethernet switch using an Ethernet cable
  • Plug the FLIR PTU USB adapter to your computer

Determine extrinsic camera parameters

These parameters correspond to the position of the camera frame in the end-effector frame. We recall that:

  • end-effector frame origin is located at the intersection of the pan and tilt axis. When pan and tilt joints are at zero position, X-axis goes forward, Y-axis on the left and Z-axis upward.
  • camera frame origin can be approximated in the middle of the CCD. Camera X-axis goes on the right, Y-axis doward and Y-axis goes forward along the optical axis.

To proceed with this extrinsic camera calibration:

  • use a ruler and measure the distances betweeen end-effector and camera frames. The precision will be enough to perform visual servoing
  • modify tutorial/robot/flir-ptu/eMc.yaml accordingly:
    $ cat eMc.yaml
    rows: 4
    cols: 4
    data:
    - [0, 0, 1, -0.1]
    - [-1, 0, 0, -0.123]
    - [0, -1, 0, 0.035]
    - [0, 0, 0, 1]

Start visual-servoing

An example of image-based visual servoing using FLIR PTU equipped with a FLIR camera is available in tutorial-flir-ptu-ibvs.cpp. Now enter in tutorial/robot/flir-ptu folder and run tutorial-flir-ptu-ibvs binary to get helper information:

$ cd tutorial/robot/flir-ptu
$ ./tutorial-flir-ptu-ibvs --help
SYNOPSIS
./tutorial-flir-ptu-ibvs [--portname <portname>] [--baudrate <rate>] [--network] [--extrinsic <extrinsic.yaml>] [--constant-gain] [--help] [-h]

Run the binary to get FLIR PTU IP address:

$ ./tutorial-flir-ptu-ibvs --portname /dev/ttyUSB0 --network
Try to connect FLIR PTU to port: /dev/ttyUSB0 with baudrate: 9600" << std::endl
PTU HostName: PTU-5
PTU IP : 169.254.110.254
PTU Gateway : 0.0.0.0

Start visual servoing:

$ ./tutorial-flir-ptu-ibvs --portname tcp:169.254.110.254 --constant-gain 0.1 --extrinsic eMc.yaml

Known issues

Failed to open /dev/ttyUSB0: Permission denied

On Unix-like OS, if you experienced the following error when running servoFlirPtu.cpp:

Failed to open /dev/ttyUSB0: Permission denied.
  1. Add users to the "dialout" group:
    $ sudo adduser <username> dialout
  2. Reboot

Relocation R_X86_64_PC32 against symbol ‘serposix’

On Unix-like OS, if you experienced the following error during ViSP build:

<your path>/sdk-x.y.z/libcpi.a(cerial.o): relocation R_X86_64_PC32 against symbol `serposix' can not be used when making a shared object; recompile with -fPIC
  1. Enter FLIR PTU SDK folder and modify config.mk to add -fPIC build flag
    $ cat <your path>/sdk-x.y.y/config.mk
    CFLAGS=-g -Wall -Werror -DLITTLE_ENDIAN -O2 -fPIC
  2. Rebuild PTU-SDK
    $ cd <your path>/sdk-x.y.y
    $ make clean
    $ make
  3. Rebuild ViSP
    $ cd $VISP_WS/visp-build
    $ make -j4
    Definition: vpIoTools.h:61

Next tutorial

You are now ready to see Tutorial: Image-based visual servo that will give some hints on image-based visual servoing in simulation with a free flying camera.