|
Visual Servoing Platform
version 3.3.0 under development (2020-02-17)
|
|
Visual Servoing Platform
version 3.3.0 under development (2020-02-17)
|
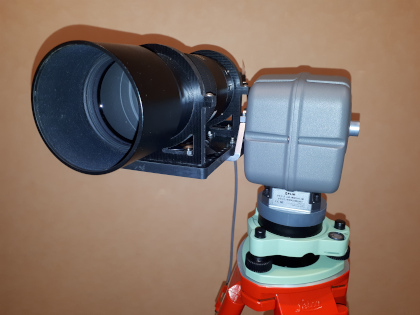
This tutorial explains how to do an image-based visual-servoing with a FLIR PTU-46 equipped with a FLIR camera (in our case a FLIR PTU-5 and a Grashopper3 GigE camera with a 300 mm lens).
In this tutorial the considered target is an AprilTag.

The goal of the servoing is to center the target in the middle of the image despite PTU and target motion.
We suppose here that you have:
a FLIR camera attached to the robot end-effector. Images will be acquired with vpFlyCaptureGrabber class. Here you need to Install FLIR FlyCapture SDK.
In order to control FLIR PTU you need to build the corresponding SDK. Here we give the steps to build sdk-2.0.2 or sdk-2.0.4.
On Linux platform
$VISP_WS $VISP_WS/sdk-2.0.4/cpi.c line 809 $VISP_WS/sdk-2.0.4/config.mk line 13 FLIRPTUSDK_HOME enviromnent variable to help ViSP finding FLIR PTU SDK On Windows platform
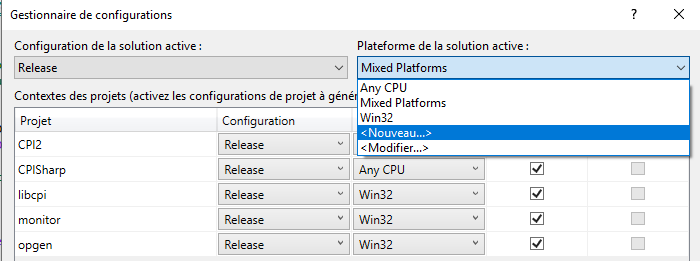
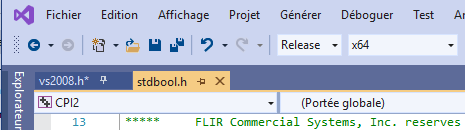
sdk-2.0.4.zip in VISP_WS%VISP_WS%\sdk-2.0.4\build\visual_studio_2008\CPI2.sln with Visual Studio C++VISP_WS%\sdk-2.0.4\build\visual_studio_2008\port\vc2008.h file to comment line 44 VISP_WS%\sdk-2.0.4\build\visual_studio_2008\port\stdbool.h to comment line 34 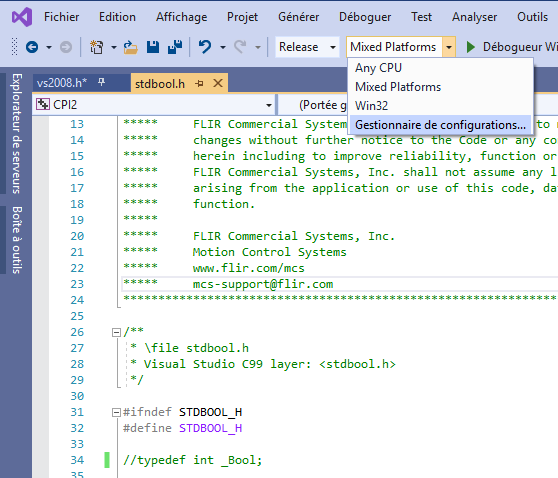
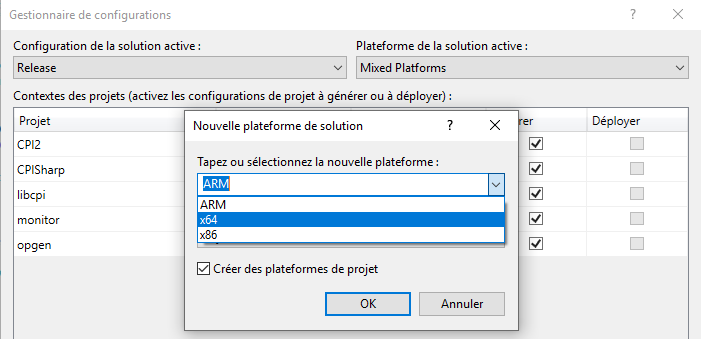
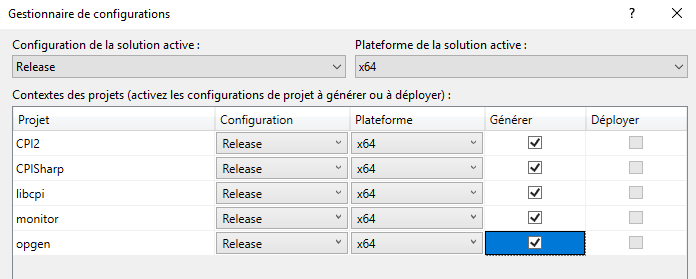

licpi.lib and libcpi.dll files in VISP_WS%\sdk-2.0.4\build\visual_studio_2008\x64\Release folderFLIRPTUSDK_HOME enviromnent variable to help ViSP finding FLIR PTU SDK This SDK is used to get images acquired by a FLIR Camera, in our case a Grashopper3 GigE camera.
On Linux platform
On Windows platform
We provide a ready to print 36h11 tag that is 12 by 12 cm square [download] that you may print.
If you are interested to get other tags, follow the steps described in Print an AprilTag marker.
Since you have just installed FLIR PTU SDK and FLIR FlyCapture SDK 3rd parties, you need to configure again ViSP with cmake in order that ViSP is able to use these SDKs.
On Linux platform
USE_FLIRPTUSDK and USE_FLYCAPTURE cmake vars appearing in the CMake GUI.On Windows platform
USE_FLIRPTUSDK and USE_FLYCAPTURE cmake vars appearing in the CMake GUI. Then follow the instructions to Build and install ViSP libraries.USE_FLIRPTUSDK and USE_FLYCAPTURE cmake vars appearing in the CMake GUI. Then follow the instructions to Build and install ViSP libraries.USE_FLIRPTUSDK and USE_FLYCAPTURE cmake vars appearing in the CMake GUI. Then follow the instructions to Build and install ViSP libraries.Before starting visual-servoing example, you need to:
These parameters correspond to the position of the camera frame in the end-effector frame. We recall that:
To proceed with this extrinsic camera calibration:
tutorial/robot/flir-ptu/eMc.yaml accordingly: An example of image-based visual servoing using FLIR PTU equipped with a FLIR camera is available in tutorial-flir-ptu-ibvs.cpp. Now enter in tutorial/robot/flir-ptu folder and run tutorial-flir-ptu-ibvs binary to get helper information:
Run the binary to get FLIR PTU IP address:
Start visual servoing:
On Unix-like OS, if you experienced the following error when running servoFlirPtu.cpp:
On Unix-like OS, if you experienced the following error during ViSP build:
config.mk to add -fPIC build flag You are now ready to see Tutorial: Image-based visual servo that will give some hints on image-based visual servoing in simulation with a free flying camera.
 1.8.13