Introduction
This tutorial will help you to install ViSP for Java on your desktop. This tutorial shows how to proceed if your desktop is running Linux or OSX. If you are rather running Windows, you need to adapt its content.
Create a workspace
First create a workspace in $HOME/visp-ws that will contain Java JDK, ViSP sources, build and dataset.
$ export VISP_WS=$HOME/visp-ws
$ mkdir -p $VISP_WS
Install Java Development Kit
Download the latest Java Development Kit (JDK) from the Oracle website. Now you should be able to install the last Java JDK by opening the file just downloaded.
After JDK download and extraction of the files from the archive, you may set JAVA_HOME environment var to help cmake to detect JDK.
If you download jdk-11.0.1_<platform>-x64_bin.tar.gz (where <platform> should be replaced by is either linux or osx) this could be done like:
$ tar xvzf jdk-11.0.1_<platform>-x64_bin.tar.gz -C $VISP_WS
$ echo "export JAVA_HOME=$VISP_VS/jdk-11.0.1.jdk" >> ~/.bashrc
$ source ~/.bashrc
Install Prerequisites
As a prerequisite, download and install first CMake and Apache Ant, if you don’t have any of these.
- On Ubuntu/Debian you may run:
$ sudo apt-get install cmake-curses-gui ant
- On Fedora/CentOS you may run:
$ sudo yum install gcc-c++ cmake ant
- On MacOS/OSX you may run:
$ brew cask install java
$ brew install cmake ant
Install ViSP from source code
Getting ViSP source code
There are different ways to get ViSP source code:
- You can download the latest release as a zip or a tarball. Once downloaded, uncompress the file using either
$ tar xvzf visp-x.y.z.tar.gz -C $VISP_WS
$ unzip visp-x.y.z.zip -d $VISP_WS
- You can also download a daily snapshot. Once downloaded, uncompress the file using
$ tar xvzf visp-snapshot-yyyy-mm-dd.tar.gz -C $VISP_WS
- Or you get the cutting-edge ViSP from GitHub repository using the following command
$ cd $VISP_WS
$ git clone https:
We suppose now that ViSP source is in the directory $VISP_WS/visp. The following should be adapted if you downloaded ViSP from a zip or tarball. In that case, the source is rather in something like $VISP_WS/visp-x.y.z.
Configuring ViSP from source
- In the workspace, create first a directory named
visp-build that will contain all the build material; generated Makefiles, object files, output libraries and binaries. $ mkdir $VISP_WS/visp-build
- Enter the
visp-build folder and configure the build: $ cd $VISP_WS/visp-build
$ cmake ../visp
ccmake, the CMake GUI: The following image shows that this command allows to configure (just by pressing [c] key) the build in a more advanced way where some options could be easily turned ON/OFF. It allows also to see which are the 3rd parties that will be used. To generate the makefiles, just press [g] key in the ccmake gui.
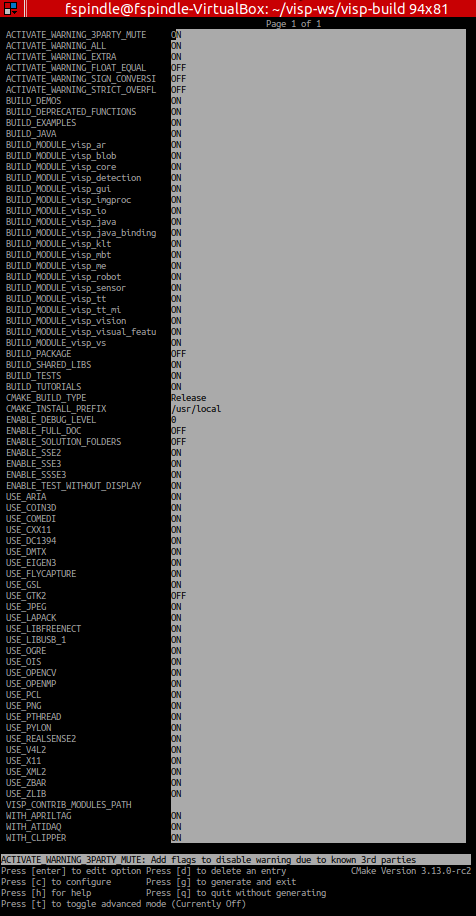
Snapshot of the ccmake ../visp command used to configure ViSP.
In $VISP_WS/visp-build/ViSP-third-party.txt you should find something similar to the following snapshot that shows that python, ant and JNI are found:
$ more ViSP-third-party.txt
==========================================================
General configuration information for ViSP 3.2.0
Version control: 3.2.0-rc1-86-gfcd39c4
Platform:
Timestamp: 2019-01-09T14:36:00Z
Host: Linux 4.15.0-42-generic x86_64
CMake: 3.5.1
CMake generator: Unix Makefiles
CMake build tool: /usr/bin/make
Configuration: Release
C/C++:
Built as dynamic libs?: yes
C++ Compiler: /usr/bin/c++ (ver 5.4.0)
C++ flags (Release): -Wall -Wextra -fopenmp -
std=c++11 -fvisibility=hidden -msse2 -msse3 -mssse3 -fPIC -O3 -DNDEBUG
C++ flags (Debug): -Wall -Wextra -fopenmp -
std=c++11 -fvisibility=hidden -msse2 -msse3 -mssse3 -fPIC -g
C Compiler: /usr/bin/cc
C flags (Release): -Wall -Wextra -fopenmp -
std=c++11 -fvisibility=hidden -msse2 -msse3 -mssse3 -fPIC -O3 -DNDEBUG
C flags (Debug): -Wall -Wextra -fopenmp -
std=c++11 -fvisibility=hidden -msse2 -msse3 -mssse3 -fPIC -g
Linker flags (Release):
Linker flags (Debug):
ViSP modules:
To be built: core gui imgproc io java_bindings_generator klt me sensor ar blob robot visual_features vs vision detection
java mbt tt tt_mi
Disabled: -
Disabled by dependency: -
Unavailable: -
Python (for build): /usr/bin/python2.7
Java:
ant: /usr/bin/ant (ver 1.9.6)
JNI: /usr/lib/jvm/default-java/include /usr/lib/jvm/default-java/include/linux /usr/lib/jvm/default-java/include
Building ViSP libraries
- To build ViSP libraries on Linux, proceed with:
$ cd $VISP_WS/visp-build
$ make -j$(nproc)
- To build ViSP libraries on MacOS/OSX, proceed with:
$ cd $VISP_WS/visp-build
$ make -j$(sysctl -n hw.ncpu)
Note that ViSP Java ARchive is now available in $VISP_WS/visp-build/bin/visp-320.jar.
Setting Up ViSP Java in Eclipse
Install the latest Eclipse version
Download the latest Eclipse version at the Eclipse Download page choosing the Eclipse IDE for Java Developers version. You don’t need to install anything. Extract the downloaded compressed file and put the resulting folder wherever you want to.
Creating a user library
Open Eclipse and select a workspace of your choice. Create a User Library, ready to be used on all your next projects: go to "Window \> Preferences" menu:
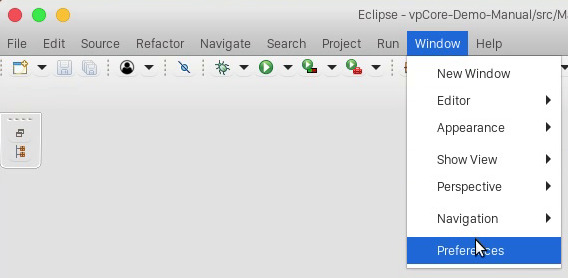
Open Preferences panel in Eclipse
In the Preferences panel navigate under "Java \> Build Path \> User Libraries" and choose New. Enter a name for the library (e.g visp) and select the newly created user library.
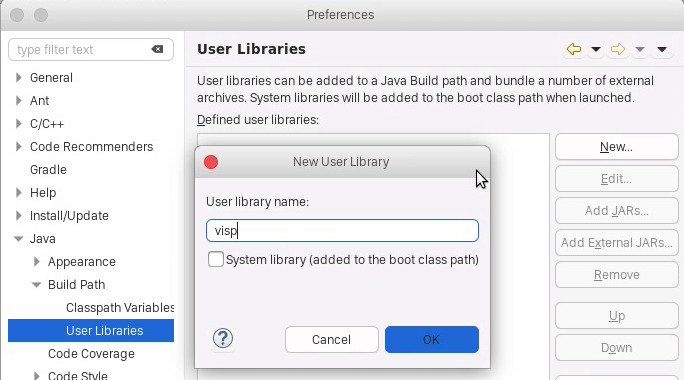
Create a new User Library
Press "Add External JARs" button, browse to select $VISP_WS/visp-build/bin/visp-320.jar from your computer. After adding the jar, select "Native library location", press first "Edit", then press "External Folder" and finaly browse to select the folder $VISP-WS/visp_build/lib containing ViSP libraries. We recall that the libraries have the extension .so in linux, .dylib in MacOS and .dll in Windows).
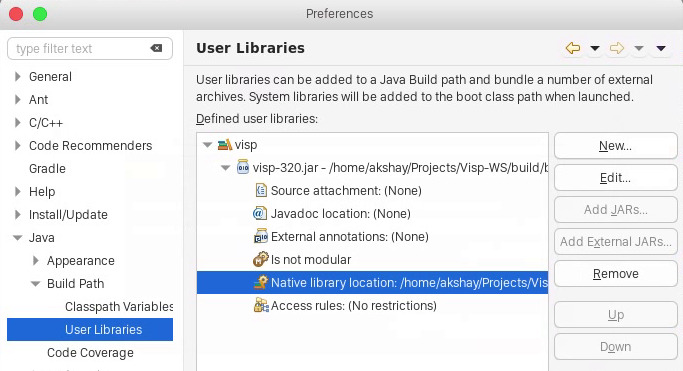
Add jar and native libraries to User Library
Once done, press "Apply and Close" button.
Next tutorial
You are now ready to follow Tutorial: First java application with ViSP.
 1.8.11
