In this tutorial you will learn how to install ViSP from source on Linux Ubuntu. These steps have been tested for Ubuntu 13.04 (64 bit) distribution, but should work with any other distribution as well.
Concerning ViSP installation, we provide also other tutorials
ViSP can also be installed on other platforms including OSX, CentOS, openSUZE (see Install from source page).
Required packages
- gcc 4.4.x or later. This can be installed with:
sudo apt-get install build-essential
- CMake 2.6 or higher that could be installed with:
sudo apt-get install cmake-curses-gui
ViSP is interfaced with several optional third-party libraries. The installation of the corresponding packages is described in Optional 3rd party packages section.
Getting ViSP source code
There are different ways to get ViSP source code:
- You can download the latest stable release as a zip or a tarball. Once downloaded, uncompress the file using either
tar xvzf ViSP-2.9.0.tar.gz
- You can also download a more recent snapshot. Once downloaded, uncompress the file using
unzip ViSP-2.y.z-snapshot-2014.mm.dd.zip
- Or you get the cutting-edge ViSP from Subversion repository. To this end you have first to install subversion
sudo apt-get install subversion
We suppose now that ViSP source is in a directory denoted <source_dir>, for example $HOME/ViSP-2.9.0
Configuring ViSP from source
- Create first a directory denoted <binary_dir> where you want to build ViSP. This directory will contain generated Makefiles, object files, and output libraries and binaries.
cd $HOME; mkdir ViSP-build-release
- Enter the <binary_dir> and to configure the build type:
cmake [<optional parameters>] <source_dir>
cd $HOME/ViSP-build-release
cmake -D CMAKE_BUILD_TYPE=RELEASE -D BUILD_SHARED_LIBS=ON ../ViSP-2.9.0
ccmake, the CMake GUI: The following image shows that this command allows to configure (just by pressing [c] key) the build in a more advanced way where some options could be easily turned On/Off. It allows also to see which are the 3rd party that will be used.
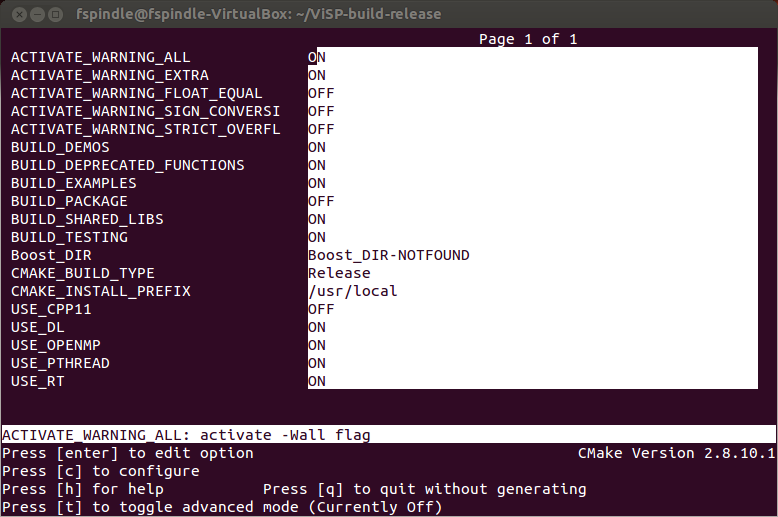
Snapshot of the ccmake
- There is an other way to see which are the 3rd party that are found during the configuration stage and that will be used by ViSP during the build. To this end you can have a look to the text file named ViSP-third-party.txt and located in <binary_dir>. We provide hereafter an example of a possible content of this file:
ViSP third-party libraries
Below you will find the list of third party libraries used to
build ViSP on your computer.
Mathematics:
Gnu Scientific Library : no
Lapack/blas : no
Simulator:
Ogre simulator : no
\- Ogre3D : no
\- OIS : no
Coin simulator :
\- Coin3D : no
\- SoWin : no
\- SoXt : no
\- SoQt : no
\- Qt4 : no
\- Qt3 : no
Robots
Afma6 : no
Afma4 : no
Biclops : no
Ptu46 : no
Pioneer : no
Viper S650 : no
Viper S850 : no
Cycab : no
Video devices (display)
X11 : no
GTK : no
OpenCV : no
GDI : no
Direct3D : no
Framegrabbers
Firewire libdc1394-1.x : no
Firewire libdc1394-2.x : no
Video For Linux Two : no
DirectShow : no
CMU 1394 Digital Camera SDK : no
OpenCV : no
Specific devices
Yarp : no
Kinect : no
\-libfreenect : no
\-libusb-1.0 : no
\-pthread : yes
Video and image Read/Write:
FFMPEG : no
libjpeg : no
libpng : no
Misc:
XML2 : no
pthread : yes
OpenMP : yes
Documentation:
Doxygen : no
Graphviz dot : no
ViSP built with C++11 features: no
pthread an OpenMP 3rd party are detected.
Optional 3rd party packages
As mentioned previously, ViSP is interfaced with some 3rd party libraries. The complete list is provided here. We recommand to install the following:
- OpenCV
sudo apt-get install libopencv-dev
- libX11 to be able to open a window to display images
sudo apt-get install libx11-dev
- lapack and GSL to benefit from optimized mathematical capabilities
sudo apt-get install liblapack-dev libgsl0-dev
- libdc1394 to grab images from firewire cameras
sudo apt-get install libdc1394-22-dev
- libv4l to grab images from usb or analogic cameras
sudo apt-get install libv4l-dev
- Coin, to be able to support vrml cad model used by the model-based trackers
sudo apt-get install libCoin60-dev
- libxml2 to be able to configure the model-based trackers from xml files
sudo apt-get install libxml2-dev
- libjpeg, libpng to support jpeg and png images
sudo apt-get install libjpeg-dev libpng12-dev
- ffmpeg, to be able to read or encode compressed video streams
sudo apt-get install libswscale-dev libavutil-dev libavformat-dev libavcodec-dev libbz2-dev libbz2-1.0
- Ogre 3D if you want to do augmented reality or simulation
sudo apt-get install libogre-dev libois-dev
Once installed, if you want that ViSP exploit the new 3rd party, you have to configure ViSP again.
The following image shows now that all the previous optional 3rd party are detected.
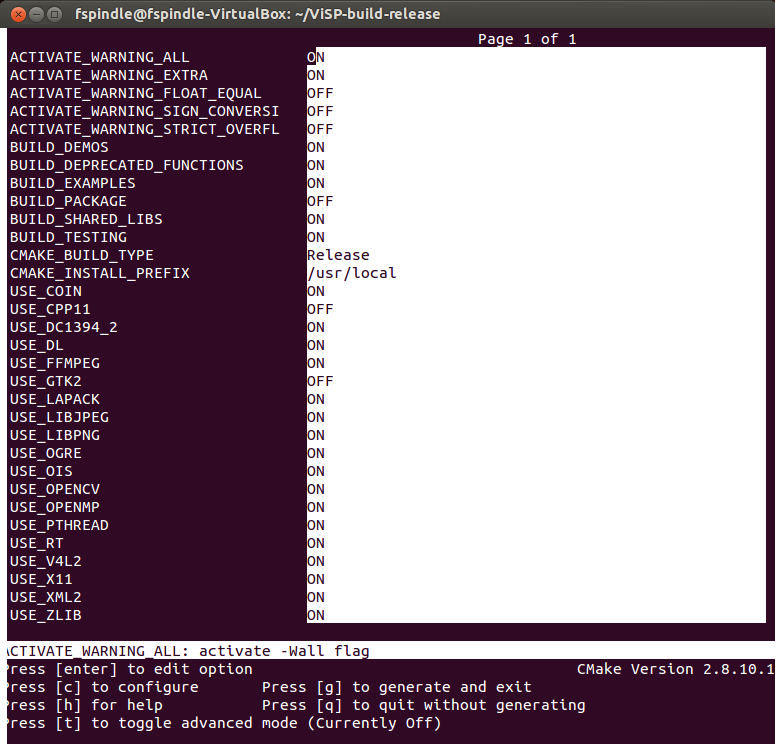
Snapshot of the ccmake
Generating Makefiles
To generate the makefiles, just press [g] key in the ccmake gui.
Now we can build ViSP.
Building ViSP from source
- To build ViSP proceed with:
- To install ViSP proceed with:
- To build ViSP documentation, you have first to install Doxygen package:
sudo apt-get install doxygen graphviz texlive-latex-base
You are now ready to see the next Tutorial: Getting started that will show you how to use ViSP as a 3rd party to build your own project.
 1.8.9.1
