|
Visual Servoing Platform
version 3.6.1 under development (2024-07-27)
|
|
Visual Servoing Platform
version 3.6.1 under development (2024-07-27)
|
In this tutorial you will learn how to install ViSP from source on Windows 11 with Visual C++. These steps have been tested on Windows 11 (64 bit), with CMake 3.24.2 and Visual Studio Community 2022.
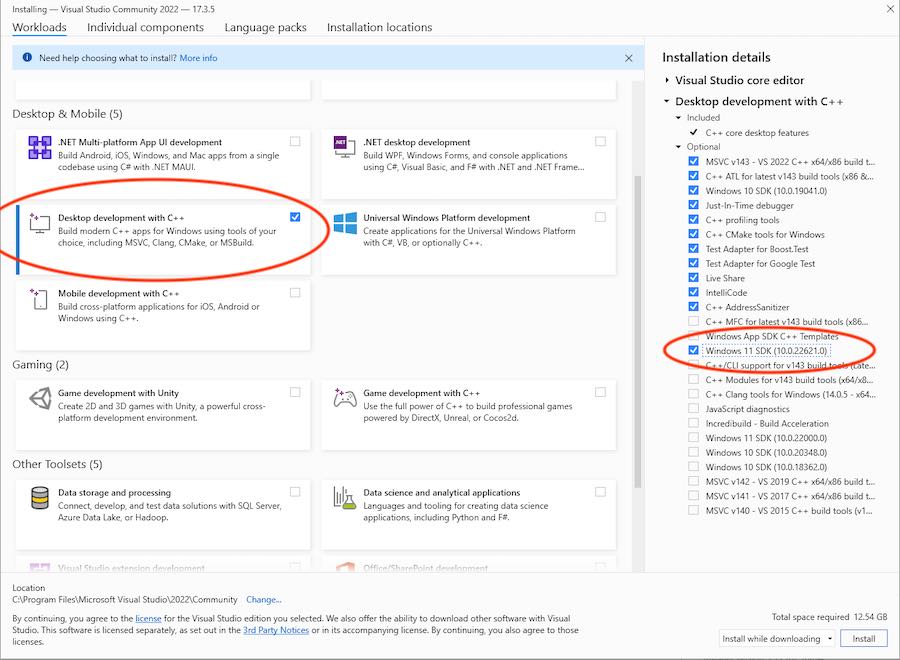
Visual Studio Community 2022 could be downloaded from https://www.visualstudio.com/downloads/. During a fresh installation enable "Desktop development with C++" workload (see image below).
If you already have Visual Studio Community 2022, you can check if "Desktop Development with C++" workload is activated following instructions given here that we resume:
CMake could be download from http://www.cmake.org. Download the latest release for Windows win64-x64 platform (at the time this tutorial was written it was the file cmake-3.24.2-windows-arm64.msi). To install just double click on the msi file.
Install Git for Windows from https://git-for-windows.github.io/. This installation allows then to use git in a cmd Command Prompt.
If not already done, create a workspace that will contain all ViSP source, build, data set and optional 3rd parties. This workspace is here set to C:\visp-ws folder, but it could be set to any other location.
To create the workspace, open a cmd Command Prompt (a fast way to launch this window is to press the Win + R keys on your keyboard. Then, type cmd or cmd.exe and press Enter or click/tap OK) and run the following to create a workspace environment var named VISP_WS:
C:\> setx VISP_WS "C:\visp-ws"
C:\> exit
Open a new cmd Command Prompt and create the corresponding folder
C:\> mkdir %VISP_WS%
C:\> exit
In this section, we give minimal instructions to build ViSP from source just to try ViSP without entering in Advanced ViSP installation.
cmd Command Prompt and get ViSP source code in the workspace C:\> cd %VISP_WS% C:\> git clone https://github.com/lagadic/visp.git
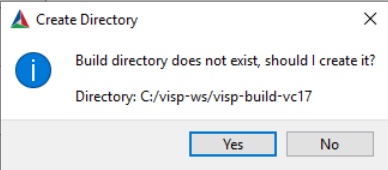
C:\> mkdir visp-build-vc17
C:\> cd visp-build-vc17
C:\> cmake -G "Visual Studio 17 2022" -A "x64" ..\visp
C:\> cmake --build . --config Release --target install
%VISP_WS%\visp-build-vc17\install folderPath var to add %VISP_WS%\visp-build-vc17\install\x64\vc17\bin corresponding to the path to ViSP libraries. To modify Path environment variable do the following:%VISP_WS%\visp-build-vc17\install\x64\vc17\binVISP_DIR var to help CMake to find ViSP as a 3rd party C:\> setx VISP_DIR "%VISP_WS%\visp-build-vc17\install" C:\> exit
To have a trial, just jump to Install ViSP data set before running some binaries that you just build or jump to Next tutorial. You can later come back to the Advanced ViSP installation.
ViSP is interfaced with several 3rd party libraries. Follow the link to see the complete list of Supported Third-Party Libraries. We recommend first to install OpenCV 3rd party in the workspace. Then to use optimized matrix operations you may install Eigen3 3rd party. Other 3rd parties are optional and should be considered only by expert developers.
1. Get OpenCV
First you have to get OpenCV:
opencv-4.8.0-windows.exe Win pack installer. The same procedure could be applied with all the previous OpenCV releases starting from 3.4.0 version.%VISP_WS%/3rdparty. 
%VISP_WS%\3rdparty\opencv.%VISP_WS%\3rdparty\opencv-4.8.0.2. Build OpenCV from source
C:\> cd %VISP_WS%\3rdparty\opencv-4.8.0 C:\> mkdir build-vc17 C:\> cd build-vc17
%VISP_WS%\3rdparty\opencv-4.8.0\build: C:\> cmake -G "Visual Studio 17 2022" -A "x64" ..\sources -DCMAKE_INSTALL_PREFIX=%VISP_WS%\3rdparty\opencv-4.8.0\build -DBUILD_TESTS=OFF -DBUILD_PERF_TESTS=OFF
C:\> cmake --build . --config Release --target install C:\> cmake --build . --config Debug --target install
2. Complete OpenCV installation
Now you have to complete OpenCV installation setting some environment vars:
OpenCV_DIR environment variable. Start up a cmd Command Prompt and enter: C:\> setx OpenCV_DIR "%VISP_WS%\3rdparty\opencv-4.8.0\build" C:\> exitwhere
%VISP_WS%\3rdparty\opencv-4.8.0\build is where you have installed OpenCV. Inside this folder you should have a file named OpenCVConfig.cmake.Path environment variable. Open the "Edit environment variable" UI, and modify Path to add a new line with %VISP_WS%\3rdparty\opencv-4.8.0\build\x64\vc17\bin.Even if Eigen3 is designed as a template we recommend to install the library with Visual Studio.
1. Get Eigen3
eigen-3.4.0.zip archive corresponding to Eigen 3.4.0.%VISP_WS%\3rdparty.%VISP_WS%\3rdparty\eigen-3.4.02. Build and install Eigen3 from source
C:\> cd %VISP_WS%\3rdparty\eigen-3.4.0 C:\> mkdir build-vc17 C:\> cd build-vc17
%VISP_WS%\3rdparty\eigen-3.4.0\build-vc17\install folder): C:\> cmake -G "Visual Studio 17 2022" -A "x64" .. -DCMAKE_INSTALL_PREFIX=%VISP_WS%\3rdparty\eigen-3.4.0\build-vc17\install
C:\> cmake --build . --config Release --target install
%VISP_WS%\3rdparty\eigen-3.4.0\build-vc17\install folder3. Complete Eigen3 installation
Now you have to complete Eigen3 installation setting some environment vars:
EIGEN_DIR environment variable. Start up a cmd Command Prompt and enter: C:\> setx Eigen3_DIR "%VISP_WS%\3rdparty\eigen-3.4.0\build-vc17\install\share\eigen3\cmake" C:\> exitwhere
%VISP_WS%\3rdparty\eigen-3.4.0\build-vc17\install is where you have installed Eigen3. Inside the folder %VISP_WS%\3rdparty\eigen-3.4.0\build-vc17\install\share\eigen3\cmake you should have a file named Eigen3Config.cmake.Path environment var since Eigen3 is a template that has no library.I you have an Intel RealSense Depth camera (SR300 or D400 series), you may install librealsense 2.x in order to use vpRealSense2 class. Otherwise you can skip this section.
1. Install Intel Realsense SDK 2.0
Intel Realsense SDK 2.0 contains librealsense. To install this SDK:
Intel.RealSense.SDK-WIN10-<version>.exe corresponding to the last Intel Realsense SDK 2.0 release. At the time this tutorial was written, we downloaded Intel.RealSense.SDK-WIN10-2.54.1.5216.exe.Intel.RealSense.SDK-WIN10-<version>.exe and follow default installation steps.2. Complete Intel Realsense SDK 2.0 installation
To finalize the installation, add the location of realsense2.dll library in the Path environment variable. Open the "Edit environment variable" UI, and modify Path to add a new line with C:\Program Files (x86)\Intel RealSense SDK 2.0\bin\x64.
JSON for modern C++ installation, can either be done from source or from a package manager
C:\> cd %VISP_WS%\3rdparty
C:\> git clone https://github.com/nlohmann/json.git
C:\> cd json && mkdir build-vc17 && cd build-vc17
C:\> cmake -G "Visual Studio 17 2022" -A "x64" .. \
-DCMAKE_INSTALL_PREFIX=%VISP_WS%\3rdparty\json\build-vc17\install \
-DBUILD_TESTING=OFF \
-DJSON_BuildTests=OFF
C:\> cmake --build . --config Release --target install
JSON is now installed in %VISP_WS%\3rdparty\json\build-vc17\install folder. Now in order that ViSP detects JSON you have to set nlohmann_json_DIR environment variable. Start up a cmd Command Prompt and enter: C:\> setx nlohmann_json_DIR "%VISP_WS%\3rdparty\json\build-vc17\install\share\cmake\nlohmann_json" C:\> exitwhere
%VISP_WS%\3rdparty\json\build-vc17\install is where you have installed JSON. Inside the folder %VISP_WS%\3rdparty\json\build-vc17\install\share\cmake\nlohmann_json you should have a file named nlohmann_jsonConfig.cmake. There is no need to set Path environment var since JSON has only a header and no library.There are different ways to get ViSP source code.
visp-x.y.z.tar.gz or visp-x.y.z.zip is downloaded, uncompress the file in %VISP_WS%\visp\visp-x.y.z using for example WinRAR.visp-snapshot-yyyy-mm-dd.tar.gz is downloaded, uncompress the file in %VISP_WS%\visp\visp-x.y.z using for example WinRAR.git command line tool: C:\> cd %VISP_WS% C:\> git clone https://github.com/lagadic/visp.git
We suppose now that ViSP source is in %VISP_WS%\visp.
The goal of the configuration step is now to use CMake to produce a Visual Studio C++ solution file that will be located in %VISP_WS%/visp-build-vc17.

%VISP_WS%/visp-build-vc17 folder.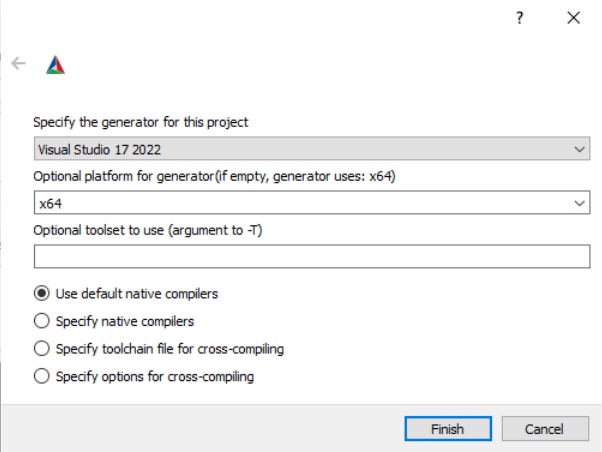
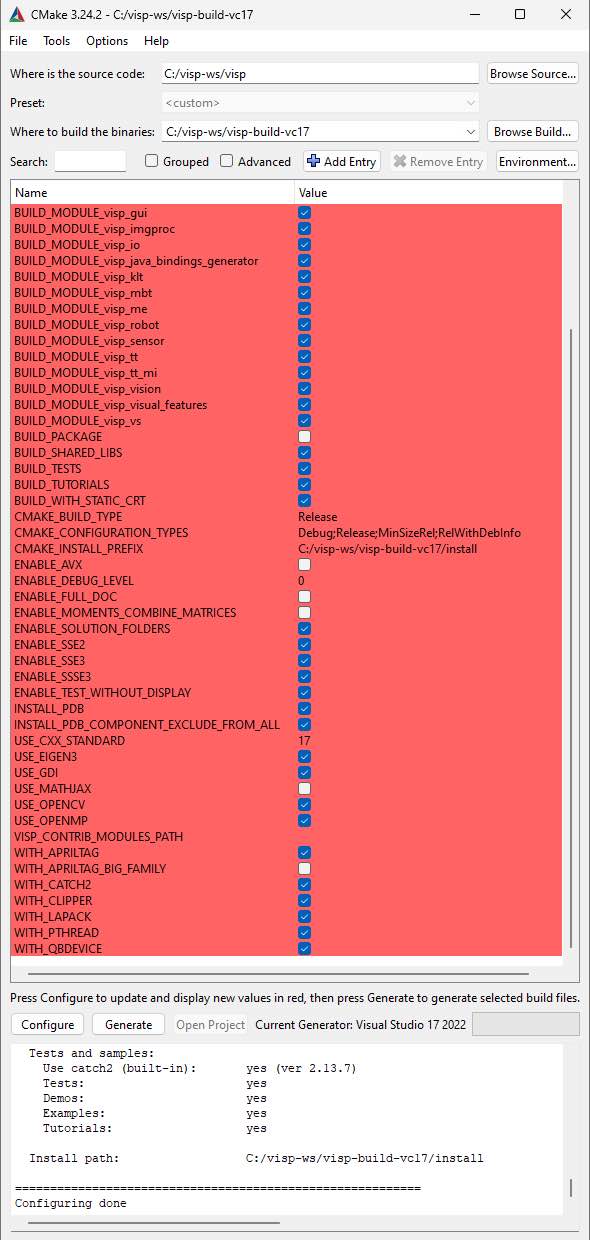
%VISP_WS%/visp-build-vc17/install. If you want to change the installation folder to C:\Program Files (x86)\ViSP, make sure that you have administrator privileges to write in that folder before modifying CMAKE_INSTALL_PREFIX. Eigen3_DIR environment var, you will get the following warning in cmake_gui: CMake Warning at CMakeLists.txt:1156 (message): Eigen3 config file is detected in C:/visp-ws/3rdparty/eigen-3.4.0/build-vc17. Using C:/visp-ws/3rdparty/eigen-3.4.0/build-vc17/Eigen3Config.cmake doesn't allow to use a valid Eigen3 include dir: C://include/eigen3. Modify Eigen3_DIR to point to Eigen3Config.cmake file located in Eigen3 installation folder or turn USE_EIGEN3 OFF.We strongly recommend to fix this warning. To this end:
cmake-guiEigen3_DIR environment var running setx Eigen3_DIR "%VISP_WS%\3rdparty\eigen-3.4.0\build-vc17\install\share\eigen3\cmake"cmake-guiFile > Delete CacheAt this point, you should no more see the warning.
.dll extension). This is the default configuration that is recommended. If you want to create rather a static library (with .lib extension) you have to uncheck the BUILD_SHARED_LIBS option to disable DLL creation.%VISP_WS%/visp-build-vc17 folder you have the Visual Studio VISP.sln generated solution file.%VISP_WS%/visp-build-vc17/VISP.sln solution file. This action will open ViSP project in Visual Studio C++. By default, Visual Studio opens the solution in Debug configuration. Modify the configuration to "Release". 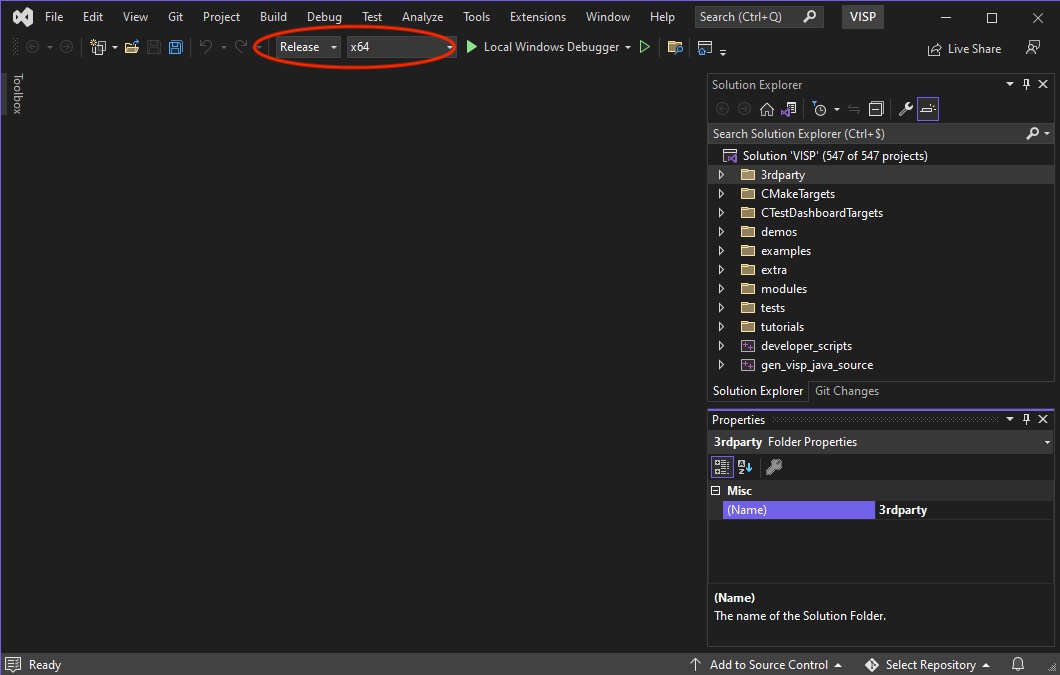
"Build > Build Solution" to build ViSP or hit "Ctrl+Maj+B".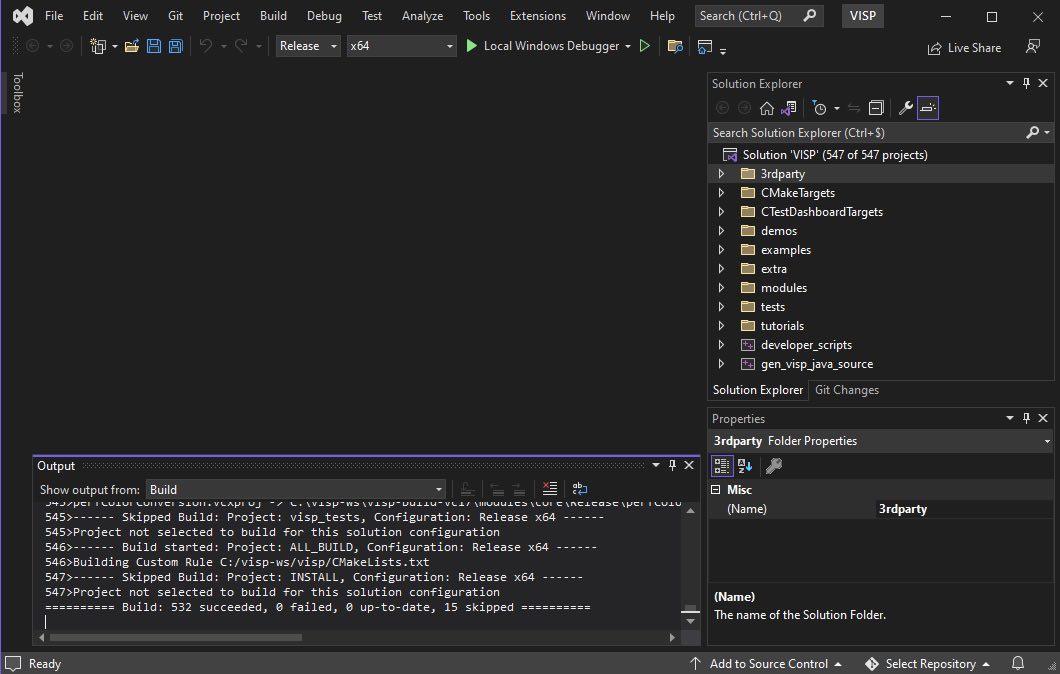
"CMakeTargets" and build "INSTALL" project. To this end, apply a left click on "INSTALL" to select the "INSTALL" project, then a right click to enter in the "Build" menu. At the end of the installation, you should have the following. 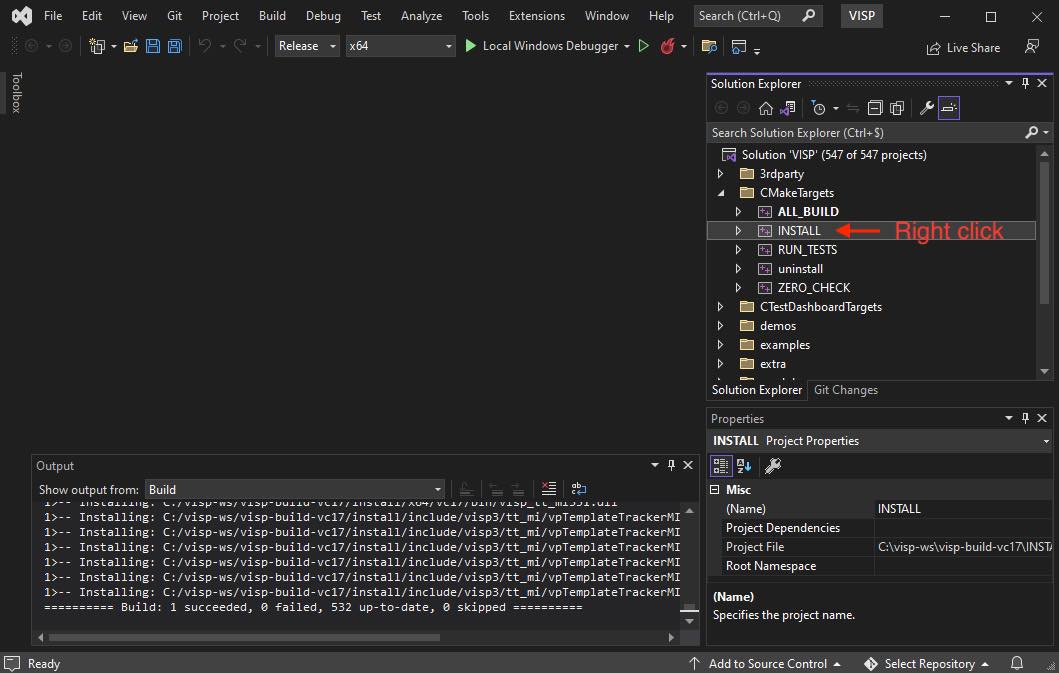
%VISP_WS\visp-build-vc17\install folder; headers and libraries in include and x64/vc17 subfolders respectively."Release" configuration. Now in %VISP_WS%/visp-build-vc17/install/x64/vc17/bin folder you have ViSP DLL libraries corresponding to ViSP modules. 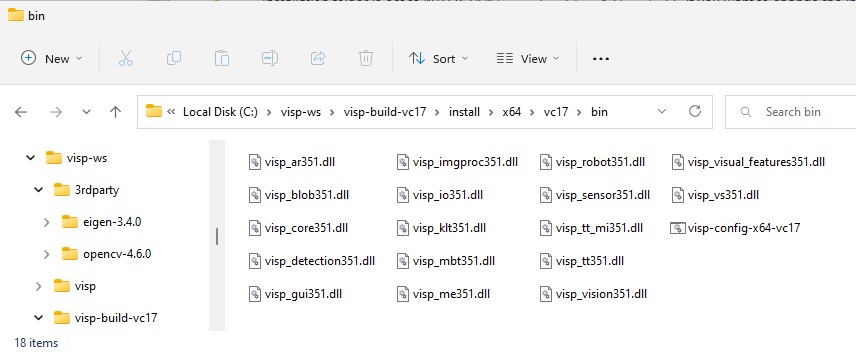
Debug configuration. In that case, all the library names are suffixed by "d" character (libvisp_core351d.dll...).To build ViSP documentation, you have first to install Doxygen:
doxygen-1.9.4-setup.execmd Command Prompt and enter build directory C:\> cd %VISP_WS%\visp-build-vc17
C:\> cmake -G "Visual Studio 17 2022" -A "x64" %VISP_WS%\visp
C:\> cmake --build . --config Release --target visp_doc
The generated documentation is then available in $VISP_WS/visp-build-vc17/doc/html/index.html
npm LTS version following these instructions, then install MathJax and build doc using: C:\> npm install mathjax C:\> cmake -G "Visual Studio 17 2022" -A "x64" %VISP_WS%\visp -DUSE_MATHJAX=ON C:\> cmake --build . --config Release --target visp_doc
ENABLE_FULL_DOC to ON like: C:\> cmake -G "Visual Studio 17 2022" -A "x64" %VISP_WS%\visp -DENABLE_FULL_DOC=ON C:\> cmake --build . --config Release --target visp_doc
Modify the Path var to add the path to ViSP dll libraries. To this end open the "Edit environment variable" UI, and modify Path to add a new line with %VISP_WS%\visp-build-vc17\install\x64\vc17\bin.
In order to ease ViSP detection by CMake when ViSP is used as a 3rd party in an external project, like the one described in the Tutorial: How to create and build a project that uses ViSP and CMake on Unix or Windows, you may set VISP_DIR environment variable with the path to the VISPConfig.cmake file:
C:\> setx VISP_DIR "%VISP_WS%\visp-build-vc17\install"
C:\> exit
Some ViSP examples and tests require a data set that contains images, video, models that is not part of ViSP source code. This data set is available in Github (https://github.com/lagadic/visp-images) or as a release in a separate archive named visp-images-x.y.z.zip. This archive could be downloaded from https://visp.inria.fr/download page. Note that ViSP tutorials are not using ViSP data set.
We give hereafter the two ways to get this data set:
1. Get data set release
visp-images-3.x.y.zip from https://visp.inria.fr/download and uncompress it in your workspace %VISP_WS%. 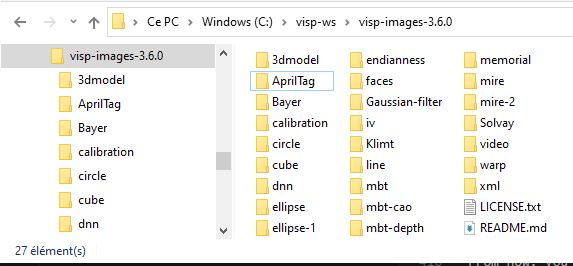
VISP_INPUT_IMAGE_PATH environment variable to help ViSP examples and tests to detect automatically the location of the requested data. In our case, this variable should be set to %VISP_WS%\visp-images-3.6.0. Open a cmd Command Prompt and run C:\> setx VISP_INPUT_IMAGE_PATH %VISP_WS%\visp-images-3.6.0 C:\> exit
2. Get data set from github
C:\> cd %VISP_WS%
C:\> git clone https://github.com/lagadic/visp-images.git
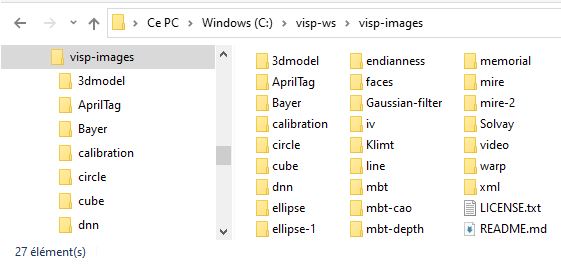
VISP_INPUT_IMAGE_PATH environment variable to help ViSP examples and tests to detect automatically the location of the requested data. In our case, this variable should be set to %VISP_WS%\visp-images. Open a cmd Command Prompt and run C:\> setx VISP_INPUT_IMAGE_PATH %VISP_WS%\visp-images C:\> exit
Test data set usage
From now, you can try to run ViSP examples and tests. For example, if you want to run %VISP_WS%\visp-build-vc17\example\device\display\Release\displayGDI.exe, open a cmd Command Prompt, enter in the right folder and run:
C:\> cd %VISP_WS%\visp-build-vc17\example\device\display\Release
C:\> displayGDI.exe

A click to close the windows...

A click to display a cross...
Cross position: 392, 306

A click to exit the program...
Bye
libvisp_io.dll was not found like in the following image it means either that you didn't add the location of ViSP dll libraries in the path environment variable (see Set Path environment var section), or that the path that you added is wrong. 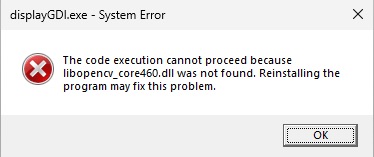
libopencv_core.dll was not found like in the following image it means either that you didn't add the location of OpenCV dll libraries in the path environment variable (see OpenCV 3rd party section), or that the path that you added is wrong. 
Since all 3rd parties are optional you may have started to install only some of them. Imagine that you just installed a new third-party, or that you upgraded the version of this 3rd party. The next step is to go back to the build folder, configure ViSP with CMake to detect the newly installed third-party library and build again ViSP. This could be achieved with:
C:\> cd $VISP_WS/visp-build-msvc17
C:\> cmake ../visp
Here you can check the content of the ViSP-third-party.txt file and see if the newly installed 3rd party is well detected.
Finally, you need to rebuild and install ViSP with:
C:\> cmake --build . --config Release --target install
After ViSP installation, you can remove installed material using:
C:\> cd $VISP_WS/visp-build-msvc17
C:\> cmake --build . --config Release --target uninstall
If you want to build only ViSP modules libraries, nor the examples, tutorials and tests:
C:\> cd $VISP_WS/visp-build-msvc17
C:\> cmake --build . --config Release --target visp_modules
If you want to build a given module and all the dependencies:
C:\> cd $VISP_WS/visp-build-msvc17
C:\> cmake --build . --config Release --target visp_<module_name>
For example to build the model-based tracker module named mbt, run:
C:\> cd $VISP_WS/visp-build-msvc17
C:\> cmake --build . --config Release --target visp_mbt
To see which are the optional 3rd parties that are found during the configuration stage and that will be used by ViSP during the build you can have a look to the text file named ViSP-third-party.txt and located in $VISP_WS/visp-build-vc17. We provide hereafter an example of a possible content of this file that contains also build info.
C:\> type $VISP_WS/visp-build-vc17/ViSP-third-party.txt
==========================================================
General configuration information for ViSP 3.5.1

  Version control:               v3.5.0-193-g039940ad2-dirty

  Platform:
    Timestamp:                   2022-10-02T11:14:47Z
    Host:                        Windows 10.0.22598 ARM64
    CMake:                       3.24.2
    CMake generator:             Visual Studio 17 2022
    CMake build tool:            C:/Program Files/Microsoft Visual Studio/2022/Community/MSBuild/Current/Bin/arm64/MSBuild.exe
    MSVC:                        1933

  System information:
    Number of CPU logical cores: 8
    Number of CPU physical cores: 8
    Total physical memory (in MiB): 10232
    OS name:                     Windows
    OS release:                  Professional
    OS version:                  (Build 22598)
    OS platform:                 ARM64
    CPU name:
    Is the CPU 64-bit?           yes
    Does the CPU have FPU?       no
    CPU optimization:            SSE2 SSE3 SSSE3 SSE4_1 SSE4_2

  C/C++:
    Built as dynamic libs?:      yes
    C++ Compiler:                C:/Program Files/Microsoft Visual Studio/2022/Community/VC/Tools/MSVC/14.33.31629/bin/HostARM64/x64/cl.exe  (ver 19.33.31630.0)
    C++ flags (Release):         /DWIN32 /D_WINDOWS /W3 /GR /EHsc /MP8   /EHa -openmp /Gy /bigobj /MD /O2 /Ob2 /DNDEBUG
    C++ flags (Debug):           /DWIN32 /D_WINDOWS /W3 /GR /EHsc /MP8   /EHa -openmp /Gy /bigobj /MDd /Zi /Ob0 /Od /RTC1
    C Compiler:                  C:/Program Files/Microsoft Visual Studio/2022/Community/VC/Tools/MSVC/14.33.31629/bin/HostARM64/x64/cl.exe
    C flags (Release):           /DWIN32 /D_WINDOWS /W3   /MP8   /EHa -openmp /MD /O2 /Ob2 /DNDEBUG
    C flags (Debug):             /DWIN32 /D_WINDOWS /W3   /MP8   /EHa -openmp /MDd /Zi /Ob0 /Od /RTC1
    Linker flags (Release):      /machine:x64 /INCREMENTAL:NO
    Linker flags (Debug):        /machine:x64 /debug /INCREMENTAL /ignore:4099
    Use cxx standard:            17

  ViSP modules:
    To be built:                 core gui imgproc io java_bindings_generator klt me sensor ar blob robot visual_features vs vision detection mbt tt tt_mi
    Disabled:                    -
    Disabled by dependency:      -
    Unavailable:                 java

  Windows RT support:            no

  Python (for build):            no

  Java:
    ant:                         no
    JNI:                         no

  Build options:
    Build deprecated:            yes
    Build with moment combine:   no

  Mathematics:
    Blas/Lapack:                 yes
    \- Use MKL:                  no
    \- Use OpenBLAS:             no
    \- Use Atlas:                no
    \- Use Netlib:               no
    \- Use GSL:                  no
    \- Use Lapack (built-in):    yes (ver 3.2.1)
    Use Eigen3:                  yes (ver 3.4.0)
    Use OpenCV:                  yes (ver 4.6.0)

  Simulator:
    Ogre simulator:
    \- Use Ogre3D:               no
    \- Use OIS:                  no
    Coin simulator:
    \- Use Coin3D:               no
    \- Use SoWin:                no
    \- Use SoXt:                 no
    \- Use SoQt:                 no
    \- Use Qt5:                  no
    \- Use Qt4:                  no
    \- Use Qt3:                  no

  Media I/O:
    Use JPEG:                    no
    Use PNG:                     no
    \- Use ZLIB:                 no
    Use OpenCV:                  yes (ver 4.6.0)
    Use stb_image (built-in):    yes (ver 2.27.0)

  Real robots:
    Use Afma4:                   no
    Use Afma6:                   no
    Use Franka:                  no
    Use Viper650:                no
    Use Viper850:                no
    Use ur_rtde:                 no
    Use Kinova Jaco:             no
    Use aria (Pioneer):          no
    Use PTU46:                   no
    Use Biclops PTU:             no
    Use Flir PTU SDK:            no
    Use MAVSDK:                  no
    Use Parrot ARSDK:            no
    \-Use ffmpeg:                no
    Use Virtuose:                no
    Use qbdevice (built-in):     yes (ver 2.6.0)
    Use takktile2 (built-in):    no

  GUI:
    Use X11:                     no
    Use GTK:                     no
    Use OpenCV:                  yes (ver 4.6.0)
    Use GDI:                     yes
    Use Direct3D:                no

  Cameras:
    Use DC1394-2.x:              no
    Use CMU 1394:                no
    Use V4L2:                    no
    Use directshow:              no
    Use OpenCV:                  yes (ver 4.6.0)
    Use FLIR Flycapture:         no
    Use Basler Pylon:            no
    Use IDS uEye:                no

  RGB-D sensors:
    Use Realsense:               no
    Use Realsense2:              no
    Use Occipital Structure:     no
    Use Kinect:                  no
    \- Use libfreenect:          no
    \- Use libusb-1:             no
    \- Use pthread:              no
    Use PCL:                     no
    \- Use VTK:                  no

  F/T sensors:
    Use atidaq (built-in):       no
    Use comedi:                  no
    Use IIT SDK:                 no

  Mocap:
    Use Qualisys:                no
    Use Vicon:                   no

  Detection:
    Use zbar:                    no
    Use dmtx:                    no
    Use AprilTag (built-in):     yes (ver 3.1.1)
    \- Use AprilTag big family:  no

  Misc:
    Use Clipper (built-in):      yes (ver 6.4.2)
    Use pugixml (built-in):      yes (ver 1.9.0)
    Use libxml2:                 no

  Optimization:
    Use OpenMP:                  yes
    Use pthread:                 no
    Use pthread (built-in):      yes (ver 3.0.1)
    Use Simd:                    yes (ver 4.9.109)

  DNN:
    Use CUDA Toolkit:            no
    Use TensorRT:                no

  Documentation:
    Use doxygen:                 yes
    \- Use mathjax:              no

  Tests and samples:
    Use catch2 (built-in):       yes (ver 2.13.7)
    Tests:                       yes
    Demos:                       yes
    Examples:                    yes
    Tutorials:                   yes

  Install path:                  C:/visp-ws/visp-build-vc17/install

==========================================================
You are now ready to see the next Tutorial: How to create and build a project that uses ViSP and CMake on Unix or Windows that will show you how to use ViSP as a 3rd party to build your own project.