|
Visual Servoing Platform
version 3.6.1 under development (2025-02-27)
|
|
Visual Servoing Platform
version 3.6.1 under development (2025-02-27)
|
In this tutorial you will learn how to install ViSP from source on Windows 10 with MinGW-W64. These steps have been tested with CMake 3.19.0 and MinGW-W64 - GCC for Windows 64 & 32 bits.
"GCC 13.1.0 (with POSIX threads) + LLVM/Clang/LLD/LLDB 16.0.5 + MinGW-w64 11.0.0 (UCRT) - release 5 (LATEST)" that brings winlibs-x86_64-posix-seh-gcc-13.1.0-llvm-16.0.5-mingw-w64ucrt-11.0.0-r5.zip file.C:\ root drive.C:\mingw64 folder you should have something similar to 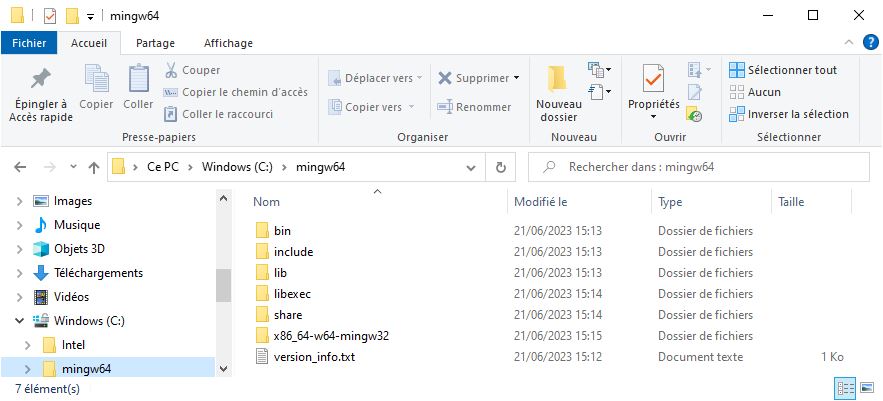
C:\mingw64\bincmd and check if everything is good by typing: C:\> gcc --version gcc (MinGW-W64 x86_64-ucrt-posix-seh, built by Brecht Sanders) 13.1.0 Copyright (C) 2023 Free Software Foundation, Inc. This is free software; see the source for copying conditions. There is NO warranty; not even for MERCHANTABILITY or FITNESS FOR A PARTICULAR PURPOSE.
CMake could be download from http://www.cmake.org. Download the latest release for Windows win64-x64 platform (at the time this tutorial was written it was the file cmake-3.26.4-win64-x64.msi). To install just double click on the msi file.
Install Git for Windows from https://git-for-windows.github.io/. This installation allows then to use git in a cmd Command Prompt.
If not already done, create a workspace that will contain all ViSP source, build, data set and optional 3rd parties. This workspace is here set to C:\visp-ws folder, but it could be set to any other location.
To create the workspace, open a cmd Command Prompt (a fast way to launch this window is to press the Win + R keys on your keyboard. Then, type cmd or cmd.exe and press Enter or click/tap OK) and run the following to create a workspace environment var named VISP_WS:
C:\> setx VISP_WS "C:\visp-ws"
C:\> exit
Open a new cmd Command Prompt and create the corresponding folder
C:\> mkdir %VISP_WS%
C:\> exit
In this section, we give minimal instructions to build ViSP from source just to try ViSP without entering in
.
cmd Command Prompt and get ViSP source code in the workspace C:\> cd %VISP_WS% C:\> git clone https://github.com/lagadic/visp.git
C:\> mkdir %VISP_WS%\visp-build-mingw
C:\> cd %VISP_WS%\visp-build-mingw
C:\> cmake -G "MinGW Makefiles" %VISP_WS%\visp
C:\> cmake --build . --config Release --target install -j4
%VISP_WS%\visp-build-mingw\install folderPath var to add %VISP_WS%\visp-build-mingw\install\x64\mingw\bin corresponding to the path to ViSP libraries. To modify Path environment variable do the following:%VISP_WS%\visp-build-mingw\install\x64\mingw\binVISP_DIR var to help CMake to find ViSP as a 3rd party C:\> setx VISP_DIR "%VISP_WS%\visp-build-mingw\install" C:\> exit
To have a trial, just jump to
before running some binaries that you just build or jump to
. You can later come back to the
.
ViSP is interfaced with several 3rd party libraries. Follow the link to see the complete list of Supported Third-Party Libraries. We recommend to install 4.1.2. Eigen3, 4.1.1. OpenCV and 4.1.3. Nlohmann JSON in the workspace.
4.1.1.1. Get OpenCV
First you have to get OpenCV:
opencv-4.8.0-windows.exe Win pack installer. The same procedure could be applied with all the previous OpenCV releases starting from 3.4.0 version.%VISP_WS%\3rdparty. 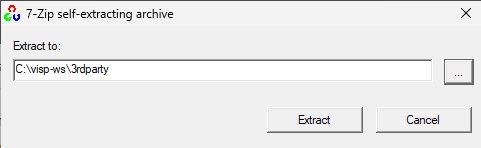
%VISP_WS%\3rdparty\opencv.%VISP_WS%\3rdparty\opencv-4.8.0.%VISP_WS%\3rdparty\opencv-4.8.0\build\x64\mingw.4.1.1.2. Configure, build and install OpenCV from source
cmd Command Prompt and create a build folder C:\> cd %VISP_WS%\3rdparty\opencv-4.8.0 C:\> mkdir build-mingw C:\> cd build-mingw
%VISP_WS%\3rdparty\opencv-4.8.0\build. We disable also tests build in order to speed up the build process: C:\> cmake -G "MinGW Makefiles" ..\sources -DCMAKE_INSTALL_PREFIX=%VISP_WS%\3rdparty\opencv-4.8.0\build -DBUILD_TESTS=OFF -DBUILD_PERF_TESTS=OFF
C:\> cmake --build . --config Release --target install -j4
%VISP_WS%\opencv-4.8.0\build folderWITH_OBSENSOR=OFF during cmake configuration you will get an 7.1. OpenCV 4.7.0 and 4.8.0 compilation problem in obsensor_stream_channel_msmf.cpp. OPENCV_ENABLE_ALLOCATOR_STATS=OFF you will get an 7.2. OpenCV 4.5.0 compilation problem gcc: error: long: No such file or directory. WITH_OPENCL_D3D11_NV=OFF you will get an 7.3. OpenCL D3D11 build failure. 4.1.1.3. Complete OpenCV installation
Now you have to complete OpenCV installation setting some environment vars:
OpenCV_DIR environment variable. Start up a cmd Command Prompt and enter: C:\> setx OpenCV_DIR "%VISP_WS%\3rdparty\opencv-4.8.0\build" C:\> exitwhere
%VISP_WS%\3rdparty\opencv-4.8.0\build is where you have installed OpenCV. Inside this folder you should have a file named OpenCVConfig.cmake.Path environment variable. Open the "Edit environment variable" UI, and modify Path to add a new line with %VISP_WS%\3rdparty\opencv-4.8.0\build\x64\mingw\bin.Even if Eigen3 is designed as a template we recommend to install the library with MinGW.
4.1.2.1. Get Eigen3
eigen-3.4.0.zip archive corresponding to Eigen 3.4.0.%VISP_WS%\3rdparty.%VISP_WS%\3rdparty\eigen-3.4.04.1.2.2. Build and install Eigen3 from source
C:\> cd %%VISP_WS%\3rdparty\eigen-3.4.0 C:\> mkdir build-mingw C:\> cd build-mingw
%VISP_WS%\3rdparty\eigen-3.4.0\build-mingw\install folder): C:\> cmake -G "MinGW Makefiles" .. -DCMAKE_INSTALL_PREFIX=%VISP_WS%\3rdparty\eigen-3.4.0\build-mingw\install
C:\> cmake --build . --config Release --target install -j4
%VISP_WS%\3rdparty\eigen-3.4.0\build-mingw\install folder.4.1.2.3. Complete Eigen3 installation
Now you have to complete Eigen3 installation setting some environment vars:
EIGEN_DIR environment variable. Start up a cmd Command Prompt and enter: C:\> setx Eigen3_DIR "%VISP_WS%\3rdparty\eigen-3.4.0\build-mingw\install\share\eigen3\cmake" C:\> exitwhere
%VISP_WS%\3rdparty\eigen-3.4.0\build-mingw\install is where you have installed Eigen3. Inside the folder %VISP_WS%\3rdparty\eigen-3.4.0\build-mingw\install\share\eigen3\cmake you should have a file named Eigen3Config.cmake.Path environment var since Eigen3 is a template that has no library.JSON for modern C++ installation need to be installed from source for MinGW.
cmd Command Prompt and follow the instructions below C:\> cd %VISP_WS%\3rdparty C:\> git clone https://github.com/nlohmann/json.git C:\> cd json && mkdir build-mingw && cd build-mingw C:\> cmake -G "MinGW Makefiles" .. -DCMAKE_INSTALL_PREFIX=%VISP_WS%\3rdparty\json\build-mingw\install -DBUILD_TESTING=OFF -DJSON_BuildTests=OFF C:\> cmake --build . --config Release --target installJSON is now installed in
%VISP_WS%\3rdparty\json\build-mingw\install folder. Now in order that ViSP detects JSON you have to set nlohmann_json_DIR environment variable. Start up a cmd Command Prompt and enter: C:\> setx nlohmann_json_DIR "%VISP_WS%\3rdparty\json\build-mingw\install\share\cmake\nlohmann_json" C:\> exitwhere
%VISP_WS%\3rdparty\json\build-mingw\install is where you have installed JSON. Inside the folder %VISP_WS%\3rdparty\json\build-mingw\install\share\cmake\nlohmann_json you should have a file named nlohmann_jsonConfig.cmake. There is no need to set Path environment var since JSON has only a header and no library.There are different ways to get ViSP source code.
visp-x.y.z.tar.gz or visp-x.y.z.zip is downloaded, uncompress the file in %VISP_WS%\visp\visp-x.y.z using for example WinRAR.visp-snapshot-yyyy-mm-dd.tar.gz is downloaded, uncompress the file in %VISP_WS%\visp\visp-x.y.z using for example WinRAR.git command line tool: C:\> cd %VISP_WS% C:\> git clone https://github.com/lagadic/visp.git
We suppose now that ViSP source is in %VISP_WS%\visp.
The goal of the configuration step is now to use CMake to produce a Visual Studio C++ solution file that will be located in %VISP_WS%/visp-build-mingw.
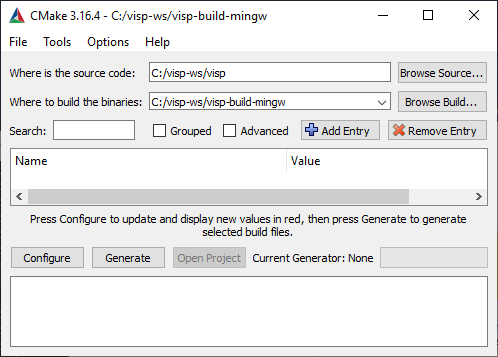
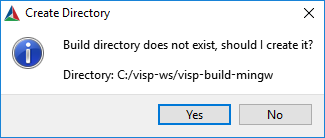
%VISP_WS%/visp-build-mingw folder.
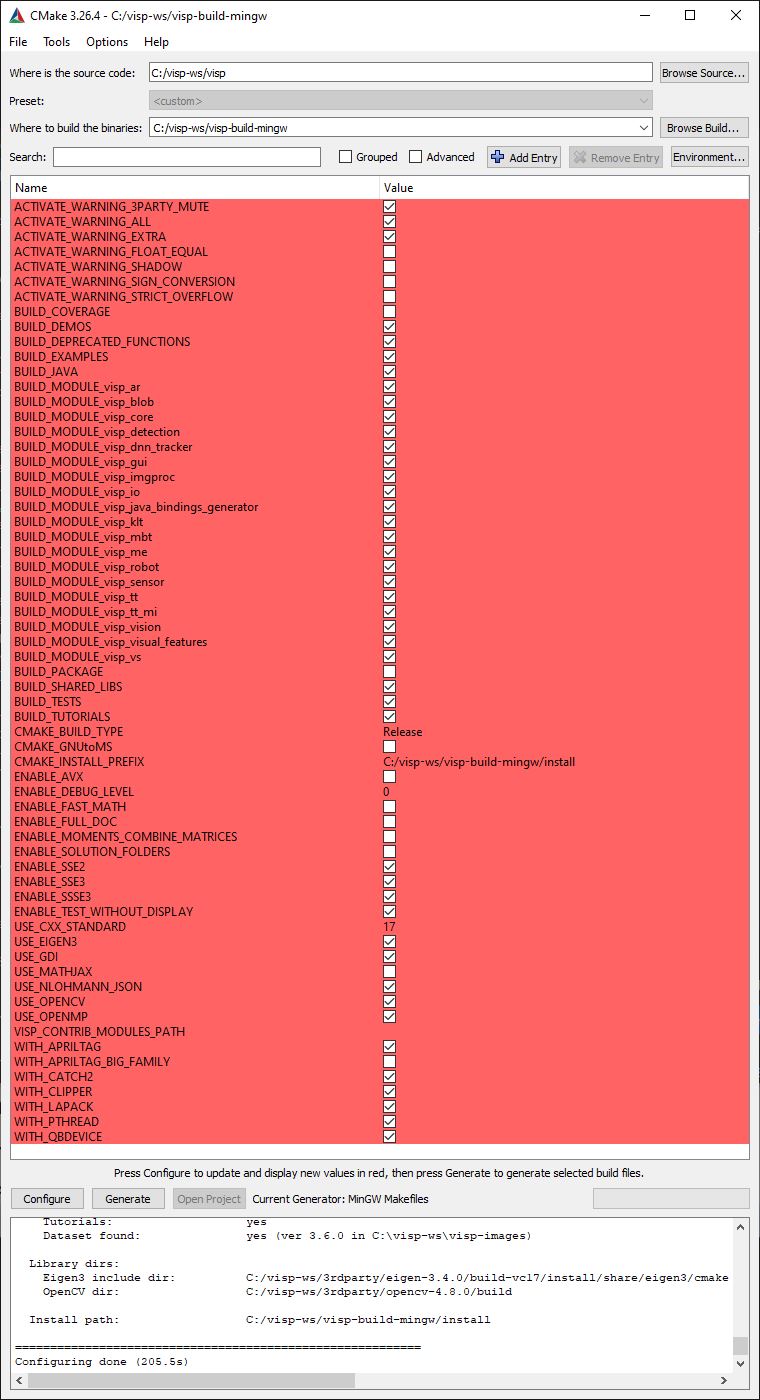
%VISP_WS%/visp-build-mingw/install. If you want to change the installation folder to C:/Program Files (x86)/ViSP, make sure that you have administrator privileges to write in that folder before modifying CMAKE_INSTALL_PREFIX..dll extension). This is the default configuration that is recommended. If you want to create rather a static library (with .lib extension) you have to uncheck the BUILD_SHARED_LIBS option to disable DLL creation.%VISP_WS%/visp-build-mingw folder you have the Makefile file that will be used by MinGW to build the whole project.cmd Command Prompt, change to %VISP_WS%\visp-build-mingw folder and run mingw32-make: C:\> cd %VISP_WS%\visp-build-mingw C:\> mingw32-make -j4
cmd Command Prompt run: C:\> mingw32-make -j4 install
%VISP_WS%/visp-build-mingw/install/x64/mingw/bin folder you will find ViSP DLL libraries corresponding to the build modules. 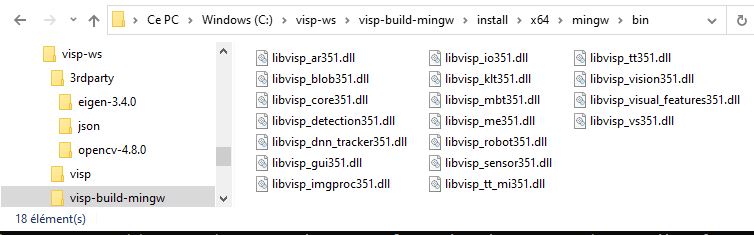
CMAKE_BUILD_TYPE is set to Debug, the library names are suffixed by "d".To build ViSP documentation, you have first to install Doxygen:
doxygen-1.8.20-setup.execmd Command Prompt and enter build directory C:\> cd %VISP_WS%\visp-build-mingw
C:\> cmake -G "MinGW Makefiles" %VISP_WS%\visp
C:\> cmake --build . --config Release --target visp_doc
The generated documentation is then available in $VISP_WS/visp-build-mingw/doc/html/index.html
npm LTS version following these instructions, then install MathJax and build doc using: C:\> npm install mathjax C:\> cmake -G "MinGW Makefiles" %VISP_WS%\visp -DUSE_MATHJAX=ON C:\> cmake --build . --config Release --target visp_doc
ENABLE_FULL_DOC to ON like: C:\> cmake -G "MinGW Makefiles" %VISP_WS%\visp -DENABLE_FULL_DOC=ON C:\> cmake --build . --config Release --target visp_doc
Modify the Path var to add the path to ViSP dll libraries. To this end open the "Edit environment variable" UI, and modify Path to add a new line with %VISP_WS%\visp-build-mingw\install\x64\mingw\bin.
In order to ease ViSP detection by CMake when ViSP is used as a 3rd party in an external project, like the one described in the Tutorial: How to create and build a project that uses ViSP and CMake on Unix or Windows, you may set VISP_DIR environment variable with the path to the VISPConfig.cmake file:
C:\> setx VISP_DIR "%VISP_WS%\visp-build-mingw\install"
C:\> exit
Some ViSP examples and tests require a dataset that contains images, video, models that is not part of ViSP source code. This dataset is available in Github (https://github.com/lagadic/visp-images) or as a release in a separate archive named visp-images-x.y.z.zip. This archive could be downloaded from https://visp.inria.fr/download page. Note that ViSP tutorials are not using ViSP data set.
We give hereafter the two ways to get this data set:
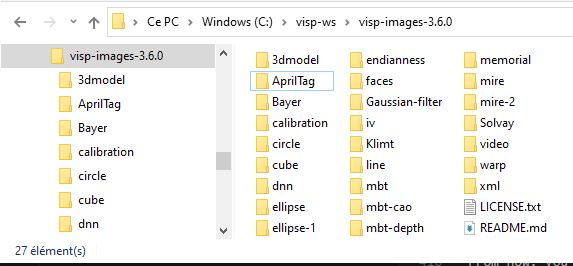
%VISP_WS%. At the time this tutorial was written, the latest release was visp-images-3.6.0.zip. 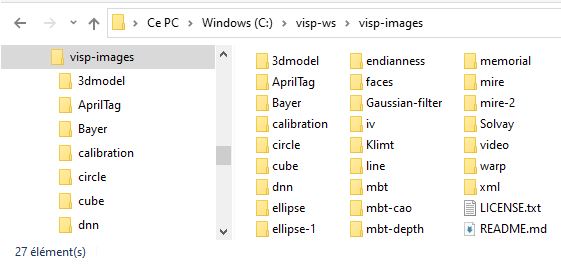
VISP_INPUT_IMAGE_PATH environment variable to help ViSP examples and tests to detect automatically the location of the requested data. In our case, this variable should be set to %VISP_WS%\visp-images-3.6.0. Open a cmd Command Prompt and run C:\> setx VISP_INPUT_IMAGE_PATH %VISP_WS%\visp-images-3.6.0 C:\> exit
C:\> cd %VISP_WS%
C:\> git clone https://github.com/lagadic/visp-images.git
VISP_INPUT_IMAGE_PATH environment variable to help ViSP examples and tests to detect automatically the location of the requested data. In our case, this variable should be set to %VISP_WS%\visp-images. Open a cmd Command Prompt and run C:\> setx VISP_INPUT_IMAGE_PATH %VISP_WS%\visp-images C:\> exit
From now, you can try to run ViSP examples and tests. For example, if you want to run %VISP_WS%\visp-build-mingw\example\device\display\displayOpenCV.exe, open a cmd Command Prompt, enter in the right folder and run:
C:\> cd %VISP_WS%\visp-build-mingw\example\device\display
C:\> displayOpenCV.exe

A click to close the windows...

A click to display a cross...
Cross position: 392, 306

A click to exit the program...
Bye
Since all 3rd parties are optional you may have started to install only some of them. Imagine that you just installed a new third-party, or that you upgraded the version of this 3rd party. The next step is to go back to the build folder, configure ViSP with CMake to detect the newly installed third-party library and build again ViSP. This could be achieved with:
$ cd $VISP_WS/visp-build-mingw
$ cmake ../visp
Here you can check the content of the ViSP-third-party.txt file and see if the newly installed 3rd party is well detected.
Finally, you need to rebuild ViSP with:
$ mingw32-make
After ViSP installation, you can remove installed material using:
$ cd $VISP_WS/visp-build-mingw
$ mingw32-make uninstall
If you want to build only ViSP modules libraries, nor the examples, tutorials and tests:
$ cd $VISP_WS%/visp-build-mingw
$ mingw32-make visp_modules
If you want to build a given module and all the dependencies:
$ cd $VISP_WS%/visp-build-mingw
$ mingw32-make visp_<module_name>
For example to build the model-based tracker module named mbt, run:
$ cd $VISP_WS%/visp-build-mingw
$ mingw32-make visp_mbt
To see which are the optional 3rd parties that are found during the configuration stage and that will be used by ViSP during the build you can have a look to the text file named ViSP-third-party.txt and located in %VISP_WS%/visp-build-mingw. We provide hereafter an example of a possible content of this file that contains also build info.
$ type %VISP_WS%/visp-build-mingw/ViSP-third-party.txt

==========================================================
General configuration information for ViSP 3.5.1

  Version control:               08a979a03-dirty

  Platform:
    Timestamp:                   2023-07-06T14:34:24Z
    Host:                        Windows 10.0.19044 AMD64
    CMake:                       3.26.4
    CMake generator:             MinGW Makefiles
    CMake build tool:            C:/mingw64/bin/mingw32-make.exe
    Configuration:               Release

  System information:
    Number of CPU logical cores: 4
    Number of CPU physical cores: 4
    Total physical memory (in MiB): 16057
    OS name:                     Windows
    OS release:                  Professional
    OS version:                  (Build 19044)
    OS platform:                 AMD64
    CPU name:                    Pentium II (0.25 micron)
    Is the CPU 64-bit?           yes
    Does the CPU have FPU?       yes
    CPU optimization:            SSE2 SSE3 SSSE3

  C/C++:
    Built as dynamic libs?:      yes
    C++ Compiler:                C:/mingw64/bin/c++.exe  (ver 13.1.0)
    C++ flags (Release):         -Wall -Wextra -fopenmp -std=c++17 -fvisibility=hidden -msse2 -msse3 -mssse3 -O3 -DNDEBUG
    C++ flags (Debug):           -Wall -Wextra -fopenmp -std=c++17 -fvisibility=hidden -msse2 -msse3 -mssse3 -g
    C Compiler:                  C:/mingw64/bin/gcc.exe
    C flags (Release):           -Wall -Wextra -fopenmp -std=c++17 -fvisibility=hidden -msse2 -msse3 -mssse3 -O3 -DNDEBUG
    C flags (Debug):             -Wall -Wextra -fopenmp -std=c++17 -fvisibility=hidden -msse2 -msse3 -mssse3 -g
    Linker flags (Release):
    Linker flags (Debug):
    Use cxx standard:            17

  ViSP modules:
    To be built:                 core dnn_tracker gui imgproc io java_bindings_generator klt me sensor ar blob robot visual_features vs vision detection mbt tt tt_mi
    Disabled:                    -
    Disabled by dependency:      -
    Unavailable:                 java

  Windows RT support:            no

  Python (for build):            C:/Python310/python.exe

  Java:
    ant:                         no
    JNI:                         C:/Program Files/Microsoft/jdk-11.0.16.101-hotspot/include C:/Program Files/Microsoft/jdk-11.0.16.101-hotspot/include/win32 C:/Program Files/Microsoft/jdk-11.0.16.101-hotspot/include

  Build options:
    Build deprecated:            yes
    Build with moment combine:   no

  OpenCV:
    Version:                     4.8.0
    Modules:                     calib3d core dnn features2d flann gapi highgui imgcodecs imgproc ml objdetect photo stitching video videoio
    OpenCV dir:                  C:/visp-ws/3rdparty/opencv-4.8.0/build

  Mathematics:
    Blas/Lapack:                 yes
    \- Use MKL:                  no
    \- Use OpenBLAS:             no
    \- Use Atlas:                no
    \- Use Netlib:               no
    \- Use GSL:                  no
    \- Use Lapack (built-in):    yes (ver 3.2.1)
    Use Eigen3:                  yes (ver 3.4.0)
    Use OpenCV:                  yes (ver 4.8.0)

  Simulator:
    Ogre simulator:
    \- Use Ogre3D:               no
    \- Use OIS:                  no
    Coin simulator:
    \- Use Coin3D:               no
    \- Use SoWin:                no
    \- Use SoXt:                 no
    \- Use SoQt:                 no
    \- Use Qt5:                  no
    \- Use Qt4:                  no
    \- Use Qt3:                  no

  Media I/O:
    Use JPEG:                    no
    Use PNG:                     no
    \- Use ZLIB:                 no
    Use OpenCV:                  yes (ver 4.8.0)
    Use stb_image (built-in):    yes (ver 2.27.0)
    Use TinyEXR (built-in):      yes (ver 1.0.2)

  Real robots:
    Use Afma4:                   no
    Use Afma6:                   no
    Use Franka:                  no
    Use Viper650:                no
    Use Viper850:                no
    Use ur_rtde:                 no
    Use Kinova Jaco:             no
    Use aria (Pioneer):          no
    Use PTU46:                   no
    Use Biclops PTU:             no
    Use Flir PTU SDK:            no
    Use MAVSDK:                  no
    Use Parrot ARSDK:            no
    \-Use ffmpeg:                no
    Use Virtuose:                no
    Use qbdevice (built-in):     yes (ver 2.6.0)
    Use takktile2 (built-in):    no

  GUI:
    Use X11:                     no
    Use GTK:                     no
    Use OpenCV:                  yes (ver 4.8.0)
    Use GDI:                     yes
    Use Direct3D:                no

  Cameras:
    Use DC1394-2.x:              no
    Use CMU 1394:                no
    Use V4L2:                    no
    Use directshow:              no
    Use OpenCV:                  yes (ver 4.8.0)
    Use FLIR Flycapture:         no
    Use Basler Pylon:            no
    Use IDS uEye:                no

  RGB-D sensors:
    Use Realsense:               no
    Use Realsense2:              no
    Use Occipital Structure:     no
    Use Kinect:                  no
    \- Use libfreenect:          no
    \- Use libusb-1:             no
    \- Use pthread:              no
    Use PCL:                     no
    \- Use VTK:                  no

  F/T sensors:
    Use atidaq (built-in):       no
    Use comedi:                  no
    Use IIT SDK:                 no

  Mocap:
    Use Qualisys:                no
    Use Vicon:                   no

  Detection:
    Use zbar:                    no
    Use dmtx:                    no
    Use AprilTag (built-in):     yes (ver 3.1.1)
    \- Use AprilTag big family:  no

  Misc:
    Use Clipper (built-in):      yes (ver 6.4.2)
    Use pugixml (built-in):      yes (ver 1.9.0)
    Use libxml2:                 no
    Use json (nlohmann):         yes (ver 3.11.2)

  Optimization:
    Use OpenMP:                  yes
    Use pthread:                 no
    Use pthread (built-in):      yes (ver 3.0.1)
    Use Simd (built-in):         yes (ver 4.9.109)

  DNN:
    Use CUDA Toolkit:            no
    Use TensorRT:                no

  Documentation:
    Use doxygen:                 yes
    \- Use mathjax:              no

  Tests and samples:
    Use catch2 (built-in):       yes (ver 2.13.7)
    Tests:                       yes
    Demos:                       yes
    Examples:                    yes
    Tutorials:                   yes
    Dataset found:               yes (ver 3.6.0 in C:\visp-ws\visp-images)

  Library dirs:
    Eigen3 include dir:          C:/visp-ws/3rdparty/eigen-3.4.0/build-vc17/install/share/eigen3/cmake
    OpenCV dir:                  C:/visp-ws/3rdparty/opencv-4.8.0/build

  Install path:                  C:/visp-ws/visp-build-mingw/install

==========================================================
This issue occurs with OpenCV 4.7.0 and OpenCV 4.8.0.
In file included from C:\visp-ws\3rdparty\opencv-4.7.0\sources\modules\videoio\src\cap_obsensor\obsensor_stream_channel_msmf.hpp:41,
                 from C:\visp-ws\3rdparty\opencv-4.7.0\sources\modules\videoio\src\cap_obsensor\obsensor_stream_channel_msmf.cpp:25:
C:\visp-ws\3rdparty\opencv-4.7.0\sources\modules\videoio\src\cap_obsensor\obsensor_stream_channel_msmf.hpp: In instantiation of 'class cv::obsensor::ComPtr<IMFAttributes>':
C:\visp-ws\3rdparty\opencv-4.7.0\sources\modules\videoio\src\cap_obsensor\obsensor_stream_channel_msmf.hpp:145:42:   required from here
C:\visp-ws\3rdparty\opencv-4.7.0\sources\modules\videoio\src\cap_obsensor\obsensor_stream_channel_msmf.hpp:106:27: error: could not convert template argument 'cv::obsensor::ComPtr<IMFAttributes>::__T_IID_getter' from 'const IID& (cv::obsensor::ComPtr<IMFAttributes>:()' {aka 'const GUID& (cv::obsensor::ComPtr<IMFAttributes>:()'} to 'const IID& ()' {aka 'const GUID& ()'}
  106 |     _COM_SMARTPTR_TYPEDEF(T, __uuidof(T));
The workaround is to configure OpenCV using cmake -DWITH_OBSENSOR=OFF like:
C:\> cd %VISP_WS%\opencv-4.7.0\build-mingw
C:\> C:\> cmake -G "MinGW Makefiles" ..\sources -DCMAKE_INSTALL_PREFIX=%VISP_WS%\3rdparty\opencv-4.7.0\build -DBUILD_TESTS=OFF -DBUILD_PERF_TESTS=OFF -DWITH_OBSENSOR=OFF
C:\> cmake --build . --config Release --target install -j4
This issue occurs with OpenCV 4.5.0 and is referenced here.
C:\>cmake --build . --config Release --target install
...
[ 44%] Building RC object modules/core/CMakeFiles/opencv_core.dir/vs_version.rc.obj
gcc: error: long: No such file or directory
C:\PROGRA~1\MINGW-~1\X86_64~1.0-P\mingw64\bin\windres.exe: preprocessing failed.
mingw32-make.exe[2]: *** [modules\core\CMakeFiles\opencv_core.dir\build.make:1494: modules/core/CMakeFiles/opencv_core.dir/vs_version.rc.obj] Error 1
mingw32-make.exe[1]: *** [CMakeFiles\Makefile2:1770: modules/core/CMakeFiles/opencv_core.dir/all] Error 2
mingw32-make.exe: *** [Makefile:181: all] Error 2
The workaround is to configure OpenCV using cmake -DOPENCV_ENABLE_ALLOCATOR_STATS=OFF like:
C:\> cd %VISP_WS%\opencv-4.5.0\build-mingw
C:\> cmake -G "MinGW Makefiles" ..\sources -DCMAKE_INSTALL_PREFIX=%VISP_WS%\opencv-4.5.0\build \
     -DBUILD_TESTS=OFF -DBUILD_PERF_TESTS=OFF -DWITH_OPENCL_D3D11_NV=OFF -DOPENCV_ENABLE_ALLOCATOR_STATS=OFF
C:\> cmake --build . --config Release --target install -j4
This issue occurs with OpenCV 4.1.1 and is referenced here.
If you encounter the following issue during OpenCV build:
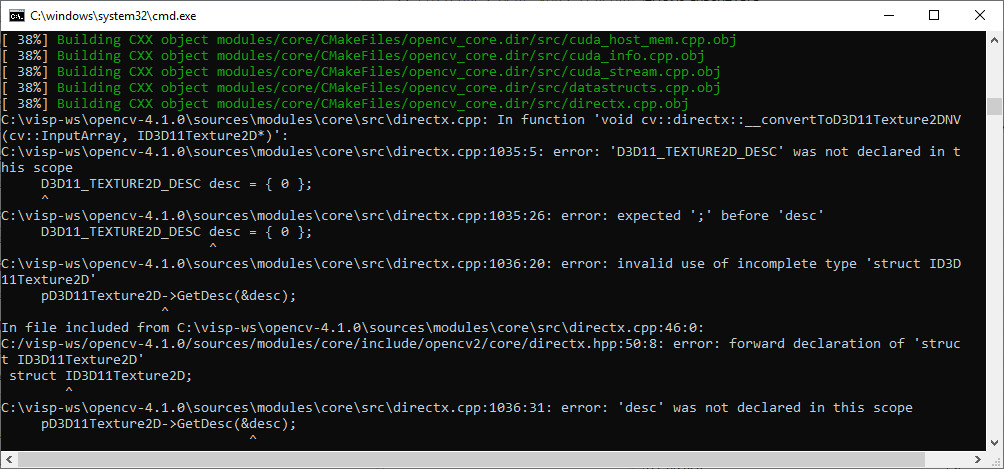
you have to disable OpenCL D3D11 support and restart a new build:
C:\> cd %VISP_WS%\opencv-4.1.1\build-mingw
C:\> cmake -G "MinGW Makefiles" ..\sources -DCMAKE_INSTALL_PREFIX=%VISP_WS%\opencv-4.1.1\build \
    -DWITH_OPENCL_D3D11_NV=OFF
C:\> cmake --build . --config Release --target install
If you encounter the following issue during CMake configuration
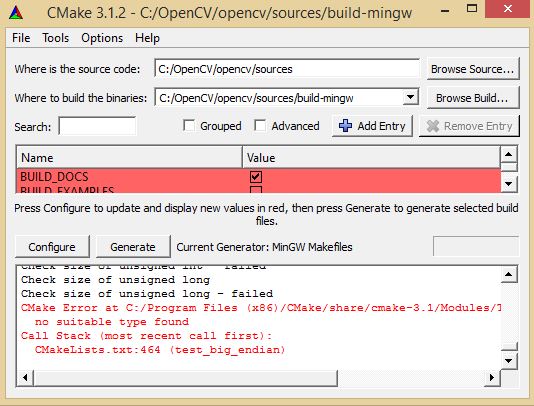
Edit %VISP_WS%\opencv-2.y.z\sources\CMakeLists.txt file, and line 464 replace:
test_big_endian(WORDS_BIGENDIAN)
by:
#test_big_endian(WORDS_BIGENDIAN)
set(WORDS_BIGENDIAN 0)
If you encounter a build issue during libtiff build as given in the next image:
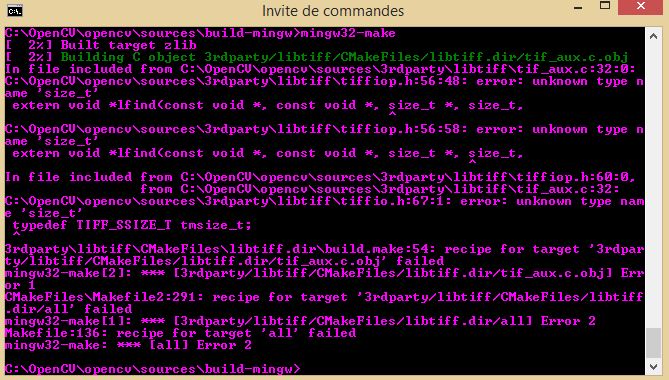
cd %VISP_WS%\opencv-2.y.z\sources\build-mingw
C:\> mingw32-make
The following image shows the link issue that may appear when building OpenCV with MinGW:

A work around is to configure OpenCV without ipp support turning WITH_IPP=OFF and then trying to build again.
This error that occurs with OpenCV 3.0.0 during cap_dshow.cpp build is known and reported as an issue in https://github.com/Itseez/opencv/pull/5282/commits.
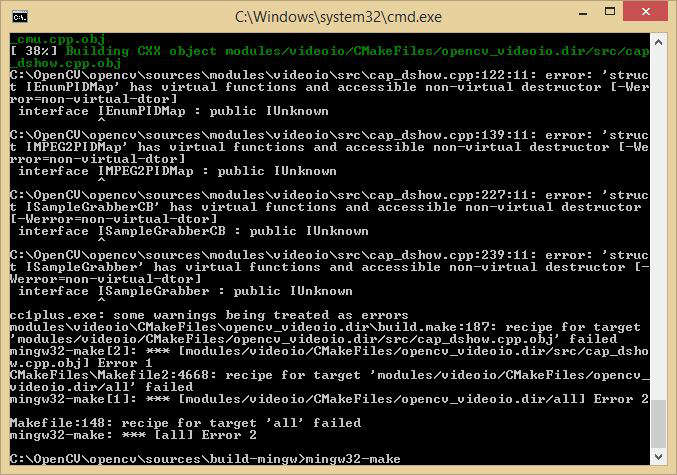
modules/videoio/src/cap_dshow.cpp by adding near line 96: #ifdef __MINGW32__ // MinGW does not understand COM interfaces #pragma GCC diagnostic ignored "-Wnon-virtual-dtor" #endif
%VISP_WS%\opencv-2.y.z\sources\cmake\OpenCVConfig.cmake, and line 89 replace: if(CMAKE_OPENCV_GCC_TARGET_MACHINE MATCHES "64")by:
if(OPENCV_GCC_TARGET_MACHINE MATCHES "64")
cmd Command Prompt to build and install OpenCV again: C:\> cd %VISP_WS%\opencv-2.y.z\sources\build-mingw C:\> mingw32-make install
When running mingw32-make if you get the following issue:
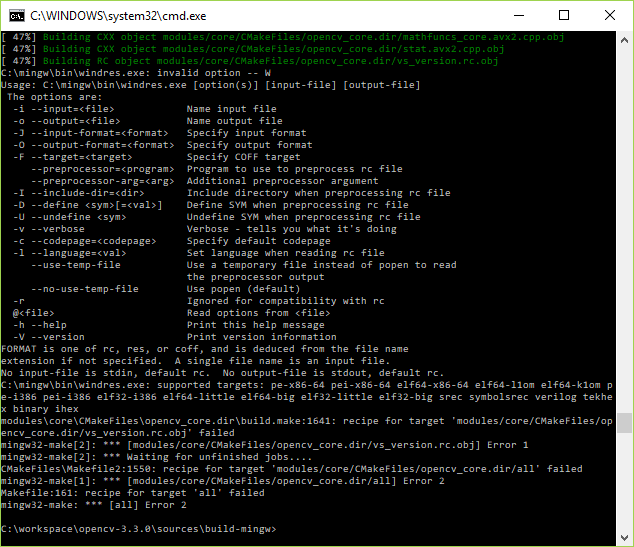
the workaround consists in:
ENABLE_PRECOMPILED_HEADERS cmake var OFF: 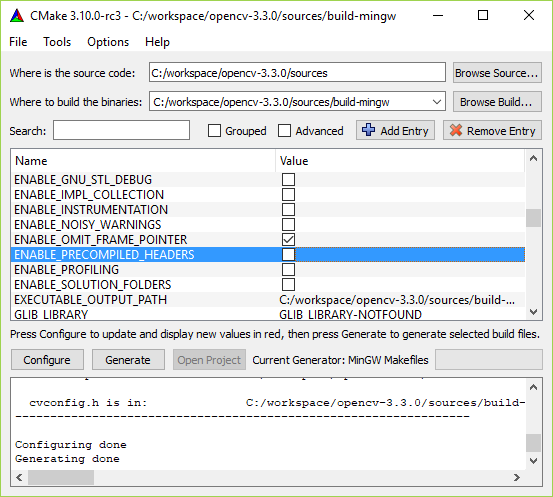
cmd Command Prompt run again mingw32-makeWhen running mingw32-make if you get the following issue:
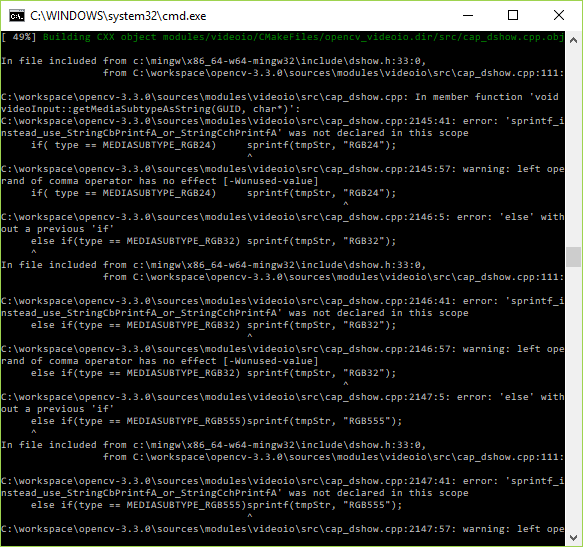
the workaround consists in:
%VISP_WS%/opencv-3.3.0/sources/modules/videoio/src/cap_dshow.cpp adding cmd Command Prompt run again mingw32-makeYou are now ready to see the next Tutorial: How to create and build a project that uses ViSP and CMake on Unix or Windows that will show you how to use ViSP as a 3rd party to build your own project.