In this tutorial you will learn how to install ViSP from source on Jetson TX2 equipped with a Connect Tech Orbitty Carrier board.
- Note
- ViSP is already packaged for linux jetson. To know which version is available
$ apt-cache search libvisp
-
Concerning ViSP installation, we provide also other Tutorials for ViSP users.
Install prerequisites
The first step is to setup and flash your Jetson for a Connect Tech Carrier Board following this tutorial. This could be achieved from a laptop running ubuntu 16.04 or more recent.
During this installation and setup we recommend to install also OpenCV.
The second step consists in installing GNU g++ compiler, CMake, git and subversion. To this end connect to the Jetson and run.
$ sudo apt-get install build-essential cmake-curses-gui git subversion wget
Create a workspace
First create a workspace that will contain all ViSP source, build, data set and optional 3rd parties. This workspace is here set to $HOME/visp-ws folder, but it could be set to any other location.
In a terminal, run:
$ echo "export VISP_WS=$HOME/visp-ws" >> ~/.bashrc
$ source ~/.bashrc
$ mkdir -p $VISP_WS
Quick ViSP installation
In this section, we give minimal instructions to build ViSP from source just to try ViSP without entering in Advanced ViSP installation.
- Install a small number of recommended 3rd parties (knowing that OpenCV should be already installed if you follow this tutorial).
$ sudo apt-get install libx11-dev liblapack-dev libeigen3-dev libv4l-dev libzbar-dev libpthread-stubs0-dev libjpeg-dev libpng-dev
- Get ViSP source code
$ cd $VISP_WS
$ git clone https:
- Create a build folder and build ViSP
$ mkdir -p $VISP_WS/visp-build
$ cd $VISP_WS/visp-build
$ cmake ../visp
$ make -j4
- Set
VISP_DIR environment variable $ echo "export VISP_DIR=$VISP_WS/visp-build" >> ~/.bashrc
$ source ~/.bashrc
To have a trial, just jump to Install ViSP dataset before running some binaries that you just build or jump to Next tutorial. You can later come back to the Advanced ViSP installation.
Advanced ViSP installation
Install 3rd parties
ViSP is interfaced with several optional 3rd party libraries. The complete list is provided here.
- Note
- ViSP can be used without any third-party since all of them are optional. But obviously in this case, as we do not want to reinvent the wheel, some features implemented in third-party libraries will not be exploitable through ViSP. It is therefore possible to skip in a first time this section and start directly to Quick ViSP installation. Later, if you realize that a third-party library is missing, you can still install it, go back to the build folder, configure ViSP with CMake to detect the newly installed third-party library and build ViSP again as explained in How to take into account a newly installed 3rd party.
Recommended 3rd parties
We recommend to install the following 3rd parties:
- OpenCV
- libX11 to be able to open a window to display images
- lapack and eigen to benefit from optimized mathematical capabilities
- libv4l to grab images from usb or analogic cameras
- libzbar to be able to detect QR codes
- pthread library
- Note
- OpenCV should be already installed if you follow this tutorial.
Installation of the other recommended 3rd parties could be performed running:
$ sudo apt-get install libx11-dev liblapack-dev libeigen3-dev libv4l-dev libzbar-dev libpthread-stubs0-dev libjpeg-dev libpng-dev
Get ViSP source code
There are different ways to get ViSP source code:
- You can download the latest release as a zip or a tarball. Once downloaded, uncompress the file using either
$ tar xvzf visp-x.y.z.tar.gz -C $VISP_WS
$ unzip visp-x.y.z.zip -d $VISP_WS
- You can also download a daily snapshot. Once downloaded, uncompress the file using
$ tar xvzf visp-snapshot-yyyy-mm-dd.tar.gz -C $VISP_WS
- Or you get the cutting-edge ViSP from GitHub repository using the following command
$ cd $VISP_WS
$ git clone https:
We suppose now that ViSP source is in the directory $VISP_WS/visp. The following should be adapted if you downloaded ViSP from a zip or tarball. In that case, the source is rather in something like $VISP_WS/visp-x.y.z.
Configure ViSP from source
These are the steps to configure ViSP from source with CMake:
- In the workspace, create first a directory named
visp-build that will contain all the build material; generated Makefiles, object files, output libraries and binaries. $ mkdir $VISP_WS/visp-build
- Enter the
visp-build folder and configure the build: $ cd $VISP_WS/visp-build
$ cmake ../visp
ccmake, the CMake GUI: The following image shows that this command allows to configure (just by pressing [c] key) the build in a more advanced way where some options could be easily turned ON/OFF. It allows also to see which are the 3rd parties that will be used. To generate the makefiles, just press [g] key in the ccmake gui.
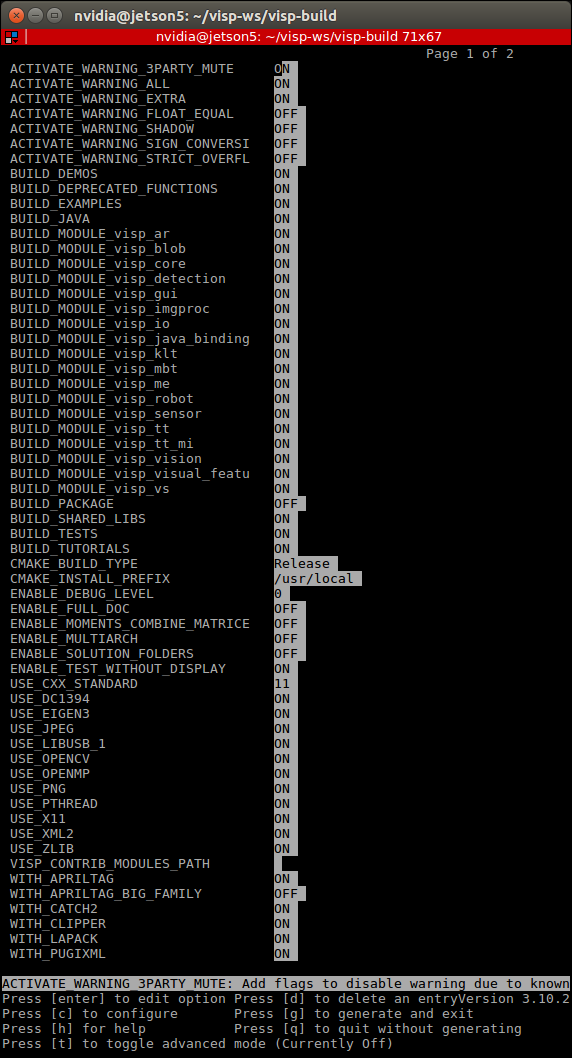
Snapshot of the ccmake ../visp command used to configure ViSP.
Build ViSP libraries
To build ViSP libraries proceed with:
$ cd $VISP_WS/visp-build
$ make -j4
Build ViSP documentation
To build ViSP documentation, you have first to install Doxygen package:
$ sudo apt-get install doxygen graphviz texlive-latex-base
Then you can proceed with:
$ cd $VISP_WS/visp-build
$ cmake ../visp
$ make -j4 visp_doc
The generated documentation is then available in $VISP_WS/visp-build/doc/html/index.html
- Note
- It is also possible to generate a more complete documentation that includes also all the internal classes. This could be achieved setting CMake var
ENABLE_FULL_DOC to ON like: $ cmake ../visp -DENABLE_FULL_DOC=ON
$ make -j4 visp_doc
Set VISP_DIR environment var
In order to ease ViSP detection by CMake when ViSP is used as a 3rd party in an external project, like the one described in the Tutorial: How to create and build a CMake project that uses ViSP on Unix or Windows, you may set VISP_DIR environment variable with the path to the VISPConfig.cmake file:
$ echo "export VISP_DIR=$VISP_WS/visp-build" >> ~/.bashrc
$ source ~/.bashrc
Install ViSP dataset
Some ViSP examples and tests require a data set that contains images, video, models that is not part of ViSP source code. This data set is available in Github (https://github.com/lagadic/visp-images) or as a release in a separate archive named visp-images-x.y.z.zip. This archive could be downloaded from http://visp.inria.fr/download page. Note that ViSP tutorials are not using ViSP data set.
We give hereafter the two ways to get this data set:
1. Get data set release
- Download
visp-images-3.3.0.zip from https://visp.inria.fr/download and uncompress it in your workspace %VISP_WS%: $ unzip ~/Downloads/visp-images-3.2.0.zip -d $VISP_WS
- We suppose now that the data are located in
$VISP_WS/visp-images-3.3.0. $ ls $VISP_WS/visp-images-3.3.0
3dmodel LICENSE.txt circle ellipse-1 iv mbt-depth video
AprilTag README.md cube endianness line mire warp
Klimt calibration ellipse faces mbt mire-2 xml
- Once downloaded, you need to set
VISP_INPUT_IMAGE_PATH environment variable to help ViSP examples and tests to detect automatically the location of the requested data. In our case, this variable should be set to $VISP_WS/visp-images-3.3.0. It is more convenient if this environment variables is automatically added to your bash session every time a new shell is launched: $ echo "export VISP_INPUT_IMAGE_PATH=$VISP_WS/visp-images-3.3.0" >> ~/.bashrc
$ source ~/.bashrc
2. Get data set from github
- Use git to get the data set latest version:
C:\> cd $VISP_WS
C:\> git clone https:
- Once cloned, you need to set
VISP_INPUT_IMAGE_PATH environment variable to help ViSP examples and tests to detect automatically the location of the requested data. In our case, this variable should be set to $VISP_WS%/visp-images. In a shell run: $ echo "export VISP_INPUT_IMAGE_PATH=$VISP_WS/visp-images" >> ~/.bashrc
$ source ~/.bashrc
Test data set usage
- From now, you can try to run ViSP examples and tests. For example you can run
displayX example that should open a windows with Klimt painting image and some overlay drawings: $ cd $VISP_WS/visp-build
$ ./example/device/display/displayX
A click to close the windows...
A click to display a cross...
Cross position: 201, 441
A click to exit the program...
Bye
Tips and tricks
How to take into account a newly installed 3rd party
Since all 3rd parties are optional you may have started to install only some of them. Imagine that you just installed a new third-party, or that you upgraded the version of this 3rd party. The next step is to go back to the build folder, configure ViSP with CMake to detect the newly installed third-party library and build again ViSP. This could be achieved with:
$ cd $VISP_WS/visp-build
$ cmake ../visp
Here you can check the content of the ViSP-third-party.txt file and see if the newly installed 3rd party is well detected (see Which are the 3rd party libraries that are used in ViSP ?).
Finally, you need to rebuild ViSP with:
How to install ViSP
Installing ViSP is optional and not recommended, since ViSP could be used as a 3rd party without installation. If you still want to proceed with the installation run:
$ cd $VISP_WS/visp-build
$ sudo make install
- Note
- The default install location is set to
/usr/local. This location could be changed modifying CMAKE_INSTALL_PREFIX var: $ cd $VISP_WS/visp-build
$ cmake ../visp -DCMAKE_INSTALL_PREFIX=/usr
$ make -j4
$ sudo make install
-
If you proceed to ViSP installation in a system folder like
/usr or /usr/local there is no need to Set VISP_DIR environment var that helps CMake to find ViSP libraries in an external project that uses ViSP as a 3rd party. If you rather install ViSP in a non "standard" folder, let say /my/install/folder, you have to set VISP_DIR to /my/install/folder/lib/cmake/visp that contains the VISPConfig.cmake file: $ cd $VISP_WS/visp-build
$ cmake ../visp -DCMAKE_INSTALL_PREFIX=/my/install/folder
$ make -j4
$ sudo make install
$ echo "export VISP_DIR=/my/install/folder/lib/cmake/visp" >> ~/.bashrc
$ source ~/.bashrc
How to uninstall ViSP
After ViSP installation, you can remove installed material using:
$ cd $VISP_WS/visp-build
$ sudo make uninstall
How to build only ViSP libraries
If you want to build only ViSP modules libraries, nor the examples, tutorials and tests:
$ cd $VISP_WS/visp-build
$ make -j4 visp_modules
How to build a ViSP specific module
If you want to build a given module and all the dependencies:
$ cd $VISP_WS/visp-build
$ make -j4 visp_<module_name>
For example to build the model-based tracker module named mbt, run:
$ cd $VISP_WS/visp-build
$ make -j4 visp_mbt
Which are the targets that could be run with make ?
To know which are the target available with make:
$ make help | grep visp
... visp_tests
... visp_modules
... visp_examples
... visp_demos
... visp_tutorials
... visp_clipper
... visp_apriltag
... visp_core
... visp_gui
... visp_imgproc
... visp_io
... gen_visp_java_source
... visp_klt
... visp_me
... visp_sensor
... visp_ar
... visp_blob
... visp_robot
... visp_visual_features
... visp_vs
... visp_vision
... visp_detection
... visp_mbt
... visp_tt
... visp_tt_mi
Which are the 3rd party libraries that are used in ViSP ?
To see which are the optional 3rd parties that are found during the configuration stage and that will be used by ViSP during the build you can have a look to the text file named ViSP-third-party.txt and located in $VISP_WS/visp-build. We provide hereafter an example of a possible content of this file that contains also build info.
$ cat $VISP_WS/visp-build/ViSP-third-party.txt
==========================================================
General configuration information for ViSP 3.3.0
Version control: 3.2.0-822-gf511da75d
Platform:
Timestamp: 2020-02-12T14:38:30Z
Host: Linux 4.9.140-tegra aarch64
CMake: 3.10.2
CMake generator: Unix Makefiles
CMake build tool: /usr/bin/make
Configuration: Release
C/C++:
Built as dynamic libs?: yes
C++ Compiler: /usr/bin/c++ (ver 7.4.0)
C++ flags (Release): -Wall -Wextra -fopenmp -
std=c++11 -fvisibility=hidden -fPIC -O3 -DNDEBUG
C++ flags (Debug): -Wall -Wextra -fopenmp -
std=c++11 -fvisibility=hidden -fPIC -g
C Compiler: /usr/bin/cc
C flags (Release): -Wall -Wextra -fopenmp -
std=c++11 -fvisibility=hidden -fPIC -O3 -DNDEBUG
C flags (Debug): -Wall -Wextra -fopenmp -
std=c++11 -fvisibility=hidden -fPIC -g
Linker flags (Release):
Linker flags (Debug):
ViSP modules:
To be built: core gui imgproc io java_bindings_generator klt me sensor ar blob robot visual_features vs vision detection mbt tt tt_mi
Disabled: -
Disabled by dependency: -
Unavailable: java
Python (for build): /usr/bin/python2.7
Java:
ant: NO
JNI: NO
Build options:
Build deprecated: yes
Build with moment combine: no
Mathematics:
Use MKL: no
Use OpenBLAS: no
Use Atlas: no
Use Netlib Lapack: no
Use Lapack (built-in): yes (ver 3.2.1)
Use Eigen3: yes (ver 3.3.4)
Use OpenCV: yes (ver 3.2.0)
Use GSL: no
Simulator:
Ogre simulator:
\- Use Ogre3D: no
\- Use OIS: no
Coin simulator:
\- Use Coin3D: no
\- Use SoWin: no
\- Use SoXt: no
\- Use SoQt: no
\- Use Qt5: no
\- Use Qt4: no
\- Use Qt3: no
Media I/O:
Use JPEG: yes (ver 80)
Use PNG: yes (ver 1.6.34)
\- Use ZLIB: yes (ver 1.2.11)
Use OpenCV: yes (ver 3.2.0)
Use stb_image (built-in): no
Real robots:
Use Afma4: no
Use Afma6: no
Use Franka: no
Use Viper650: no
Use Viper850: no
Use aria (Pioneer): no
Use PTU46: no
Use Biclops PTU: no
Use Flir PTU SDK: no
Use Parrot ARSDK: no
\-Use ffmpeg: no
Use Virtuose: no
Use qbdevice (built-in): yes (ver 2.6.0)
GUI:
Use X11: yes
Use GTK: no
Use OpenCV: yes (ver 3.2.0)
Use GDI: no
Use Direct3D: no
Cameras:
Use DC1394-2.x: yes (ver 2.2.5)
Use CMU 1394: no
Use V4L2: no
Use directshow: no
Use OpenCV: yes (ver 3.2.0)
Use Flycapture: no
Use Pylon: no
RGB-D sensors:
Use Realsense: no
Use Realsense2: no
Use Kinect: no
\- Use libfreenect: no
\- Use libusb-1: yes (ver 1.0.21)
\- Use pthread: yes
Use PCL: no
\- Use VTK: no
F/T sensors:
Use atidaq (built-in): no
Use comedi: no
Use IIT SDK: no
Detection:
Use zbar: no
Use dmtx: no
Use AprilTag (built-in): yes (ver 3.1.1)
\- Use AprilTag big family: no
Misc:
Use Clipper (built-in): yes (ver 6.4.2)
Use pugixml (built-in): yes (ver 1.9.0)
Use libxml2: yes (ver 2.9.4)
Optimization:
Use OpenMP: yes
Use pthread: yes
Use pthread (built-in): no
Use cxx standard: 11
Documentation:
Use doxygen: no
Tests and samples:
Use catch2 (built-in): yes (ver 2.9.2)
Tests: yes
Demos: yes
Examples: yes
Tutorials: yes
Install path: /usr/local
==========================================================
Next tutorial
You are now ready to see the next Tutorial: How to create and build a CMake project that uses ViSP on Unix or Windows that will show you how to use ViSP as a 3rd party to build your own project.
 1.8.13