Introduction
While the ViSP library is not intended to be an image processing library or replace a raster graphics editor, some easy image processing techniques can be used to improve or adjust the brightness and the contrast of an image.
The different techniques used in this tutorial are:
- brightness and contrast adjustment using a linear function
- gamma correction
- histogram equalization
- Retinex algorithm
The following example also available in tutorial-brightness-adjustment.cpp will demonstrate on a real underexposed photo the result of each of these methods:
#include <cstdlib>
#include <iostream>
#include <visp3/core/vpImage.h>
#include <visp3/gui/vpDisplayGDI.h>
#include <visp3/gui/vpDisplayOpenCV.h>
#include <visp3/gui/vpDisplayX.h>
#include <visp3/io/vpImageIo.h>
#if defined(VISP_HAVE_MODULE_IMGPROC)
#include <visp3/imgproc/vpImgproc.h>
#endif
int main(int argc, const char **argv)
{
#if defined(VISP_HAVE_MODULE_IMGPROC) && \
(defined(VISP_HAVE_X11) || defined(VISP_HAVE_GDI) || defined(VISP_HAVE_OPENCV)) && \
(defined(VISP_HAVE_PNG) || defined(VISP_HAVE_OPENCV))
std::string input_filename = "Sample_low_brightness.png";
double alpha = 10.0, beta = 50.0;
double gamma = 3.5;
int scale = 240, scaleDiv = 3, level = 0, kernelSize = -1;
double dynamic = 3.0;
for (int i = 1; i < argc; i++) {
if (std::string(argv[i]) == "--input" && i + 1 < argc) {
input_filename = std::string(argv[i + 1]);
} else if (std::string(argv[i]) == "--alpha" && i + 1 < argc) {
alpha = atof(argv[i + 1]);
} else if (std::string(argv[i]) == "--beta" && i + 1 < argc) {
beta = atof(argv[i + 1]);
} else if (std::string(argv[i]) == "--gamma" && i + 1 < argc) {
gamma = atof(argv[i + 1]);
} else if (std::string(argv[i]) == "--scale" && i + 1 < argc) {
scale = atoi(argv[i + 1]);
} else if (std::string(argv[i]) == "--scaleDiv" && i + 1 < argc) {
scaleDiv = atoi(argv[i + 1]);
} else if (std::string(argv[i]) == "--level" && i + 1 < argc) {
level = atoi(argv[i + 1]);
} else if (std::string(argv[i]) == "--kernelSize" && i + 1 < argc) {
kernelSize = atoi(argv[i + 1]);
} else if (std::string(argv[i]) == "--dynamic" && i + 1 < argc) {
dynamic = atof(argv[i + 1]);
} else if (std::string(argv[i]) == "--help" || std::string(argv[i]) == "-h") {
std::cout << "Usage: " << argv[0]
<< " [--input <input image>]"
" [--alpha <alpha for vp::adjust()>] [--beta <beta for "
"vp::adjust()>]"
" [--gamma <gamma for vp::gammaCorrection()>]"
" [--scale <scale for vp::retinex()> [--scaleDiv for "
"vp::retinex()]"
" [--level <level for vp::retinex()> [--kernelSize "
"<kernelSize for vp::retinex()>]"
" [--dynamic <dynamic for vp::retinex()>] [--help]"
<< std::endl;
return EXIT_SUCCESS;
}
}
#ifdef VISP_HAVE_X11
#elif defined(VISP_HAVE_GDI)
#elif defined(VISP_HAVE_OPENCV)
#endif
std::stringstream ss;
ss << "Sample_low_brightness_alpha=" << alpha << "_beta=" << beta << ".png";
ss.str("");
ss << "Sample_low_brightness_gamma=" << gamma << ".png";
ss.str("");
ss << "Sample_low_brightness_eqHist.png";
vp::retinex(I_color, I_color_retinex, scale, scaleDiv, level, dynamic, kernelSize);
ss.str("");
ss << "Sample_low_brightness_scale=" << scale << "_scaleDiv=" << scaleDiv << "_level=" << level
<< "_dynamic=" << dynamic << "_kernelSize=" << kernelSize << ".png";
return EXIT_SUCCESS;
#else
(void)argc;
(void)argv;
return 0;
#endif
}
These functions are provided in a vp:: namespace and accessible using this include:
#include <visp3/imgproc/vpImgproc.h>
Brightness and contrast adjustment
The brightness and the contrast of an image can be adjusted using a linear function:
![\[I_{res}\left ( i,j \right ) = \alpha \cdot I_{src}\left ( i,j \right ) + \beta\]](form_1266.png)
The  value will behave as a gain factor and the
  value as an offset.
The code to use is straightforward:
The result image is the following:

Left: underexposed image - Right: image adjusted with alpha=10, beta=50
Gamma correction
Gamma correction is a simple technique allowing to correct an image using a non-linear operation. The formula used is:
![\[I_{res}\left ( i,j \right ) = \left ( \frac{I_{src}\left ( i,j \right )}{255} \right )^{\frac{1}{\gamma}} \cdot 255\]](form_1268.png)
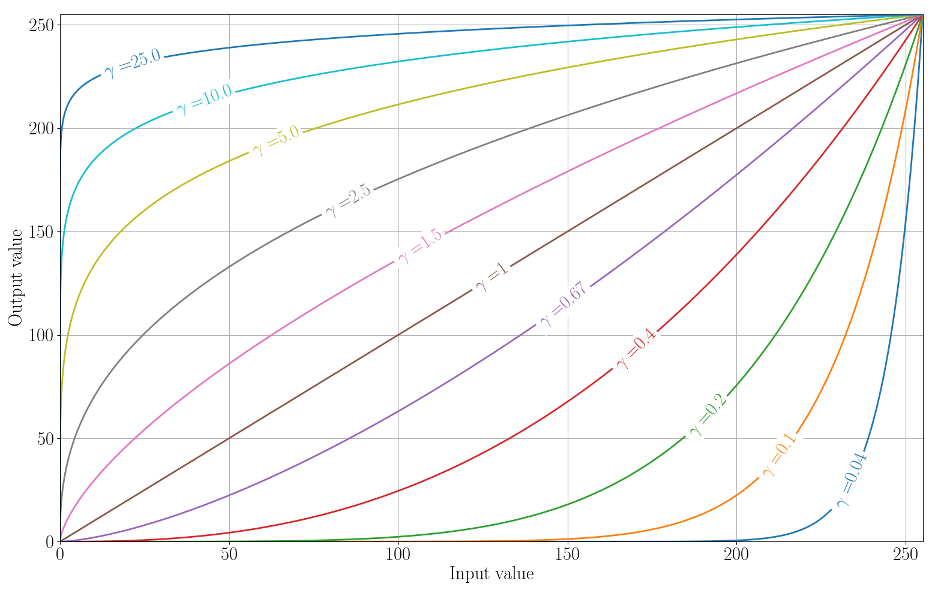
The image below shows in x the input pixel values and in y the output pixel values as they would be transformed by a gamma correction function according to different gamma values.

Visualization of the gamma correction function
The result image is the following:

Left: underexposed image - Right: image corrected with gamma=3.5
Histogram equalization
Histogram equalization is an image processing method that will adjust the contrast of an image by stretching or shrinking the intensity distribution in order to have a linear cumulative histogram distribution.
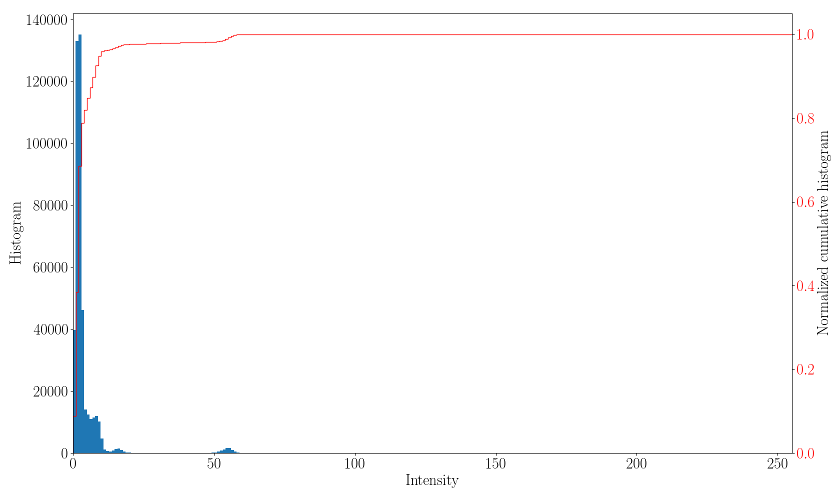
In the next figure, you can observe the histogram for the original underexposed photo where most of the pixel intensities are located in the [0, 30] range. The cumulative histogram distribution has a strong slope for very low pixel intensities.

Histogram and normalized cumulative histogram of the underexposed photo
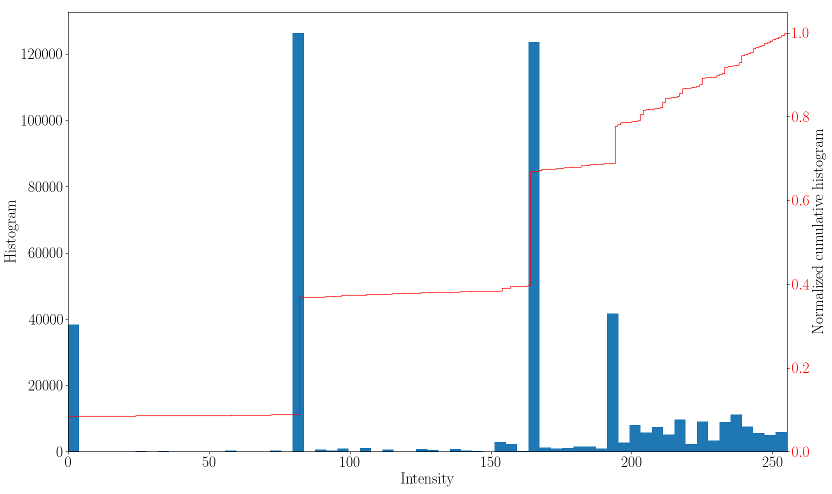
The histogram for the equalized photo is displayed in the next figure. This time, the bins are spread more uniformally along the intensity range and the cumulative histogram distribution presents a more linear shape.

Histogram and normalized cumulative histogram of the equalized photo
The result of the histogram equalized image is displayed below:

Left: underexposed image - Right: histogram equalized image
Retinex
The Retinex algorithm implemented is ported from the Retinex ImageJ plugin:
Retinex filtering is based on Land's theory of image perception, proposed to explain the perceived colour constancy of objects under varying illumination conditions. Several approaches exist to implement the retinex principles, among these the multiscale retinex with colour restoration algorithm (MSRCR) combines colour constancy with local contrast enhancement so images are rendered similarly to how human vision is believed to operate.
The original photo after the Retinex processing:

Left: underexposed image - Right: result of the Retinex algorithm with default parameters and dynamic=3
Next tutorial
You can now read the Tutorial: Contrast and image sharpening techniques, for additional contrast and sharpness improvement techniques.


![\[I_{res}\left ( i,j \right ) = \alpha \cdot I_{src}\left ( i,j \right ) + \beta\]](form_1266.png)
 value will behave as a gain factor and the
  value as an offset.
![\[I_{res}\left ( i,j \right ) = \left ( \frac{I_{src}\left ( i,j \right )}{255} \right )^{\frac{1}{\gamma}} \cdot 255\]](form_1268.png)


