Visual Servoing Platform  version 3.2.0 under development (2019-01-22)
Tutorial: How to draw basic drawings

Introduction

In this tutorial you will learn how to draw basic drawings with ViSP either on Unix-like systems (including OSX, Fedora, Ubuntu, Debian, ...) or on Windows.

Note that all the material (source code and images) described in this tutorial is part of ViSP source code and could be downloaded using the following command:

$ svn export https://github.com/lagadic/visp.git/trunk/tutorial/image

How to display an image

ViSP gui module provides Graphical User Interfaces capabilities. This module may use several optional third-party libraries which are: OpenCV, X11, GTK, GDI, Direct3D. We recommand to use X11 on unix-like systems thanks to vpDisplayX class and GDI on Windows thanks to vpDisplayGDI.

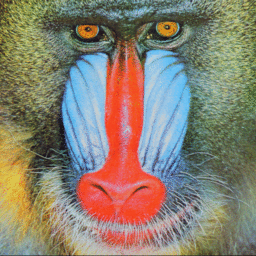
The following example also available in tutorial-viewer.cpp shows how to read and display an image.

#include <visp3/gui/vpDisplayD3D.h>
#include <visp3/gui/vpDisplayGDI.h>
#include <visp3/gui/vpDisplayGTK.h>
#include <visp3/gui/vpDisplayOpenCV.h>
#include <visp3/gui/vpDisplayX.h>
#include <visp3/io/vpImageIo.h>
int main(int argc, char **argv)
{
if (argc != 2) {
printf("Usage: %s <image name.[pgm,ppm,jpeg,png,tiff,bmp,ras,jp2]>\n", argv[0]);
return -1;
}
try {
vpImageIo::read(I, argv[1]);
} catch (...) {
std::cout << "Cannot read image \"" << argv[1] << "\"" << std::endl;
return -1;
}
try {
#if defined(VISP_HAVE_X11)
#elif defined(VISP_HAVE_GDI)
#elif defined(VISP_HAVE_OPENCV)
#elif defined(VISP_HAVE_GTK)
#elif defined(VISP_HAVE_D3D9)
vpDisplayD3d d(I, vpDisplay::SCALE_AUTO);
#else
std::cout << "No image viewer is available..." << std::endl;
#endif
vpDisplay::setTitle(I, "My image");
std::cout << "A click to quit..." << std::endl;
} catch (const vpException &e) {
std::cout << "Catch an exception: " << e << std::endl;
}
}

Here is the detailed explanation of the source, line by line :

#include <visp3/gui/vpDisplayD3D.h>
#include <visp3/gui/vpDisplayGDI.h>
#include <visp3/gui/vpDisplayGTK.h>
#include <visp3/gui/vpDisplayOpenCV.h>
#include <visp3/gui/vpDisplayX.h>

Include all the headers for image viewers. The two first one are for Windows systems. They require that Direct 3D or the Graphical Device Interface (GDI) coming with the installation of Visual Studio are available. The third one needs GTK that is cross-platform. The fourth is for unix-like systems and requires that libX11 is available. The last one is also cross-platform and requires that OpenCV is available.

#include <visp3/io/vpImageIo.h>

Include the header that allows to read/write PGM, PPM, PNG and JPEG images from the disk using vpImageIo class.

Create an instance of a color image where each pixel is coded in RGBa.

try {
vpImageIo::read(I, argv[1]);
} catch (...) {
std::cout << "Cannot read image \"" << argv[1] << "\"" << std::endl;
return -1;
}

The image I is initialized by reading an image file from the disk. If the image format is not supported we throw an exception.

#if defined(VISP_HAVE_X11)
#elif defined(VISP_HAVE_GDI)
#elif defined(VISP_HAVE_OPENCV)
#elif defined(VISP_HAVE_GTK)
#elif defined(VISP_HAVE_D3D9)
vpDisplayD3d d(I, vpDisplay::SCALE_AUTO);
#else
std::cout << "No image viewer is available..." << std::endl;
#endif

Create an instance of an image display window for image I. The first viewer that is available is used. Here we create the link between the image I and the display d. Note that an image can only have one display.

vpDisplay::setTitle(I, "My image");

The title of the display is then set to "My image".

First we display the content of the image I, then we flush the display to render the image.

Here we handle mouse events. We are waiting for a blocking mouse click to end the program.

Here is a screen shot of the resulting output window :

img-monkey.png

How to draw basic drawings

How to draw a point

As shown in tutorial-draw-point.cpp which source code is given below we use vpDisplay::displayPoint() function to draw a point in the overlay of a windows that displays a 3840 by 2160 grey image that has all the pixels set to 128 gray level.

#include <visp3/gui/vpDisplayGDI.h>
#include <visp3/gui/vpDisplayX.h>
int main()
{
vpImage<unsigned char> I(2160, 3840, 128);
try {
#if defined(VISP_HAVE_X11)
#elif defined(VISP_HAVE_GDI)
#endif
vpDisplay::setTitle(I, "My image");
std::cout << "A click to quit..." << std::endl;
} catch (const vpException &e) {
std::cout << "Catch an exception: " << e.getMessage() << std::endl;
}
}

Here we draw a point at the center of a grey image with red color and thickness 2.

How to draw a line segment

As given in tutorial-draw-line.cpp we use vpDisplay::displayLine() function to draw a line segment on the screen.

vpDisplay::displayLine(I, I.getHeight() / 4, I.getWidth() / 4, (3 * I.getHeight() ) / 4, (3 * I.getWidth() ) / 4, vpColor::red, 10);

Here we draw a red coloured line segment with the specified initial and final coordinates and thickness 10.

How to draw a circle

As given in tutorial-image-display-scaled-auto.cpp we use vpDisplay::displayCircle() function to draw a circle on the screen.

vpDisplay::displayCircle(I, I.getHeight() / 2, I.getWidth() / 2, 200, vpColor::red, true);

Here we draw a red coloured filled circle at the center with radius of 200.

How to draw a rectangle

As given in tutorial-draw-rectangle.cpp we use vpDisplay::displayRectangle() function to draw a rectangle on the screen.

vpDisplay::displayRectangle(I, I.getHeight() / 4, I.getWidth() / 4, I.getWidth() / 2, I.getHeight() / 2, vpColor::red, true);

Here we draw a red coloured filled rectangle with specified top-left coordinates and width and height.

How to draw a cross

As given in tutorial-draw-cross.cpp we use vpDisplay::displayCross() function to draw a rectangle on the screen.

vpDisplay::displayCross(I, I.getHeight() / 2, I.getWidth() / 2, I.getWidth() / 2, vpColor::red, 2);

Here we draw a red coloured cross on the center with speicfied size and thickness 2.

How to add text in the window overlay

As given in tutorial-draw-text.cpp we use vpDisplay::displayText() function to add text in the window overlay.

vpDisplay::displayText(I, I.getHeight() / 2, I.getWidth() / 2, "Hello World!", vpColor::yellow);

Here Hello world is displayed in the middle of the image.

How to export an image

As given in tutorial-export-image.cpp which source code is given below, we use vpDisplay::getImage() function to update the image with an overlay.

#include <visp/vpConfig.h>
#include <visp/vpImageIo.h>
#include <visp/vpDisplayX.h>
#include <visp/vpDisplayGTK.h>
#include <visp/vpDisplayGDI.h>
#include <visp/vpDisplayD3D.h>
#include <visp/vpDisplayOpenCV.h>
int main()
{
vpImage<unsigned char> I(240, 320, 255); // Create a black grey level image
vpImage<vpRGBa> Ioverlay;
// Depending on the detected third party libraries, we instantiate here the
// first video device which is available
#if defined(VISP_HAVE_X11)
#elif defined(VISP_HAVE_GTK)
#elif defined(VISP_HAVE_GDI)
#elif defined(VISP_HAVE_D3D9)
#elif defined(VISP_HAVE_OPENCV)
#endif
// Initialize the display with the image I. Display and image are
// now link together.
#ifdef VISP_HAVE_DISPLAY
d->init(I);
#endif
// Set the display background with image I content
// Draw a red rectangle in the display overlay (foreground)
vpDisplay::displayRectangle(I, 10, 10, 100, 20, vpColor::red, true);
// Flush the foreground and background display
// Updates the color image with the original loaded image and the overlay
vpDisplay::getImage(I, Ioverlay) ;
// Write the color image on the disk
std::cout << "Save image in overlay.ppm" << std::endl;
std::string ofilename("overlay.ppm");
vpImageIo::write(Ioverlay, ofilename) ;
// Wait for a click in the display window
std::cout << "A click to quit..." << std::endl;
#ifdef VISP_HAVE_DISPLAY
delete d;
#endif
}

How to handle keyboard events

As given in tutorial-event-keyboard.cpp which code is given below, we use vpDisplay::getKeyboardEvent() function to get the value of the key pressed.

#include <visp/vpConfig.h>
#include <visp/vpDisplayOpenCV.h>
#include <visp/vpDisplayX.h>
#include <visp/vpDisplayGTK.h>
#include <visp/vpDisplayGDI.h>
#include <visp/vpDisplayD3D.h>
int main()
{
vpImage<unsigned char> I(240, 320); // Create a black image
#if defined(VISP_HAVE_X11)
#elif defined(VISP_HAVE_GTK)
#elif defined(VISP_HAVE_GDI)
#elif defined(VISP_HAVE_D3D9)
#elif defined(VISP_HAVE_OPENCV)
#else
std::cout << "Sorry, no video device is available" << std::endl;
return -1;
#endif
// Initialize the display with the image I. Display and image are
// now link together.
#ifdef VISP_HAVE_DISPLAY
d->init(I);
#endif
// Set the display background with image I content
// Flush the foreground and background display
// Wait for keyboard event
std::cout << "Waiting a keyboard event..." << std::endl;
std::cout << "A keyboard event was detected" << std::endl;
// Non blocking keyboard event loop
int cpt_event = 0;
char key[10];
std::cout << "Enter a non blocking keyboard event detection loop..." << std::endl;
do {
bool event = vpDisplay::getKeyboardEvent(I, &key[0], false);
if (event) {
std::cout << "Key detected: " << key << std::endl;
cpt_event ++;
}
vpTime::wait(5); // wait 5 ms
} while(cpt_event < 5);
#ifdef VISP_HAVE_DISPLAY
delete d;
#endif
}

Next tutorial

You are now ready to see how to continue with Tutorial: Image frame grabbing.