Getting Started
In this tutorial, we'll create an Android app demonstrating AprilTag detection using the ViSP SDK. We assume that you've already created the SDK using this tutorial: Tutorial: Building ViSP SDK for Android.
This tutorial assumes you have the following software installed and configured:
Create an Android Project
If you're new to app development using Android Studio, we'll recommend this tutorial for getting acquainted to it. Following this tutorial create an Android Project with an Empty Activity. Make sure to keep minSdkVersion >= 21, since the SDK is not compatible with older versions. You're app's build.gradle file should look like:
android {
compileSdkVersion ...
defaultConfig {
applicationId "example.myapplication"
minSdkVersion 21
versionCode 1
versionName "1.0"
...
}
Importing ViSP SDK
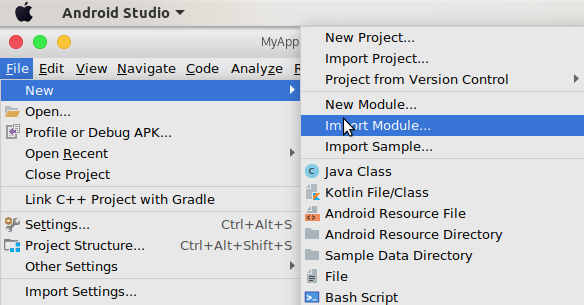
In Android Studio, head to File -> New -> Import Module option.
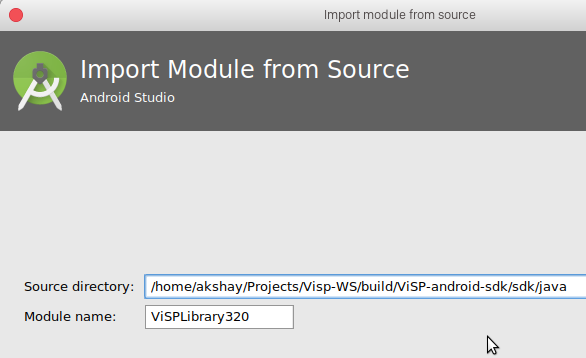
Head over to the directory where you've installed the SDK. Select sdk -> java folder and name the module.
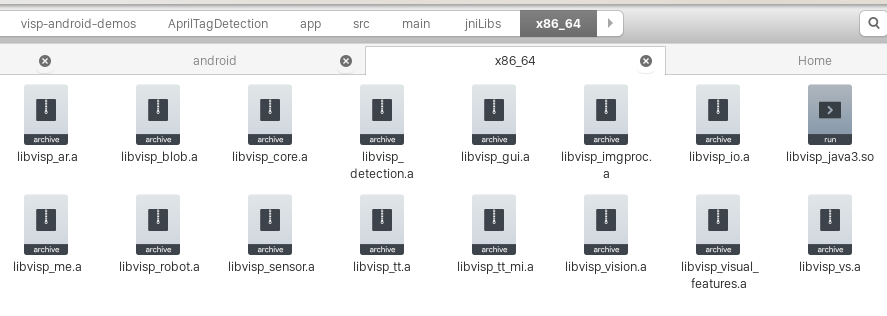
This only imports the Java code. You need to copy the libraries too (.so files in linux, .dll in windows and .dylib in mac). Create a folder named jniLibs in app/src/main folder. Then depending upon your emulator/device architecture (mostly x86 or x86_64), create a folder inside jniLibs and copy those libraries into your project.
Then in your MainActivity.java, you need to load ViSP libraries
public class MainActivity{
static {
System.loadLibrary("visp_java3");
}
...
}
Begin Camera Preview
Before you begin scanning, you need to ask user for Camera Permissions. Firstly in your manifest file, you need to include
<manifest xmlns:android="http://schemas.android.com/apk/res/android"
package="...">
<uses-permission android:name="android.permission.CAMERA" />
<uses-feature
android:name="android.hardware.camera"
android:required="true" />
<application ...>
...
</application>
</manifest>
Then, you need to add a runtime permission for accessing camera in MainActivity.java. Note that detection will execute only when user allows camera access
if (ActivityCompat.checkSelfPermission(this, Manifest.permission.CAMERA)
== PackageManager.PERMISSION_GRANTED) {
Intent intent = new Intent(this, CameraPreviewActivity.class);
startActivity(intent);
} else {
ActivityCompat.requestPermissions(this, new String[]{Manifest.permission.CAMERA},
PERMISSION_REQUEST_CAMERA);
}
And finally implement a request callback listener
public class MainActivity extends AppCompatActivity implements ActivityCompat.OnRequestPermissionsResultCallback {
...
@Override
public void onRequestPermissionsResult(int requestCode, @NonNull String[] permissions,
@NonNull int[] grantResults) {
if (requestCode == PERMISSION_REQUEST_CAMERA) {
if (grantResults.length == 1 && grantResults[0] == PackageManager.PERMISSION_GRANTED) {
Intent intent = new Intent(this, CameraPreviewActivity.class);
startActivity(intent);
} else {
}
}
}
...
}
Starting Camera Preview
Now create a new activity CameraPreview.java. This will call the camera API. The incident image is recieved as a byte array which can be easily manipulated for our purposes. We can render the resultant image as Java Bitmap in an ImageView element. In brief,
public class CameraPreviewActivity extends AppCompatActivity {
private Camera mCamera;
public static ImageView resultImageView;
...
@Override
protected void onCreate(Bundle savedInstanceState) {
super.onCreate(savedInstanceState);
mCamera = getCameraInstance(CAMERA_ID);
Camera.CameraInfo cameraInfo = new Camera.CameraInfo();
Camera.getCameraInfo(CAMERA_ID, cameraInfo);
if (mCamera == null) {
Toast.makeText(this, "Camera is not available.", Toast.LENGTH_SHORT).show();
setContentView(R.layout.camera_unavailable);
} else {
setContentView(R.layout.activity_camera_preview);
resultImageView = findViewById(R.id.resultImage);
...
final int displayRotation = getWindowManager().getDefaultDisplay()
.getRotation();
...
}
}
Now that we get access to Camera, we need to create a Camera Preview class that'll process the image for AprilTag detection. In brief,
public class CameraPreview extends SurfaceView implements SurfaceHolder.Callback, Camera.PreviewCallback {
private int w,h;
private VpCameraParameters cameraParameters;
private double tagSize;
public CameraPreview(Context context, Camera camera, Camera.CameraInfo cameraInfo,
int displayOrientation) {
super(context);
if (camera == null || cameraInfo == null) {
return;
}
mCamera = camera;
mCameraInfo = cameraInfo;
mDisplayOrientation = displayOrientation;
...
w = mCamera.getParameters().getPreviewSize().width;
h = mCamera.getParameters().getPreviewSize().height;
cameraParameters = new VpCameraParameters();
cameraParameters.initPersProjWithoutDistortion(615.1674805, 615.1675415, 312.1889954, 243.4373779);
tagSize = 0.053;
}
...
public void onPreviewFrame(byte[] data, Camera camera) {
if (System.currentTimeMillis() > 50 + lastTime) {
VpImageUChar imageUChar = new VpImageUChar(data,h,w,true);
VpDetectorAprilTag detectorAprilTag = new VpDetectorAprilTag();
List<VpHomogeneousMatrix> matrices = detectorAprilTag.detect(imageUChar,tagSize,cameraParameters);
Log.d("CameraPreview.java",matrices.size() + " tags detected");
updateResult(data);
lastTime = System.currentTimeMillis();
}
}
}
Note that the detector works on grayscale images. The camera API returns values for all pixels (R,G,B,A). Depending on the image format rendered in Android, we can convert those color values into grayscale. Refer this page, for a complete list of formats. Most commonly used format is NV21. In it, the first few bytes are grayscale values of the image and rest are used to compute the color image. So AprilTag detector process only first width*height bytes of the image as VpImageUChar.
Also, we're detecting tags every 50 milli-seconds. This is simple but efficient since actual tag dectection time will vary according to the image and should be an asynchronous task.
We need to change CameraPreviewActivity accordingly,
public class CameraPreviewActivity extends AppCompatActivity {
...
public static ImageView resultImageView;
static int w,h;
@Override
protected void onCreate(Bundle savedInstanceState) {
super.onCreate(savedInstanceState);
w = mCamera.getParameters().getPreviewSize().width;
h = mCamera.getParameters().getPreviewSize().height;
final int displayRotation = getWindowManager().getDefaultDisplay()
.getRotation();
CameraPreview mPreview = new CameraPreview(this, mCamera, cameraInfo, displayRotation);
FrameLayout preview = findViewById(R.id.camera_preview);
preview.addView(mPreview);
}
}
public static void updateResult(byte[] Src){
byte [] Bits = new byte[Src.length*4];
int i;
for(i=0;i<Src.length;i++){
Bits[i*4] = Bits[i*4+1] = Bits[i*4+2] = Src[i];
Bits[i*4+3] = -1;
}
Bitmap bm = Bitmap.createBitmap(w, h, Bitmap.Config.ARGB_8888);
bm.copyPixelsFromBuffer(ByteBuffer.wrap(Bits));
resultImageView.setImageBitmap(bm);
}
...
}
Note the inversion in updateResult method. Visp in C++ accepts image as sequence of RGBA values but Java Bitmap process them as ARGB.
Further Image manipulation
In this tutorial, we've developed a bare bones tag detection app. We can use OpenGL for Android to manipulate the image (for instance, drawing a 3D arrow on the tags) using the list of VpHomogeneous matrices. You can find the complete source code of above Android App here.


