Introduction
This tutorial will show you how to use the flood fill algorithm to fill connected areas in an image. This method is used for instance in raster graphics editor to perform the "bucket" fill tool.
The principle for a 2D image is the following:
- in input: a seed point, the pixel value to be replaced that forms the connected area, the pixel value to replace
- starting from a seed point
- explore the neighborhood looking for same pixel values
- replace the old pixel value by the desired one
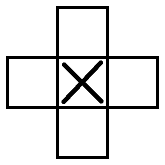
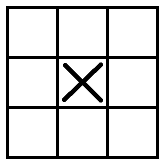
To explore the neighborhood, a 4-connexity or 8-connexity search are possible:

4-connexity

8-connexity
Example code
The following example also available in tutorial-flood-fill.cpp will mimic the "bucket" fill tool:
#include <cstdlib>
#include <iostream>
#include <visp3/core/vpConfig.h>
#include <visp3/core/vpImage.h>
#include <visp3/gui/vpDisplayFactory.h>
#if defined(VISP_HAVE_MODULE_IMGPROC) && defined(VISP_HAVE_DISPLAY)
#include <visp3/imgproc/vpImgproc.h>
#ifdef ENABLE_VISP_NAMESPACE
#endif
namespace
{
{
switch (octant) {
case 0:
break;
case 1:
break;
case 2:
break;
case 3:
break;
case 4:
break;
case 5:
break;
case 6:
break;
case 7:
break;
default:
break;
}
return imPt_switched;
}
{
switch (octant) {
case 0:
break;
case 1:
break;
case 2:
break;
case 3:
break;
case 4:
break;
case 5:
break;
case 6:
break;
case 7:
break;
default:
break;
}
return imPt_switched;
}
{
if (dx >= 0 && dy >= 0) {
if (dy >= dx) {
return 1;
}
else {
return 0;
}
}
else if (dx < 0 && dy >= 0) {
if (-dx >= dy) {
return 3;
}
else {
return 2;
}
}
else if (dx < 0 && dy < 0) {
if (dy <= dx) {
return 5;
}
else {
return 4;
}
}
else {
if (dx >= -dy) {
return 7;
}
else {
return 6;
}
}
}
{
int octant = getOctant(imPt1, imPt2);
imPt1 = switchToOctantZeroFrom(octant, imPt1);
imPt2 = switchToOctantZeroFrom(octant, imPt2);
double D = 2 * dy - dx;
double y = imPt1.
get_v();
for (
int x = (
int)imPt1.
get_u(); x <= (
int)imPt2.
get_u(); x++) {
currentPt = switchFromOctantZeroTo(octant, currentPt);
unsigned int i = std::min<unsigned int>(I.
getHeight() - 1, (
unsigned int)std::max<double>(0.0, currentPt.get_i()));
unsigned int j = std::min<unsigned int>(I.
getWidth() - 1, (
unsigned int)std::max<double>(0.0, currentPt.get_j()));
I[i][j] = value;
if (D >= 0) {
y++;
D -= dx;
}
D += dy;
}
}
}
#endif
int main()
{
#if defined(VISP_HAVE_MODULE_IMGPROC) && defined(VISP_HAVE_DISPLAY)
#if (VISP_CXX_STANDARD >= VISP_CXX_STANDARD_11)
#else
#endif
display->init(I, 0, 0, "Paint");
std::vector<vpPolygon> polygons;
for (int i = 0; i < 3; i++) {
std::stringstream ss;
ss << "Left click to draw polygon " << i + 1 << "/3"
<< ", right click to close the shape.";
polygons.push_back(polygon);
}
for (size_t i = 0; i < polygons.size(); i++) {
if (polygons[i].getCorners().size() <= 1)
continue;
for (size_t j = 0; j < polygons[i].getCorners().size() - 1; j++)
drawLine(mask, 255, polygons[i].getCorners()[j], polygons[i].getCorners()[j + 1]);
drawLine(mask, 255, polygons[i].getCorners().front(), polygons[i].getCorners().back());
}
bool quit = false;
while (!quit) {
"Left click on a pixel location to fill the "
"shape, right click to quit.",
{
switch (button) {
for (unsigned int cpt = 0; cpt < mask.getSize(); cpt++) {
if (mask.bitmap[cpt])
}
break;
quit = true;
break;
default:
break;
}
}
}
#if (VISP_CXX_STANDARD < VISP_CXX_STANDARD_11) && defined(VISP_HAVE_DISPLAY)
if (display != nullptr) {
delete display;
}
#endif
#endif
return EXIT_SUCCESS;
}
Class that defines generic functionalities for display.
static bool getClick(const vpImage< unsigned char > &I, bool blocking=true)
static void display(const vpImage< unsigned char > &I)
static void displayLine(const vpImage< unsigned char > &I, const vpImagePoint &ip1, const vpImagePoint &ip2, const vpColor &color, unsigned int thickness=1, bool segment=true)
static void getImage(const vpImage< unsigned char > &Is, vpImage< vpRGBa > &Id)
static void flush(const vpImage< unsigned char > &I)
static void displayText(const vpImage< unsigned char > &I, const vpImagePoint &ip, const std::string &s, const vpColor &color)
Class that defines a 2D point in an image. This class is useful for image processing and stores only ...
void set_uv(double u, double v)
unsigned int getWidth() const
Type * bitmap
points toward the bitmap
unsigned int getHeight() const
Defines a generic 2D polygon.
const std::vector< vpImagePoint > & getCorners() const
void initClick(const vpImage< unsigned char > &I, unsigned int size=5, const vpColor &color=vpColor::red, unsigned int thickness=1)
VISP_EXPORT void floodFill(VISP_NAMESPACE_ADDRESSING vpImage< unsigned char > &I, const VISP_NAMESPACE_ADDRESSING vpImagePoint &seedPoint, const unsigned char oldValue, const unsigned char newValue, const VISP_NAMESPACE_ADDRESSING vpImageMorphology::vpConnexityType &connexity=VISP_NAMESPACE_ADDRESSING vpImageMorphology::CONNEXITY_4)
std::shared_ptr< vpDisplay > createDisplay()
Return a smart pointer vpDisplay specialization if a GUI library is available or nullptr otherwise.
vpDisplay * allocateDisplay()
Return a newly allocated vpDisplay specialization if a GUI library is available or nullptr otherwise.
What the tutorial code does from the user side is:
- let the user draw 3 polygons on a raster (bitmap) image
- do the "bucket" fill tool when the user clicks on a pixel location
The flood fill function is provided in a vp:: namespace and accessible using this include:
#include <visp3/imgproc/vpImgproc.h>
The first thing to do is to create a raster image of 640x480 size:
These lines of code allows the user to click in the image to draw a polygon shape:
std::vector<vpPolygon> polygons;
for (int i = 0; i < 3; i++) {
std::stringstream ss;
ss << "Left click to draw polygon " << i + 1 << "/3"
<< ", right click to close the shape.";
polygons.push_back(polygon);
}
Now, we need to draw these polygons on a grayscale image (the current flood fill implementation needs a grayscale image) as the ViSP display is done on an internal image. This will be used as a mask: 255 pixel values are used for locations where we need to paint in the raster image.
For this, we can use the Bresenham's line algorithm to actually draw a line from a starting and ending point. The direct C++ implementation of the Bresenham's line algorithm is the following:
{
switch (octant) {
case 0:
break;
case 1:
break;
case 2:
break;
case 3:
break;
case 4:
break;
case 5:
break;
case 6:
break;
case 7:
break;
default:
break;
}
return imPt_switched;
}
{
switch (octant) {
case 0:
break;
case 1:
break;
case 2:
break;
case 3:
break;
case 4:
break;
case 5:
break;
case 6:
break;
case 7:
break;
default:
break;
}
return imPt_switched;
}
{
if (dx >= 0 && dy >= 0) {
if (dy >= dx) {
return 1;
}
else {
return 0;
}
}
else if (dx < 0 && dy >= 0) {
if (-dx >= dy) {
return 3;
}
else {
return 2;
}
}
else if (dx < 0 && dy < 0) {
if (dy <= dx) {
return 5;
}
else {
return 4;
}
}
else {
if (dx >= -dy) {
return 7;
}
else {
return 6;
}
}
}
{
int octant = getOctant(imPt1, imPt2);
imPt1 = switchToOctantZeroFrom(octant, imPt1);
imPt2 = switchToOctantZeroFrom(octant, imPt2);
double D = 2 * dy - dx;
double y = imPt1.
get_v();
for (
int x = (
int)imPt1.
get_u(); x <= (
int)imPt2.
get_u(); x++) {
currentPt = switchFromOctantZeroTo(octant, currentPt);
unsigned int i = std::min<unsigned int>(I.
getHeight() - 1, (
unsigned int)std::max<double>(0.0, currentPt.get_i()));
unsigned int j = std::min<unsigned int>(I.
getWidth() - 1, (
unsigned int)std::max<double>(0.0, currentPt.get_j()));
I[i][j] = value;
if (D >= 0) {
y++;
D -= dx;
}
D += dy;
}
}
Draw the polygon lines on a grayscale image is then simple:
for (size_t i = 0; i < polygons.size(); i++) {
if (polygons[i].getCorners().size() <= 1)
continue;
for (size_t j = 0; j < polygons[i].getCorners().size() - 1; j++)
drawLine(mask, 255, polygons[i].getCorners()[j], polygons[i].getCorners()[j + 1]);
drawLine(mask, 255, polygons[i].getCorners().front(), polygons[i].getCorners().back());
}
Now we need to be able to get the 2D image location when the user click on the image to select the seed point:
The flood fill is performed using the desired seed point and by replacing 0 pixel values by 255 values in the mask image. A 4-connexity is used as the 8-connexity will overflow due to the thin line drawing.
The final step is to update the raster image:
for (unsigned int cpt = 0; cpt < mask.getSize(); cpt++) {
if (mask.bitmap[cpt])
}
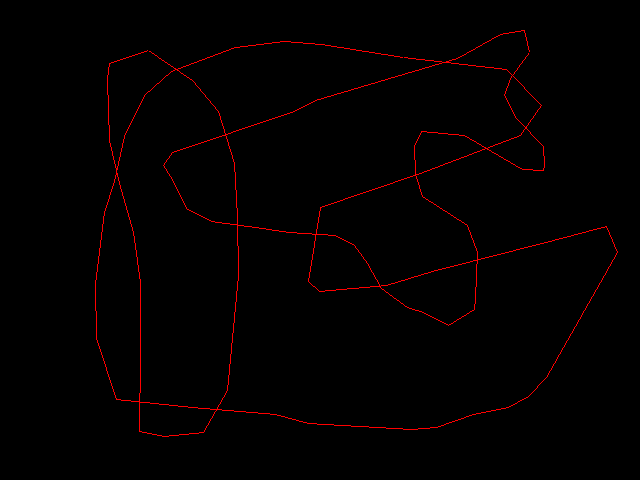
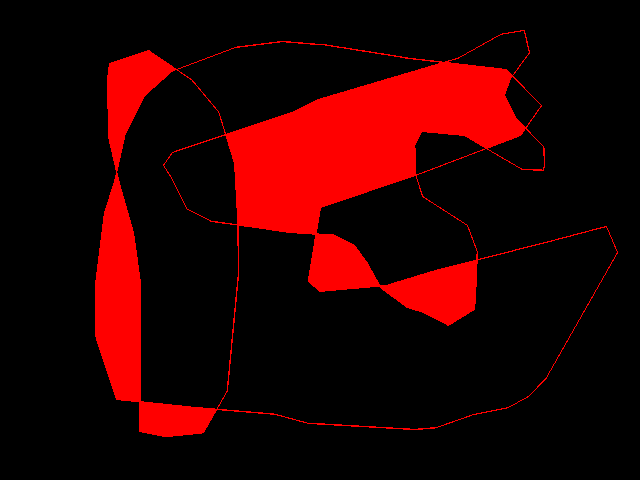
Here are some steps illustrated with images:

Polygons drawn by the user

Raster image after bucket fill
Next tutorial
You can now read the Practical example: count the number of coins in an image, for a final tutorial that will illustrate some of the image processing techniques presented in these tutorials on a specific use case: how to count the number of coins in an image.


