Visual Servoing Platform  version 3.6.1 under development (2024-04-19)
Tutorial: PBVS with a robot from Universal Robots

This tutorial explains also how to implement a position-based visual-servoing with an UR robot equipped with an Intel Realsense camera. It follows Tutorial: IBVS with a robot from Universal Robots that explains also how to setup the robot.

Position-based visual servoing

An example of position-based visual servoing using a robot from Universal Robots equipped with a Realsense camera is available in servoUniversalRobotsPBVS.cpp.

  • Attach your Realsense camera to the robot end-effector. To this end, we provide a CAD model of a support that could be 3D printed. The FreeCAD model is available here.
  • Put an Apriltag in the camera field of view
  • If not already done, follow Tutorial: Camera eye-to-hand extrinsic calibration to estimate $^e{\bf M}_c$, the homogeneous transformation between robot end-effector and camera frame. We suppose here that the file is located in apps/calibration/eMc.yaml.

Now enter in example/servo-universal-robots folder and run servoUniversalRobotsPBVS binary using --eMc to locate the file containing the $^e{\bf M}_c$ transformation. Other options are available. Using --help show them:

$ cd example/servo-universal-robots
$ ./servoUniversalRobotsPBVS --help
./servoUniversalRobotsPBVS [--ip <default 192.168.1.1>] [--tag_size <marker size in meter; default 0.12>] \
                           [--eMc <eMc extrinsic file>] [--quad_decimate <decimation; default 2>]         \
                           [--adaptive_gain] [--plot] [--task_sequencing] [--no-convergence-threshold]    \
                           [--verbose] [--help] [-h]

Run the binary activating the plot and using a constant gain:

$ ./servoUniversalRobotsPBVS --eMc ../../apps/calibration/ur_eMc.yaml --plot

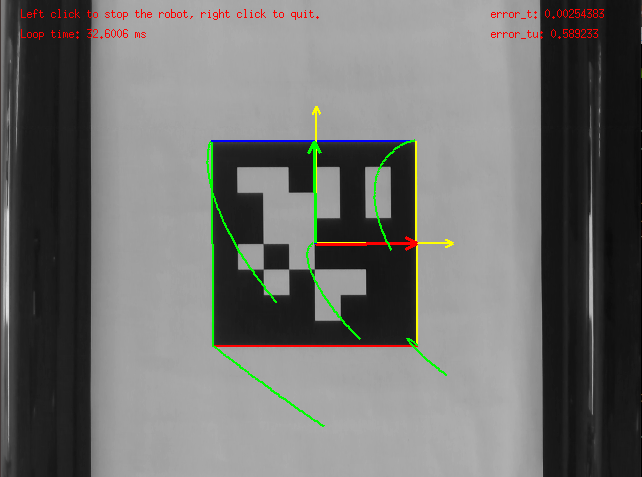
Use the left mouse click to enable the robot controller, and the right click to quit the binary.

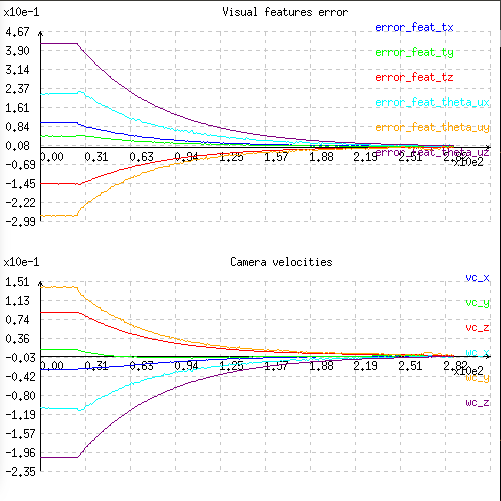
At this point the behaviour that you should observe is the following:

Legend: Example of initial position. The goal is here to bring the RGB frame attached to the tag over the yellow frame corresponding to the desired position of the tag in the camera frame.
Legend: Example of final position reached after position-based visual servoing. In green, you can see the trajectories in the image of the tag corners and tag cog. The latest correspond to the trajectory of the projection in the image of the tag frame origin. The 3D trajectory of this frame is a straight line when the camera extrinsic parameters are well calibrated.
Legend: Corresponding visual-features (translation and orientation of the cdMc homogeneous matrix corresponding to the transformation between the desired camera pose and the current one) and velocities applied to the robot in the camera frame. You can observe an exponential decrease of the visual features.

You can also activate an adaptive gain that will make the convergence faster:

$ ./servoUniversalRobotsPBVS --eMc ../../apps/calibration/ur_eMc.yaml --plot --adaptive_gain

You can also start the robot with a zero velocity at the beginning introducing task sequencing option:

$ ./servoUniversalRobotsPBVS --eMc ../../apps/calibration/ur_eMc.yaml --plot --task_sequencing

And finally you can activate the adaptive gain and task sequencing:

$ ./servoUniversalRobotsPBVS --eMc ../../apps/calibration/ur_eMc.yaml --plot --adaptive_gain --task_sequencing

Next tutorial

To learn more about adaptive gain and task sequencing see Tutorial: How to boost your visual servo control law.