Introduction
The HSV scale, which stands for Hue Saturation and Value, provides a numerical readout of your color image that corresponds to the color names contained therein. Hue is measured in degrees from 0 to 360, while Saturation and Value of a color are both analyzed on a scale of 0 to 100 percent.
Hue, Saturation, and Value are the main color properties that allow us to distinguish between different colors. In this tutorial, you will learn how to use HSV color scale to segment a specific color in an image.
Note that all the material (source code and images) described in this tutorial is part of ViSP source code (in tutorial/segmentation/color folder) and could be found in https://github.com/lagadic/visp/tree/master/tutorial/segmentation/color.
RGB to HSV color scale conversion
In ViSP, color images can be read and converted to the RGB color scale. The RGB color scale is based on the color theory that all visible colors can be obtained from the additive primary colors red, green and blue. In ViSP, we introduce an additional Alpha channel to add color transparency. The RGB + Alpha channels are therefore implemented in the vpRGBa class. The following snippet shows how to load a color image in ViSP:
#include <visp3/io/vpImageIo.h>
int main()
{
}
static void read(vpImage< unsigned char > &I, const std::string &filename, int backend=IO_DEFAULT_BACKEND)
The color conversion from RGB to HSV or from RGBa to HSV color scale is performed in ViSP using one of the following functions:
The following snippet shows how to convert to HSV color scale:
#include <visp3/io/vpImageIo.h>
#include <visp3/core/vpImageConvert.h>
int main()
{
reinterpret_cast<unsigned char *>(H.bitmap),
reinterpret_cast<unsigned char *>(S.bitmap),
reinterpret_cast<unsigned char *
>(V.bitmap), I.
getSize());
}
static void RGBaToHSV(const unsigned char *rgba, double *hue, double *saturation, double *value, unsigned int size)
unsigned int getWidth() const
unsigned int getSize() const
Type * bitmap
points toward the bitmap
unsigned int getHeight() const
In the previous example, we obtained for each pixel:
- Hue in
H image where values are scaled from 0 to 255. here 255 stands for 360 degrees.
- Saturation in
S image where values are scaled from 0 to 255. Here 255 stands for 100%.
- Value in
V image where values are scaled from 0 to 255. Here 255 stands for 100%.
HSV color segmentation
It's easy to segment a given color if we select the range of hue, saturation and value we're interested in.
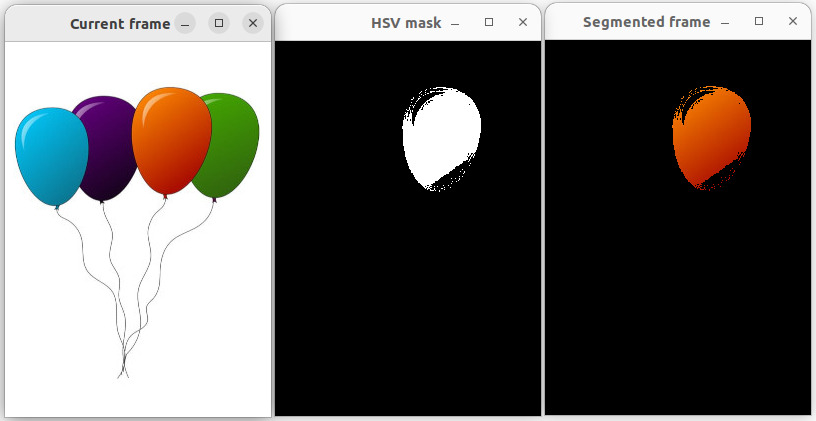
In the image ballons.jpg, the pixel at coordinates [93][164] has an RGB value (209, 72, 0) which corresponds to an HSV value (14, 255, 209). We can use these HSV values and an additional offset to determine the low and high values of the HSV ranges used to create a mask corresponding to the segmented color.
#include <visp3/io/vpImageIo.h>
#include <visp3/core/vpImageConvert.h>
#include <visp3/core/vpImageTools.h>
int main()
{
reinterpret_cast<unsigned char *>(H.bitmap),
reinterpret_cast<unsigned char *>(S.bitmap),
reinterpret_cast<unsigned char *
>(V.bitmap), I.
getSize());
int h = 14, s = 255, v = 209;
int offset = 30;
int h_low = std::max<int>(0, h - offset), h_high = std::min<int>(h + offset, 255);
int s_low = std::max<int>(0, s - offset), s_high = std::min<int>(s + offset, 255);
int v_low = std::max<int>(0, v - offset), v_high = std::min<int>(v + offset, 255);
std::vector<int> hsv_range({ h_low, h_high, s_low, s_high, v_low, v_high });
reinterpret_cast<unsigned char *>(S.bitmap),
reinterpret_cast<unsigned char *>(V.bitmap),
hsv_range,
reinterpret_cast<unsigned char *>(mask.bitmap),
mask.getSize());
}
Using the mask we can create a segmented color image. The following snippet shows how to combine the mask and the color image using vpImageTools::inMask() to create the segmented image as given in the next snippet also available in tutorial-hsv-segmentation-basic.cpp
#include <visp3/core/vpConfig.h>
#include <visp3/io/vpImageIo.h>
#include <visp3/core/vpImageConvert.h>
#include <visp3/core/vpImageTools.h>
#include <visp3/gui/vpDisplayX.h>
int main()
{
#ifdef ENABLE_VISP_NAMESPACE
#endif
reinterpret_cast<unsigned char *>(H.bitmap),
reinterpret_cast<unsigned char *>(S.bitmap),
reinterpret_cast<unsigned char *
>(V.bitmap), I.
getSize());
int h = 14, s = 255, v = 209;
int offset = 30;
int h_low = std::max<int>(0, h - offset), h_high = std::min<int>(h + offset, 255);
int s_low = std::max<int>(0, s - offset), s_high = std::min<int>(s + offset, 255);
int v_low = std::max<int>(0, v - offset), v_high = std::min<int>(v + offset, 255);
std::vector<int> hsv_range;
hsv_range.push_back(h_low);
hsv_range.push_back(h_high);
hsv_range.push_back(s_low);
hsv_range.push_back(s_high);
hsv_range.push_back(v_low);
hsv_range.push_back(v_high);
reinterpret_cast<unsigned char *>(S.bitmap),
reinterpret_cast<unsigned char *>(V.bitmap),
hsv_range,
reinterpret_cast<unsigned char *>(mask.bitmap),
mask.getSize());
#if defined(VISP_HAVE_X11)
vpDisplayX d_I(I, 0, 0, "Current frame");
vpDisplayX d_mask(mask, I.
getWidth()+75, 0,
"HSV mask");
vpDisplayX d_I_segmented(I_segmented, 2*mask.getWidth()+80, 0, "Segmented frame");
#endif
}
static bool getClick(const vpImage< unsigned char > &I, bool blocking=true)
static void display(const vpImage< unsigned char > &I)
static void flush(const vpImage< unsigned char > &I)
The end of the previous snippet shows also how to display the following images.
Next tutorial
You are now ready to see how to continue with Tutorial: HSV low/high range tuner tool.


