|
Visual Servoing Platform
version 3.4.0
|
|
Visual Servoing Platform
version 3.4.0
|
In this tutorial you will learn how to build ViSP framework for Universal Windows Platform (UWP) to include ViSP functionalities in apps developments that target a wide range of devices including PC, mobile, Xbox, HoloLens, IoT, and Surface Hub.
This tutorial has been tested on Windows 10 (64 bit), with CMake 3.13.1 and Visual Studio Community 2017.
Visual Studio Community 2017 could be downloaded from https://www.visualstudio.com/downloads/. During a fresh installation enable "Universal Windows App Development Tools". Without this workload, you won't be able to create your universal apps. After a fresh installation, start Visual Studio and create an empty C++ project to install the common tools for Visual C++ 2017.
If you already have Visual Studio Community 2017, you can check if "Universal Windows App Development" workload is activated following instructions given here that we resume:

After Visual Studio installation, you need to enable your Windows 10 device for development.
CMake could be download from http://www.cmake.org. Download the latest release for Windows win64-x64 platform (at the time this tuto was written it was the file cmake-3.13.1-win64-x64.msi). To install just double click on the msi file.
Install Git for Windows from https://git-for-windows.github.io/. This installation allows then to use git in a cmd Command Prompt.
If not already done, create a workspace that will contain all ViSP source, build, data set and optional 3rd parties. This workspace is here set to C:\visp-ws folder, but it could be set to any other location.
To create the workspace, open a cmd Command Prompt (a fast way to launch this window is to press the Win + R keys on your keyboard. Then, type cmd or cmd.exe and press Enter or click/tap OK) and run the following to create a workspace environment var named VISP_WS:
C:\> setx VISP_WS "C:\visp-ws"
C:\> exit
Open a new cmd Command Prompt and create the corresponding folder
C:\> mkdir %VISP_WS%
C:\> exit
There are different ways to get ViSP source code.
visp-x.y.z.tar.gz or visp-x.y.z.zip is downloaded, uncompress the file in %VISP_WS%\visp\visp-x.y.z using for axample WinRAR.%VISP_WS%\visp\visp-x.y.z using for axample WinRAR.git command line tool: C:\> cd %VISP_WS% C:\> git clone https://github.com/lagadic/visp.git
We suppose now that ViSP source is in %VISP_WS%\visp.
With CMake configure ViSP specifying options for cross compiling for "Windows Store" operating system in version "10" targeting a "x86" platform, by opening a cmd Command Prompt and running:
C:\> cd %VISP_WS%
C:\> mkdir visp-build-vc15-uwp-ws-10-x86
C:\> cd visp-build-vc15-uwp-ws-10-x86
C:\> cmake.exe -G "Visual Studio 15 2017" -A "Win32" -DCMAKE_SYSTEM_NAME:String=WindowsStore \
               -DCMAKE_SYSTEM_VERSION:String="10.0" -DBUILD_DEMOS=OFF -DBUILD_EXAMPLES=OFF   \
               -DBUILD_TESTS=OFF -DBUILD_TUTORIALS=OFF                                       \
               -DCMAKE_INSTALL_PREFIX=%VISP_WS%\visp-build-vc15-uwp-ws-10-install ..\visp
C:\> cmake --build . --config Release --target install
If everything goes right you will find ViSP libraries and headers in %VISP_WS%/visp-build-vc15-uwp-ws-10-install folder. Libraries are located in x86/vc15/bin subfolder and headers in include subfolder.
%VISP_WS%\visp-build-vc15-uwp-ws-10-x86 folder and just double click on VISP.sln solution file. This action will open ViSP solution in Visual Studio C++."Release" configuration and build "INSTALL" project. To this end, in Visual Studio right panel apply a left click on "INSTALL" to select the project, then a right click to enter in the "Build" menu. 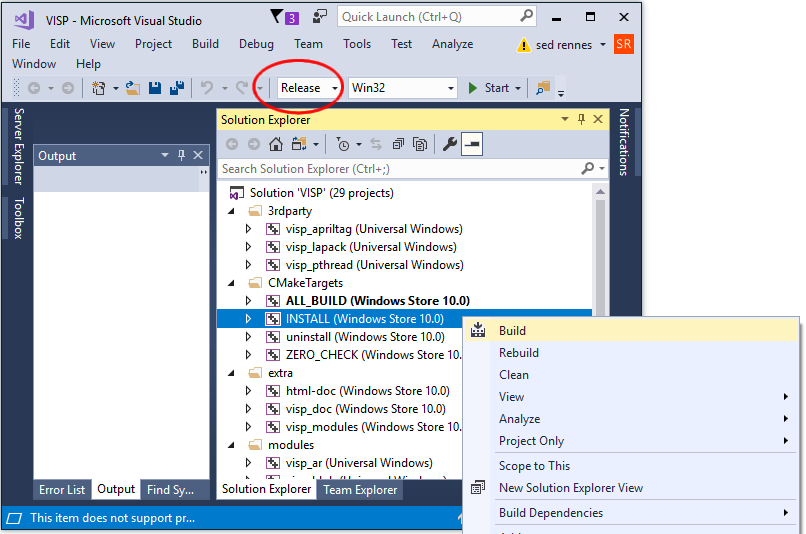
The same process could be applied except that during cmake configuration you have to use "Visual Studio 15 2017 Win64" generator. Installation folder is the same to ensure a unique installation folder for all the targeted platforms:
C:\> cd %VISP_WS%
C:\> mkdir visp-build-vc15-uwp-ws-10-x64
C:\> cd visp-build-vc15-uwp-ws-10-x64
C:\> cmake.exe -G "Visual Studio 15 2017" -A "x64" -DCMAKE_SYSTEM_NAME:String=WindowsStore \
               -DCMAKE_SYSTEM_VERSION:String="10.0" -DBUILD_DEMOS=OFF -DBUILD_EXAMPLES=OFF \
               -DBUILD_TESTS=OFF -DBUILD_TUTORIALS=OFF                                     \
               -DCMAKE_INSTALL_PREFIX=%VISP_WS%\visp-build-vc15-uwp-ws-10-install ..\visp
C:\> cmake --build . --config Release --target install
If everything goes right you will find ViSP libraries and headers in %VISP_WS%/visp-build-vc15-uwp-ws-10-install folder. Libraries are located in x64/vc15/bin subfolder and headers in include subfolder.
The same process could be applied except that during cmake configuration you have to use "Visual Studio 15 2017 ARM" generator. Installation folder is the same to ensure a unique installation folder for all the targeted platforms:
C:\> cd %VISP_WS%
C:\> mkdir visp-build-vc15-uwp-ws-10-arm
C:\> cd visp-build-vc15-uwp-ws-10-arm
C:\> cmake.exe -G "Visual Studio 15 2017" -A "ARM" -DCMAKE_SYSTEM_NAME:String=WindowsStore \
               -DCMAKE_SYSTEM_VERSION:String="10.0" -DBUILD_DEMOS=OFF -DBUILD_EXAMPLES=OFF \
               -DBUILD_TESTS=OFF -DBUILD_TUTORIALS=OFF \
               -DCMAKE_INSTALL_PREFIX=%VISP_WS%\visp-build-vc15-uwp-ws-10-install ..\visp
C:\> cmake --build . --config Release --target install
If everything goes right you will find ViSP libraries and headers in %VISP_WS%/visp-build-vc15-uwp-ws-10-install folder. Libraries are located in ARM/vc15/bin subfolder and headers in include subfolder.
In case you're trying to build Windows Store and Windows Phone 10.0 projects having only default Visual Studio 2017 installation you'll likely get the following error during cmake run:
A Windows Store component with CMake requires both the Windows Desktop SDK
as well as the Windows Store '10.0' SDK. Please make sure that you have
both installed
Follow Visual Studio installation instructions to activate "Universal Windows App Development" workload in order to resolve this issue.
 1.8.11
