|
Visual Servoing Platform
version 3.4.0
|
|
Visual Servoing Platform
version 3.4.0
|
Even with the detailed and tested Installation from source code tutorials, sometimes it is tough for people to get a system up and running with ViSP. That's why in this tutorial we explain how to get ready to use Docker images that contains ViSP source code with already build tests, examples and tutorials that you may just run to discover ViSP capabilities.
Our Docker images available on Docker Hub are around 1 GB in size (compressed size) and contain minimal things to discover and start to play with ViSP.
As mentioned here, to install Docker Engine on Ubuntu host using the repository, follow the instructions:
$ sudo apt-get update

$ sudo apt-get install \
    apt-transport-https \
    ca-certificates \
    curl \
    gnupg-agent \
    software-properties-common
$ curl -fsSL https://download.docker.com/linux/ubuntu/gpg | sudo apt-key add -
$ sudo add-apt-repository \
   "deb [arch=amd64] https://download.docker.com/linux/ubuntu \
   $(lsb_release -cs) \
   stable"
$ sudo apt-get update
$ sudo apt-get install docker-ce docker-ce-cli containerd.io
In Docker Hub we provide various ready to use Docker images with ViSP already built that could be used on an Ubuntu or MacOS host.
Dockerfile used to generate this image is available here.To use the docker image installed on an Ubuntu 18.04 system, use the following instructions:
$ docker pull vispci/vispci:ubuntu-18.04
$ docker run -it vispci/vispci:ubuntu-18.04
Within the container, ViSP workspace is installed in $HOME/visp-ws folder:
[root@7152a1ec64ba]# ls $HOME/visp-ws
visp  visp-build  visp-images
visp folder you will find a Github clone of the source code. To update its content with the last changes, run cd visp; git pullvisp-build folder you will find ViSP libraries and all the build binaries corresponding to the tests, examples and tutorials. If you updated visp folder content, don't forget to refresh your build with cd visp-build; cmake ../visp; makevisp-images folder you will find the dataset used by the tests and examples.Dockerfile used to generate this image is available here.To use the docker image installed on an Ubuntu 20.04 system, use the following instructions:
$ docker pull vispci/vispci:ubuntu-20.04
$ docker run -it vispci/vispci:ubuntu-20.04
Within the container, ViSP workspace is installed in $HOME/visp-ws folder:
[root@7152a1ec64ba]# ls $HOME/visp-ws
visp  visp-build  visp-images
visp folder you will find a Github clone of the source code. To update its content with the last changes, run cd visp; git pullvisp-build folder you will find ViSP libraries and all the build binaries corresponding to the tests, examples and tutorials. If you updated visp folder content, don't forget to refresh your build with cd visp-build; cmake ../visp; makevisp-images folder you will find the dataset used by the tests and examples.With Docker installed on a MacOS host, when you run ViSP binaries that open GUI window to display for example an image you will get the following error:
$ docker pull vispci/vispci:ubuntu-20.04
$ docker run -it vispci/vispci:ubuntu-20.04
[root@7152a1ec64ba]# cd $HOME/visp-ws/visp-build/tutorial/image
[root@7152a1ec64ba]# ./tutorial-viewer monkey.png
Catch an exception: Error [2]:  Can't connect display on server .
In order to run GUIs from the container, you will need to:
...
wlp2s0: flags=4163<UP,BROADCAST,RUNNING,MULTICAST>  mtu 1500
        inet 192.168.1.5  netmask 255.255.255.0  broadcast 192.168.1.255
...
$ xhost +
access control disabled, clients can connect from any host
$ docker run --device=/dev/video0:/dev/video0 -v /tmp/.X11-unix:/tmp/.X11-unix -e DISPLAY=$DISPLAY -it vispci/vispci:ubuntu-20.04
[root@7152a1ec64ba]# cd $HOME/visp-ws/visp-build/tutorial/image
[root@7152a1ec64ba]# ./tutorial-viewer monkey.png
A click to quit...

[root@7152a1ec64ba]# cd $HOME/visp-ws/visp-build/tutorial/grabber
[root@7152a1ec64ba]# ./tutorial-grabber-v4l2
Use device : 0
Recording  : disabled
Warning: cannot set input channel to 2
Image size : 640 480
or with this other tutorial
[root@7152a1ec64ba]# ./tutorial-grabber-opencv
Use device : 0
Recording  : disabled
With Docker installed on a MacOS host, when you run ViSP binaries that open GUI window to display for example an image you will get the following error:
$ docker pull vispci/vispci:ubuntu-20.04
$ docker run -it vispci/vispci:ubuntu-20.04
[root@7152a1ec64ba]# cd $HOME/visp-ws/visp-build/tutorial/image
[root@7152a1ec64ba]# ./tutorial-viewer monkey.png
Catch an exception: Error [2]:  Can't connect display on server .
In order to run GUIs from the container, you will need to:
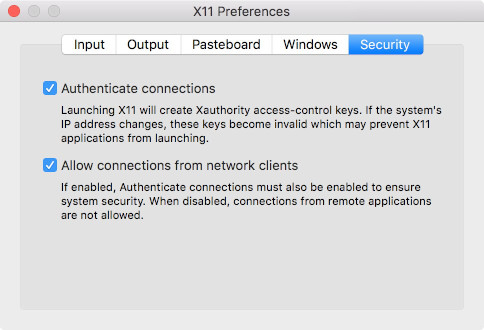
$ ifconfig en0 | grep inet | awk '$1=="inet" {print $2}'
192.168.1.18
$ xhost + 192.168.1.18
192.168.1.18 being added to access control list
$ docker run -it vispci/vispci:ubuntu-20.04
DISPLAY variable within your container. [root@7152a1ec64ba]# export DISPLAY=192.168.1.18:0
[root@7152a1ec64ba]# cd $HOME/visp-ws/visp-build/tutorial/image
[root@7152a1ec64ba]# ./tutorial-viewer monkey.png
A click to quit...
You are now ready to see the next Tutorial: How to create and build a project that uses ViSP and CMake on Unix or Windows that will show you how to use ViSP as a 3rd party to build your own project.
 1.8.11
