Visual Servoing Platform  version 3.3.0 under development (2020-02-17)
Tutorial: AprilTag marker detection on iOS

Introduction

This tutorial follows the Tutorial: AprilTag marker detection and shows how AprilTag marker detection could be achieved with ViSP on iOS devices.

In the next section you will find an example that show how to detect tags in a single image. To know how to print an AprilTag marker, see Print an AprilTag marker.

Note that all the material (Xcode project and image) described in this tutorial is part of ViSP source code and could be downloaded using the following command:

$ svn export https://github.com/lagadic/visp.git/trunk/tutorial/ios/StartedAprilTag

AprilTag detection and pose estimation (single image)

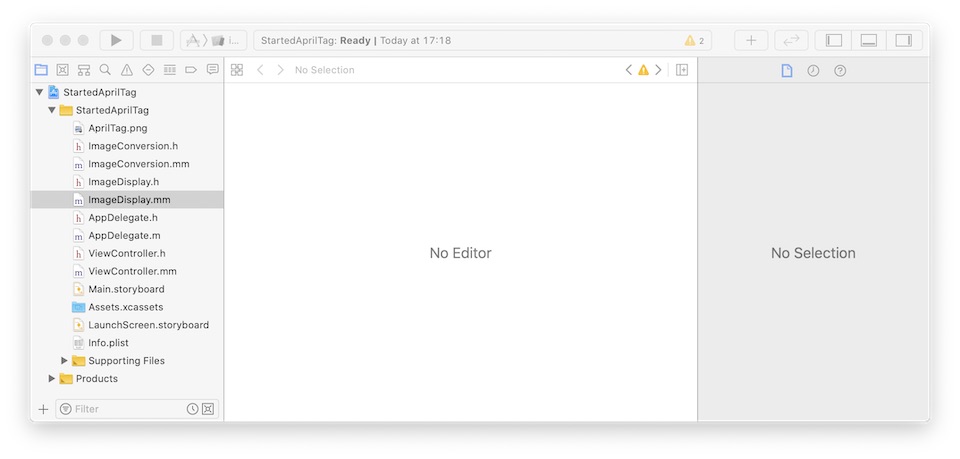
Let us consider the Xcode project named StartedAprilTag that is part of ViSP source code and located in $VISP_WS/tutorial/ios/StartedAprilTag. This project is a Xcode "Single view application" that contain ImageConversion.h and ImageConversion.mm to convert from/to UIImage to ViSP images (see Image conversion functions). It contains also ImageDisplay.h and ImageDisplay.mm files useful to display lines and frames in an image overlay, ViewController.mm that handles the tag detection, and an image AprilTag.png used as input.

To open this application, if you followed Tutorial: Installation from prebuilt packages for iOS devices simply run:

$ cd ~/framework
$ svn export https://github.com/lagadic/visp.git/trunk/tutorial/ios/StartedAprilTag
$ open ~/visp-ws/StartedImageProc -a Xcode

or if you already downloaded ViSP following Tutorial: Installation from source for iOS devices run:

$ open ~/framework/visp/tutorial/ios/StartedAprilTag -a Xcode

Here you should see something similar to:
img-detection-apriltag-ios-xcode.jpg

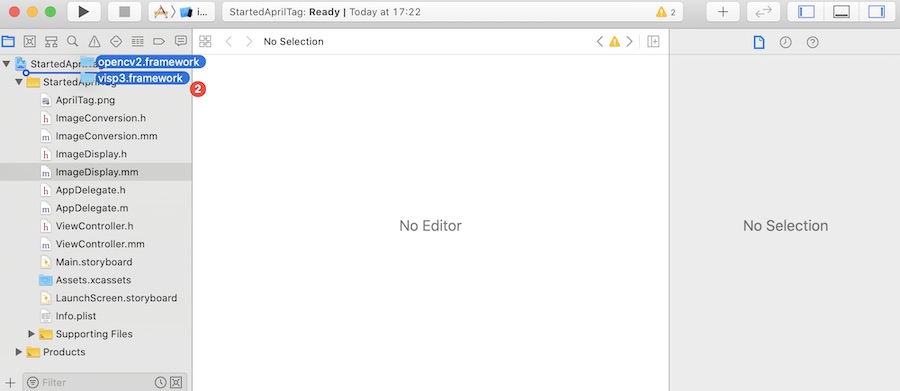
Once opened, you have just to drag & drop ViSP and OpenCV frameworks available in ~/framework/ios if you followed Tutorial: Installation from prebuilt packages for iOS devices.
img-detection-apriltag-ios-drag-drop.jpg

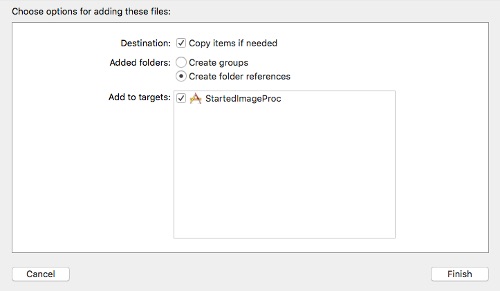
In the dialog box, enable check box "Copy item if needed" to add visp3.framework and opencv.framework to the project.
img-started-imgproc-ios-drag-drop-dialog.jpg

Now you should be able to build and run your application.

Image display functions

The Xcode project StartedAprilTag contains ImageDisplay.h and ImageDisplay.mm files that implement the functions to display a line or a frame in overlay of an UIImage.

Display a line

The following function implemented in ImageDisplay.mm show how to display a line.

// UIImage *image = <the image you want to add a line to>
// vpImagePoint &ip1 = Line first point
// vpImagePoint &ip2 = Line second point
// UIColor *color = <the color of the line>
// int tickness = <the tickness of the lines on the AprilTag contour>
+ (UIImage *)displayLine:(UIImage *)image :(vpImagePoint &)ip1 :(vpImagePoint &)ip2 :(UIColor*)color :(int)tickness
{
UIGraphicsBeginImageContext(image.size);
// Draw the original image as the background
[image drawAtPoint:CGPointMake(0,0)];
// Draw the line on top of original image
CGContextRef context = UIGraphicsGetCurrentContext();
CGContextSetLineWidth(context, tickness);
CGContextSetStrokeColorWithColor(context, [color CGColor]);
CGContextMoveToPoint(context, ip1.get_u(), ip1.get_v());
CGContextAddLineToPoint(context, ip2.get_u(), ip2.get_v());
CGContextStrokePath(context);
// Create new image
UIImage *retImage = UIGraphicsGetImageFromCurrentImageContext();
// Tidy up
UIGraphicsEndImageContext();
return retImage;
}

Display a 3D frame

The following function implemented in ImageDisplay.mm show how to display a 3D frame; red line for x, green for y and blue for z axis.

// UIImage *image = <the image you want to add a line to>
// vpHomogeneousMatrix cMo = <Homegeneous transformation>
// vpCameraParameters cam = <Camera parameters>
// double size = <Size of the frame in meter>
// int tickness = <the tickness of the lines describing the frame>
+ (UIImage *)displayFrame:(UIImage *)image :(const vpHomogeneousMatrix &)cMo :(const vpCameraParameters &)cam
:(double) size :(int)tickness
{
UIGraphicsBeginImageContext(image.size);
// Draw the original image as the background
[image drawAtPoint:CGPointMake(0,0)];
vpPoint o( 0.0, 0.0, 0.0);
vpPoint x(size, 0.0, 0.0);
vpPoint y( 0.0, size, 0.0);
vpPoint z( 0.0, 0.0, size);
o.track(cMo);
x.track(cMo);
y.track(cMo);
z.track(cMo);
vpImagePoint ipo, ip1;
vpMeterPixelConversion::convertPoint (cam, o.p[0], o.p[1], ipo);
// Draw red line on top of original image
vpMeterPixelConversion::convertPoint (cam, x.p[0], x.p[1], ip1);
CGContextRef context = UIGraphicsGetCurrentContext();
CGContextSetLineWidth(context, tickness);
CGContextSetStrokeColorWithColor(context, [[UIColor redColor] CGColor]);
CGContextMoveToPoint(context, ipo.get_u(), ipo.get_v());
CGContextAddLineToPoint(context, ip1.get_u(), ip1.get_v());
CGContextStrokePath(context);
// Draw green line on top of original image
vpMeterPixelConversion::convertPoint ( cam, y.p[0], y.p[1], ip1) ;
context = UIGraphicsGetCurrentContext();
CGContextSetLineWidth(context, tickness);
CGContextSetStrokeColorWithColor(context, [[UIColor greenColor] CGColor]);
CGContextMoveToPoint(context, ipo.get_u(), ipo.get_v());
CGContextAddLineToPoint(context, ip1.get_u(), ip1.get_v());
CGContextStrokePath(context);
// Draw blue line on top of original image
vpMeterPixelConversion::convertPoint ( cam, z.p[0], z.p[1], ip1) ;
context = UIGraphicsGetCurrentContext();
CGContextSetLineWidth(context, tickness);
CGContextSetStrokeColorWithColor(context, [[UIColor blueColor] CGColor]);
CGContextMoveToPoint(context, ipo.get_u(), ipo.get_v());
CGContextAddLineToPoint(context, ip1.get_u(), ip1.get_v());
CGContextStrokePath(context);
// Create new image
UIImage *retImage = UIGraphicsGetImageFromCurrentImageContext();
// Tidy up
UIGraphicsEndImageContext();
return retImage;
}

Application output

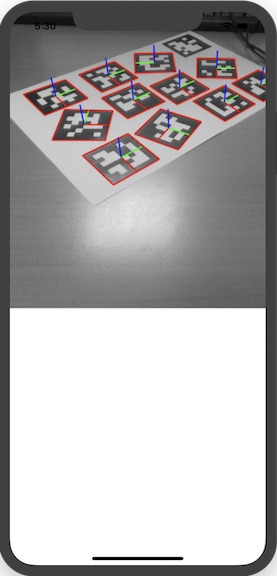
  • Now we are ready to build "StartedAprilTag" application using Xcode "Product>Build" menu.
  • Once build, if you run StartedAprilTag application on your device, you should be able to see the following screen shot:
img-detection-apriltag-ios-output.jpg

Known issues

iOS error: libxml/parser.h not found

Follow iOS error: libxml/parser.h not found link if you get this issue.

Next tutorial

You are now ready to follow Tutorial: AprilTag marker real-time detection on iOS that shows how to detect in realtime AprilTags from your iOS device camera.