In this tutorial you will learn how to install ViSP from source on Linux Fedora. These steps have been tested for Fedora 21 (64 bit) distribution, but should work with any other distribution as well.
- Note
- Concerning ViSP installation, we provide also other Tutorials.
Install prerequisities
- gcc 4.4.x or later. This can be istalled with:
$ su -c "dnf install gcc-c++"
- CMake 2.6 or higher that could be installed with:
$ su -c "dnf install cmake"
Install 3rd parties
ViSP is interfaced with several optional 3rd party libraries. The complete list is provided here.
Recommended 3rd parties
We recommend to install the following:
- OpenCV
$ su -c "dnf install opencv-devel"
- libX11 to be able to open a window to display images
$ su -c "dnf install libX11-devel"
- lapack to benefit from optimized mathematical capabilities
$ su -c "dnf install lapack-devel"
- libdc1394 to grab images from firewire cameras
$ su -c "dnf install libdc1394-devel"
- libv4l to grab images from usb or analogic cameras
$ su -c "dnf install libv4l-devel"
- libxml2 to be able to configure the model-based trackers from xml files
$ su -c "dnf install libxml2-devel"
- QR code detection
$ su -c "dnf install zbar-devel"
Other optional 3rd parties
We give also the way to install other 3rd party libraries to enable specific capabilities.
- Coin, to be able to support vrml cad model used by the model-based trackers
$ su -c "dnf install Coin3-devel"
- libjpeg, libpng to support jpeg and png images (only useful if OpenCV is not installed)
$ su -c "dnf install libjpeg-devel libpng-devel"
- ffmpeg, to be able to read or encode compressed video streams (only useful if OpenCV is not installed)
$ su -c "dnf install ffmpeg-devel"
- Ogre 3D if you want to do augmented reality or simulation
$ su -c "dnf install ogre-devel ogre-samples ois-devel"
- Datamatrix code detection
$ su -c "dnf install libdmtx-devel"
Install ViSP from source code
Getting ViSP source code
There are different ways to get ViSP source code:
- You can download the latest release as a zip or a tarball. Once downloaded, uncompress the file using either
$ tar xvzf visp-x.y.z.tar.gz
- You can also download a daily snapshot. Once downloaded, uncompress the file using
$ tar xvzf visp-snapshot-yyyy-mm-dd.tar.gz
- Or you get the cutting-edge ViSP from GitHub repository using the following command
We suppose now that ViSP source is in a directory denoted <source_dir>, for example $HOME/visp
Configuring ViSP from source
- Create first a directory denoted
<binary_dir> where you want to build ViSP. This directory will contain generated Makefiles, object files, and output libraries and binaries. $ cd $HOME; mkdir visp-build
- Enter the
<binary_dir> and configure the build: $ cd $HOME/visp-build
$ cmake ../visp
ccmake, the CMake GUI: The following image shows that this command allows to configure (just by pressing [c] key) the build in a more advanced way where some options could be easily turned On/Off. It allows also to see which are the 3rd parties that will be used. To generate the makefiles, just press [g] key in the ccmake gui.
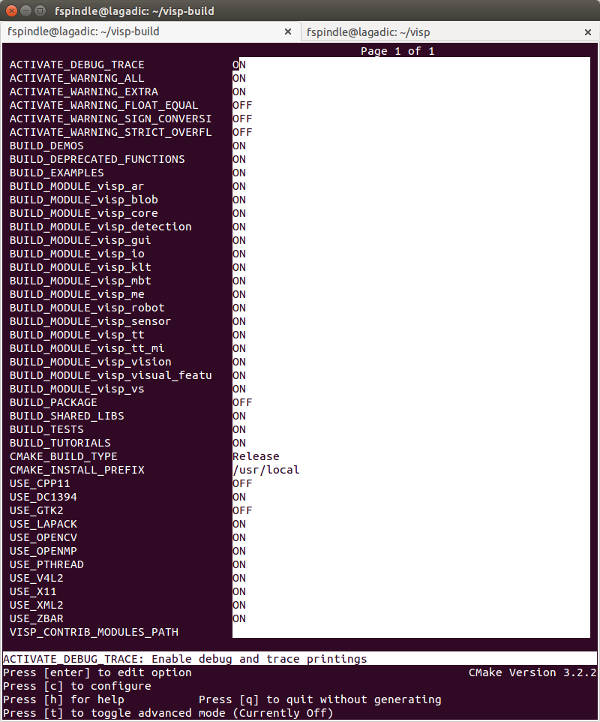
Snapshot of the ccmake
Now we can build ViSP.
Building ViSP libraries
- To build ViSP libraries proceed with:
- To install ViSP proceed with:
- Note
- This stage is optional, since ViSP could be used as a 3rd party without installation.
-
The default install location is set to
/usr/local. This location could be changed modifying CMAKE_INSTALL_PREFIX var.
Building ViSP documentation
- To build ViSP documentation, you have first to install Doxygen package:
$ su -c "dnf install doxygen graphviz"
$ cmake ../visp
$ make -j4 visp_doc
<binary_dir>/doc/html/index.html
- It is also possible to generate a more complete documentation that includes also all the internal classes. This could be achieved setting CMake var
ENABLE_FULL_DOC=ON like: $ cmake ../visp -DENABLE_FULL_DOC=ON
$ make -j4 visp_doc
Install ViSP dataset
Some ViSP examples and tests require data (images, video, models) that are not part of ViSP source code but available in a separate archive named ViSP-images-x.y.z.zip. This archive could be downloaded from http://visp.inria.fr/download page. We provide here after the way to install these data if you want to run ViSP examples.
$ cd $HOME
$ unzip ViSP-images-x.y.z.zip
We suppose now that the data are located in $HOME/ViSP-images.
$ ls $HOME/ViSP-images
Klimt README.md circle ellipse iv mbt mire-2
LICENSE.txt calibration cube ellipse-1 line mire video
Set VISP_INPUT_IMAGE_PATH environment variable to help ViSP examples and tests to find the location of the data set. It's convenient if the environment variables is automatically added to your bash session every time a new shell is launched:
$ echo "export VISP_INPUT_IMAGE_PATH=$HOME" >> ~/.bashrc
$ source ~/.bashrc
- Note
- For historical reasons
VISP_INPUT_IMAGE_PATH should not contain the folder ViSP-images, but the parent folder.
From now, you can try to run ViSP examples and tests. For example you can run displayX example that should open a windows with Klimt painting image and some overlay drawings:
$ cd $HOME/visp-build
$ ./example/device/display/displayX
A click to close the windows...
A click to display a cross...
Cross position: 201, 441
A click to exit the program...
Bye
Tips and tricks
How to uninstall ViSP
After ViSP installation, you can remove installed material using:
How to build only ViSP libraries
If you want to build only ViSP modules libraries, nor the examples, tutorials and tests:
How to build a ViSP specific module
If you want to build a given module and all the dependencies:
$ make -j4 visp_<module_name>
For example to build the model-based tracker module named mbt, run:
Which are the targets that could be run with make ?
To know which are the target available with make:
$ make help | grep visp
... visp_tests
... visp_demos
... visp_tutorials
... visp_examples
... visp_modules
... visp_doc
... visp_core
... visp_detection
... visp_gui
... visp_io
... visp_klt
... visp_me
... visp_robot
... visp_sensor
... visp_ar
... visp_blob
... visp_visual_features
... visp_vs
... visp_vision
... visp_mbt
... visp_tt
... visp_tt_mi
Which are the 3rd party libraries that are used in ViSP ?
To see which are the optional 3rd parties that are found during the configuration stage and that will be used by ViSP during the build you can have a look to the text file named ViSP-third-party.txt and located in <binary_dir>. We provide hereafter an example of a possible content of this file:
ViSP third-party libraries
Below you will find the list of third party libraries used to
build ViSP on your computer.
Mathematics:
Gnu Scientific Library : no
Lapack/blas : yes
Simulator:
Ogre simulator : no
\- Ogre3D : no
\- OIS : no
Coin simulator : no
\- Coin3D : no
\- SoWin : no
\- SoXt : no
\- SoQt : no
\- Qt4 : no
\- Qt3 : no
Robots
Afma6 : no
Afma4 : no
Biclops : no
Ptu46 : no
Pioneer : no
Viper S650 : no
Viper S850 : no
Video devices (display)
X11 : yes
GTK : no
OpenCV : yes
GDI : no
Direct3D : no
Framegrabbers
Firewire libdc1394-2.x : yes
Video For Linux Two : yes
DirectShow : no
CMU 1394 Digital Camera SDK : no
OpenCV : yes
Specific devices
Yarp : no
Kinect : no
\-libfreenect : no
\-libusb-1.0 : no
\-pthread : yes
Video and image Read/Write:
FFMPEG : no
libjpeg : no
libpng : no
Misc:
XML2 : yes
pthread : yes
OpenMP : yes
zbar : yes
dmtx : no
Documentation:
Doxygen : no
Graphviz dot : no
ViSP built with C++11 features: no
Next tutorial
You are now ready to see the next Tutorial: How to create and build a CMake project that uses ViSP on Unix or Windows that will show you how to use ViSP as a 3rd party to build your own project.
 1.8.6
1.8.6 
