ViSP  2.10.0
Tutorial: Blob tracking

Blob tracking

With ViSP you can track a blob using either vpDot or vpDot2 classes. By blob we mean a region of the image that has the same gray level. The blob can be white on a black background, or black on a white background.

In this tutorial we focus on vpDot2 class that provides more functionalities than vpDot class. As presented in section Blob auto detection and tracking, it allows especially to automize the detection of blobs that have the same characteristics than a reference blob.

The next videos show the result of ViSP blob tracker on two different objects:

In the next subsections we explain how to achieve this kind of tracking, first using a firewire live camera, then using a v4l2 live camera that can be an usb camera, or a Raspberry Pi camera module.

From a firewire live camera

The following code also available in tutorial-blob-tracker-live-firewire.cpp file provided in ViSP source code tree allows to grab images from a firewire camera and track a blob. The initialisation is done with a user mouse click on a pixel that belongs to the blob.

To acquire images from a firewire camera we use vp1394TwoGrabber class on unix-like systems or vp1394CMUGrabber class under Windows. These classes are described in the Tutorial: Image frame grabbing.

#include <visp/vp1394CMUGrabber.h>
#include <visp/vp1394TwoGrabber.h>
#include <visp/vpDisplayGDI.h>
#include <visp/vpDisplayOpenCV.h>
#include <visp/vpDisplayX.h>
#include <visp/vpDot2.h>
int main()
{
#if (defined(VISP_HAVE_DC1394_2) || defined(VISP_HAVE_CMU1394) || (VISP_HAVE_OPENCV_VERSION >= 0x020100)) && (defined(VISP_HAVE_X11) || defined(VISP_HAVE_GDI) || defined(VISP_HAVE_OPENCV))
vpImage<unsigned char> I; // Create a gray level image container
#if defined(VISP_HAVE_DC1394_2)
vp1394TwoGrabber g(false);
g.open(I);
#elif defined(VISP_HAVE_CMU1394)
g.open(I);
#elif defined(VISP_HAVE_OPENCV)
cv::VideoCapture g(0); // open the default camera
if(!g.isOpened()) { // check if we succeeded
std::cout << "Failed to open the camera" << std::endl;
return -1;
}
cv::Mat frame;
g >> frame; // get a new frame from camera
#endif
#if defined(VISP_HAVE_X11)
vpDisplayX d(I, 0, 0, "Camera view");
#elif defined(VISP_HAVE_GDI)
vpDisplayGDI d(I, 0, 0, "Camera view");
#elif defined(VISP_HAVE_OPENCV)
vpDisplayOpenCV d(I, 0, 0, "Camera view");
#endif
vpDot2 blob;
blob.setGraphics(true);
bool init_done = false;
while(1) {
try {
#if defined(VISP_HAVE_DC1394_2) || defined(VISP_HAVE_CMU1394)
g.acquire(I);
#elif defined(VISP_HAVE_OPENCV)
g >> frame;
#endif
if (! init_done) {
vpDisplay::displayText(I, vpImagePoint(10,10), "Click in the blob to initialize the tracker", vpColor::red);
if (vpDisplay::getClick(I, germ, false)) {
blob.initTracking(I, germ);
init_done = true;
}
}
else {
blob.track(I);
}
}
catch(...) {
init_done = false;
}
}
#endif
}

From now, we assume that you have successfully followed the Tutorial: How to create and build a CMake project that uses ViSP on Unix or Windows and the Tutorial: Image frame grabbing. Here after we explain the new lines that are introduced.

vpDot2 blob;

Then we are modifying some default settings to allow drawings in overlay the contours pixels and the position of the center of gravity with a thickness of 2 pixels.

blob.setGraphics(true);

Then we are waiting for a user initialization throw a mouse click event in the blob to track.

blob.initTracking(I, germ);

The tracker is now initialized. The tracking can be performed on new images:

blob.track(I);

From a v4l2 live camera

The following code also available in tutorial-blob-tracker-live-v4l2.cpp file provided in ViSP source code tree allows to grab images from a camera compatible with video for linux two driver (v4l2) and track a blob. Webcams or more generally USB cameras, but also the Raspberry Pi Camera Module can be considered.

To acquire images from a v4l2 camera we use vpV4l2Grabber class on unix-like systems. This class is described in the Tutorial: Image frame grabbing.

#include <visp/vpV4l2Grabber.h>
#include <visp/vpDisplayGDI.h>
#include <visp/vpDisplayGTK.h>
#include <visp/vpDisplayOpenCV.h>
#include <visp/vpDisplayX.h>
#include <visp/vpDot2.h>
int main()
{
#if ((defined(VISP_HAVE_V4L2) || (VISP_HAVE_OPENCV_VERSION >= 0x020100)) && (defined(VISP_HAVE_X11) || defined(VISP_HAVE_GDI) || defined(VISP_HAVE_OPENCV) || defined(VISP_HAVE_GTK)))
vpImage<unsigned char> I; // Create a gray level image container
#if defined(VISP_HAVE_V4L2)
g.open(I);
#elif defined(VISP_HAVE_OPENCV)
cv::VideoCapture g(0); // open the default camera
if(!g.isOpened()) { // check if we succeeded
std::cout << "Failed to open the camera" << std::endl;
return -1;
}
cv::Mat frame;
g >> frame; // get a new frame from camera
#endif
#if defined(VISP_HAVE_X11)
vpDisplayX d(I, 0, 0, "Camera view");
#elif defined(VISP_HAVE_GDI)
vpDisplayGDI d(I, 0, 0, "Camera view");
#elif defined(VISP_HAVE_OPENCV)
vpDisplayOpenCV d(I, 0, 0, "Camera view");
#elif defined(VISP_HAVE_GTK)
vpDisplayGTK d(I, 0, 0, "Camera view");
#endif
vpDot2 blob;
blob.setGraphics(true);
bool init_done = false;
std::cout << "Click!!!" << std::endl;
while(1) {
try {
#if defined(VISP_HAVE_V4L2)
g.acquire(I);
#elif defined(VISP_HAVE_OPENCV)
g >> frame;
#endif
if (! init_done) {
vpDisplay::displayText(I, vpImagePoint(10,10), "Click in the blob to initialize the tracker", vpColor::red);
if (vpDisplay::getClick(I, germ, false)) {
blob.initTracking(I, germ);
init_done = true;
}
}
else {
blob.track(I);
}
}
catch(...) {
init_done = false;
}
}
#endif
}

The code is the same than the one presented in the previous subsection, except that here we use the vpV4l2Grabber class to grab images from usb cameras. Here we have also modified the while loop in order to catch an exception when the tracker fail:

try { blob.track(I); }
catch(...) { }

If possible, it allows the tracker to overcome a previous tracking failure (due to blur, blob outside the image,...) on the next available images.

Blob auto detection and tracking

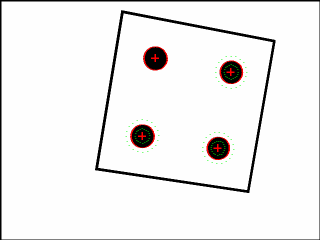
The following example also available in tutorial-blob-auto-tracker.cpp file provided in ViSP source code tree shows how to detect blobs in the first image and then track all the detected blobs. This functionality is only available with vpDot2 class. Here we consider an image that is provided in ViSP source tree.

#include <visp/vpDisplayGDI.h>
#include <visp/vpDisplayOpenCV.h>
#include <visp/vpDisplayX.h>
#include <visp/vpDot2.h>
#include <visp/vpImageIo.h>
int main()
{
try {
bool learn = false;
vpImage<unsigned char> I; // Create a gray level image container
vpImageIo::read(I, "./target.pgm");
#if defined(VISP_HAVE_X11)
vpDisplayX d(I, 0, 0, "Camera view");
#elif defined(VISP_HAVE_GDI)
vpDisplayGDI d(I, 0, 0, "Camera view");
#elif defined(VISP_HAVE_OPENCV)
vpDisplayOpenCV d(I, 0, 0, "Camera view");
#else
std::cout << "No image viewer is available..." << std::endl;
#endif
vpDot2 blob;
if (learn) {
// Learn the characteristics of the blob to auto detect
blob.setGraphics(true);
blob.initTracking(I);
blob.track(I);
std::cout << "Blob characteristics: " << std::endl;
std::cout << " width : " << blob.getWidth() << std::endl;
std::cout << " height: " << blob.getHeight() << std::endl;
#if VISP_VERSION_INT > VP_VERSION_INT(2,7,0)
std::cout << " area: " << blob.getArea() << std::endl;
#endif
std::cout << " gray level min: " << blob.getGrayLevelMin() << std::endl;
std::cout << " gray level max: " << blob.getGrayLevelMax() << std::endl;
std::cout << " grayLevelPrecision: " << blob.getGrayLevelPrecision() << std::endl;
std::cout << " sizePrecision: " << blob.getSizePrecision() << std::endl;
std::cout << " ellipsoidShapePrecision: " << blob.getEllipsoidShapePrecision() << std::endl;
}
else {
// Set blob characteristics for the auto detection
blob.setWidth(50);
blob.setHeight(50);
#if VISP_VERSION_INT > VP_VERSION_INT(2,7,0)
blob.setArea(1700);
#endif
blob.setGrayLevelMin(0);
blob.setGrayLevelMax(30);
blob.setSizePrecision(0.65);
}
std::list<vpDot2> blob_list;
blob.searchDotsInArea(I, 0, 0, I.getWidth(), I.getHeight(), blob_list);
if (learn) {
// The blob that is tracked by initTracking() is not in the list of auto detected blobs
// We add it:
blob_list.push_back(blob);
}
std::cout << "Number of auto detected blob: " << blob_list.size() << std::endl;
std::cout << "A click to exit..." << std::endl;
while(1) {
for(std::list<vpDot2>::iterator it=blob_list.begin(); it != blob_list.end(); ++it) {
(*it).setGraphics(true);
(*it).setGraphicsThickness(3);
(*it).track(I);
}
if (vpDisplay::getClick(I, false))
break;
}
}
catch(vpException e) {
std::cout << "Catch an exception: " << e << std::endl;
}
}

Here is a screen shot of the resulting program :

img-blob-auto-detection.png

And here is the detailed explanation of the source :

First we create an instance of the tracker.

vpDot2 blob;

Then, two cases are handled. The first case, when learn is set to true, consists in learning the blob characteristics. The user has to click in a blob that serves as reference blob. The size, area, gray level min and max, and some precision parameters will than be used to search similar blobs in the whole image.

if (learn) {
// Learn the characteristics of the blob to auto detect
blob.setGraphics(true);
blob.initTracking(I);
blob.track(I);
std::cout << "Blob characteristics: " << std::endl;
std::cout << " width : " << blob.getWidth() << std::endl;
std::cout << " height: " << blob.getHeight() << std::endl;
#if VISP_VERSION_INT > VP_VERSION_INT(2,7,0)
std::cout << " area: " << blob.getArea() << std::endl;
#endif
std::cout << " gray level min: " << blob.getGrayLevelMin() << std::endl;
std::cout << " gray level max: " << blob.getGrayLevelMax() << std::endl;
std::cout << " grayLevelPrecision: " << blob.getGrayLevelPrecision() << std::endl;
std::cout << " sizePrecision: " << blob.getSizePrecision() << std::endl;
std::cout << " ellipsoidShapePrecision: " << blob.getEllipsoidShapePrecision() << std::endl;
}

If you have an precise idea of the dimensions of the blob to search, the second case consists is settings the reference characteristics directly.

else {
// Set blob characteristics for the auto detection
blob.setWidth(50);
blob.setHeight(50);
#if VISP_VERSION_INT > VP_VERSION_INT(2,7,0)
blob.setArea(1700);
#endif
blob.setGrayLevelMin(0);
blob.setGrayLevelMax(30);
blob.setSizePrecision(0.65);
}

Once the blob characteristics are known, to search similar blobs in the image is simply done by:

std::list<vpDot2> blob_list;
blob.searchDotsInArea(I, 0, 0, I.getWidth(), I.getHeight(), blob_list);

Here blob_list contains the list of the blobs that are detected in the image I. When learning is enabled, the blob that is tracked is not in the list of auto detected blobs. We add it to the end of the list:

if (learn) {
// The blob that is tracked by initTracking() is not in the list of auto detected blobs
// We add it:
blob_list.push_back(blob);
}

Finally, when a new image is available we do the tracking of all the blobs:

for(std::list<vpDot2>::iterator it=blob_list.begin(); it != blob_list.end(); ++it) {
(*it).setGraphics(true);
(*it).setGraphicsThickness(3);
(*it).track(I);
}

You are now ready to see the next Tutorial: Keypoint tracking.