In this tutorial you will learn how to install ViSP from source on Raspberry Pi 1 or Pi 2 equipped with an optional HD camera module.
In a first section we give some useful instructions to start with a Raspberry PI. Then in the second section, we focus on the installation of ViSP from source.
- Note
- Concerning ViSP installation, we provide also other Tutorials.
Raspberry Pi installation
Setting up Raspberry Pi
There are a lot of documentation and tutorial that explain different ways to setup a Raspberry Pi. A good reference is the official page http://www.raspberrypi.org
We suggest to start with NOOBS (New Out Of the Box Software). Bellow we resume the different steps that are fully described in http://www.raspberrypi.org/help/noobs-setup:
- Format you SD card (at least 4Go are requested) on your computer. To this end you can use "GParted partition editor" under Ubuntu.
- Download Noobs "Offline and network install" zip file from http://www.raspberrypi.org/downloads.
- Unzip all the files on the SD card.
- Insert your SD Card into your Raspberry Pi.
- Plug in your keyboard, mouse, monitor and Ethernet cables.
- Now plug in the USB power cable to your Pi.
- Your Raspberry Pi will boot, and a window will appear with a list of different operating systems that you can install. Select the "recommended Raspbian" checkbox and click on "Install" button.
- When the install process has completed, the Raspberry Pi configuration menu (raspi-config) will load. Here you are able to set the time and date for your region and enable a Raspberry Pi camera board, or even create users. You can exit this menu by using Tab on your keyboard to move to Finish.
Logging in
The default login for Raspbian is username pi with the password raspberry.
Update your Raspbian distribution
If your Raspberry Pi is connected to Ethernet you can update your Raspbian distribution:
sudo apt-get update
sudo apt-get upgrade
Setting up a Raspberry Pi camera
If you have a Raspberry Pi camera module see http://www.raspberrypi.org/help/camera-module-setup. To resume, enable the camera using:
Enter in menu 5/ to enable the camera.
Then load the camera module:
sudo modprobe bcm2835-v4l2
This will add the following modules:
pi@raspberrypi ~ $ lsmod
Module Size Used by
bcm2835_v4l2 37611 0
videobuf2_core 30853 1 bcm2835_v4l2
v4l2_common 7792 1 bcm2835_v4l2
videodev 121362 3 bcm2835_v4l2,v4l2_common,videobuf2_core
To check if the camera is recognized and connected, run:
After each Raspberry Pi reboot you need to relaunch the previous modprobe command. To load bcm2835-v4l2 module during reboot, you can edit /etc/modules file
and add a line with the name of the module:
Start graphical user interface
To load the graphical user interface, type startx and press Enter on your keyboard. This will later allow to use ViSP vpDisplayX or vpDisplayOpenCV classes useful to display images in a X11 window.
ViSP installation
Prerequisities
First you need to install the following packagages (g++, CMake, Subversion) that are requested to get and build ViSP:
sudo apt-get install build-essential cmake-curses-gui subversion
Then you can install the following packages (X11, lapack, gsl, v4l, xml, png, jpeg, opencv), that correspond to the optional 3rd party libraries that are interfaced with ViSP:
sudo apt-get install libx11-dev liblapack-dev libgsl0-dev libv4l-dev libxml2-dev libpng12-dev libjpeg-dev libopencv-dev
The complete list of 3rd party libraries is detailed following http://team.inria.fr/lagadic/visp/libraries.html link.
Getting ViSP source code
There are different ways to get ViSP source code on Raspberry Pi:
- You can download the latest stable release tarball. Once downloaded, uncompress the file using:
mkdir /home/pi/soft; cd /home/pi/soft
wget http:
tar xvzf ViSP-2.10.0.tar.gz
- You can also download the cutting-edge version of the source code from Subversion repository using:
mkdir /home/pi/soft; cd /home/pi/soft
svn checkout svn:
We suppose now that ViSP source is in a directory denoted <source_dir>, for example /home/pi/soft/ViSP-2.10.0 or /home/pi/soft/ViSP-trunk
Configuring ViSP from source
- Create first a directory denoted <binary_dir> where you want to build ViSP. This directory will contain generated Makefiles, object files, and output libraries and binaries.
cd /home/pi/soft; mkdir ViSP-build-release
- Enter the <binary_dir> and configure the build type:
cmake [<optional parameters>] <source_dir>
cd /home/pi/soft/ViSP-build-release
cmake -DCMAKE_BUILD_TYPE=RELEASE -DBUILD_SHARED_LIBS=ON ../ViSP-2.10.0
ccmake, the CMake GUI: The following image shows that this command allows to configure (just by pressing [c] key) the build in a more advanced way where some options could be easily turned On/Off. It allows also to see which are the 3rd parties that will be used. Then to generate the makefiles, just press [g] key in the ccmake gui.
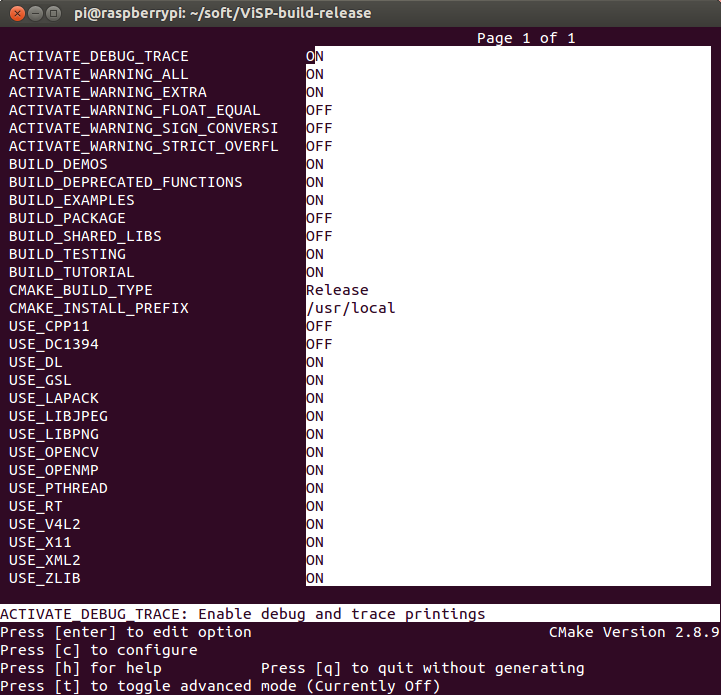
Snapshot of the ccmake
- There is an other way to see which are the 3rd parties that are found during the configuration stage and that will be used by ViSP during the build. To this end you can have a look to the text file named ViSP-third-party.txt and located in <binary_dir>. We provide hereafter an example of a possible content of this file:
ViSP third-party libraries
Below you will find the list of third party libraries used to
build ViSP on your computer.
Mathematics:
Gnu Scientific Library : yes
Lapack/blas : yes
Simulator:
Ogre simulator : no
\- Ogre3D : no
\- OIS : no
Coin simulator :
\- Coin3D : no
\- SoWin : no
\- SoXt : no
\- SoQt : no
\- Qt4 : no
\- Qt3 : no
Robots
Afma6 : no
Afma4 : no
Biclops : no
Ptu46 : no
Pioneer : no
Viper S650 : no
Viper S850 : no
Video devices (display)
X11 : yes
GTK : no
OpenCV : yes
GDI : no
Direct3D : no
Framegrabbers
Firewire libdc1394-2.x : no
Video For Linux Two : yes
DirectShow : no
CMU 1394 Digital Camera SDK : no
OpenCV : yes
Specific devices
Yarp : no
Kinect : no
\-libfreenect : no
\-libusb-1.0 : no
\-pthread : yes
Video and image Read/Write:
FFMPEG : no
libjpeg : yes
libpng : yes
Misc:
XML2 : yes
pthread : yes
OpenMP : yes
zbar : no
dmtx : no
Documentation:
Doxygen : no
Graphviz dot : no
ViSP built with C++11 features: no
Building ViSP from source
- To build ViSP proceed with:
- To install ViSP proceed with:
- To build ViSP documentation, you have first to install Doxygen package:
sudo apt-get install doxygen graphviz texlive-latex-base
You are now ready to see the next Tutorial: How to create and build a CMake project that uses ViSP on Unix or Windows that will show you how to use ViSP as a 3rd party to build your own project on Raspberry Pi or on any other system. Then if you have a Raspberry Pi camera module, you can also follow the Tutorial: Blob tracking especially subsection Tracking form v4l2 live cameras.
 1.8.9.1
