ViSP  2.10.0
Tutorial: How to create and build a CMake project that uses ViSP on iOS
Note
We assume that you have successfully installed ViSP as described in the previous Tutorial: Installation from source on OSX for iOS devices.

Add ViSP library into your project

Create a new single view Xcode project.
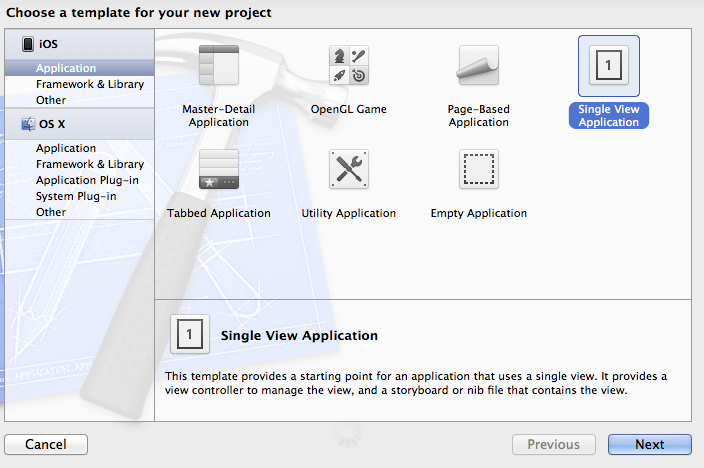
img-getting-started-iOS-create.png

Add <lib_folder> a lib folder in your project.

Copy the libvisp.a file in <lib_folder>. You'll find libvisp.a in the VISP.xcodeproj folder in lib –> Debug.

Go to your Xcode project Settings and edit the Build Phases by adding libvisp.a in "Link Binary With Libraries".

img-getting-started-iOS-lib.png

Copy ViSP header into your project

Add <header_folder> a header folder in your project.

Go to ViSP source code in "include" folder and copy the "visp" folder in your project <header_folder>.

Go to your Xcode project Settings and edit the Build Settings by adding your <header_folder> path in the "Header Search Paths".
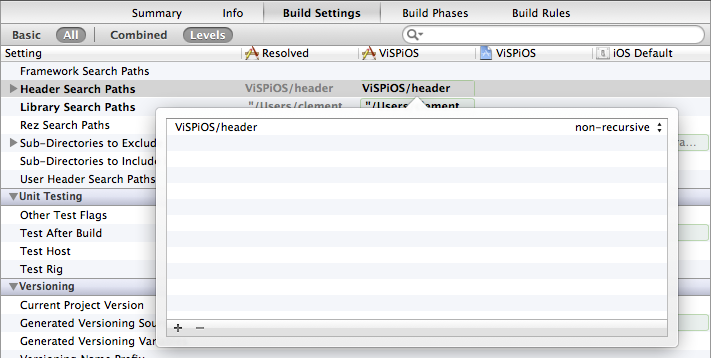
img-getting-started-iOS-header.png

Use ViSP in your project

Because we will mix Objective C and C++ Code, rename your ViewController.m in ViewController.mm.

You will also have to add the Accelerate.framework in your project in order to be able to execute the specific visp code we will use. Go to your Xcode project Settings and edit the Build Phases by adding Accelerate.framework in "Link Binary With Libraries".
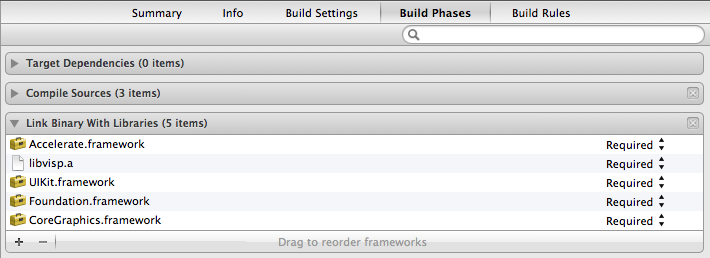
img-getting-started-iOS-accelerate.png

Here is the detailed explanation of the source, line by line :

#include <vector>
#include <visp/vpConfig.h>
#include <visp/vpHomography.h>
#include <visp/vpMeterPixelConversion.h>

Include all the headers for homography computation in ViewController.mm.

#pragma mark - ViSP Methods
- (void)processTutorialHomography{
std::vector<vpPoint> oP(4), aP(4), bP(4);
double L = 0.1;
oP[0].setWorldCoordinates( -L,-L, 0);
oP[1].setWorldCoordinates(2*L,-L, 0);
oP[2].setWorldCoordinates( L, 3*L, 0);
oP[3].setWorldCoordinates( -L, 4*L, 0);
vpHomogeneousMatrix bMo(0,0, 1, 0, 0, 0) ;
vpHomogeneousMatrix aMb(0.2, 0, 0.1, 0,vpMath::rad(20), 0) ;
vpHomogeneousMatrix aMo = aMb*bMo ;
// Normalized coordinates of points in the image frame
double xa[4], ya[4], xb[4], yb[4];
for(int i=0 ; i < 4; i++){
oP[i].project(aMo);
xa[i] = oP[i].get_x();
ya[i] = oP[i].get_y();
oP[i].project(bMo);
xb[i] = oP[i].get_x();
yb[i] = oP[i].get_y();
}
// Compute the homography
vpHomography::HartleyDLT(4, xb, yb, xa, ya, aHb);
std::cout << "Homography:\n" << aHb << std::endl;
// Compute the 3D transformation
aHb.computeDisplacement(aRb, atb, n);
std::cout << "atb: " << atb.t() << std::endl;
// Compute coordinates in pixels of point 3
double ua, va, ub, vb;
vpMeterPixelConversion::convertPoint(cam, xb[3], yb[3], ub, vb);
vpMeterPixelConversion::convertPoint(cam, xa[3], ya[3], ua, va);
std::cout << "Point 3 in pixels in frame b: " << "(" << ub << ", " << vb << ")" << std::endl;
std::cout << "Point 3 in pixels in frame a: " << "(" << ua << ", " << va << ")" << std::endl;
// Estimate the position in pixel of point 3 from the homography
vpMatrix H = cam.get_K() * aHb * cam.get_K_inverse();
double z = ub * H[2][0] + vb * H[2][1] + H[2][2];
ua = (ub * H[0][0] + vb * H[0][1] + H[0][2]) / z;
va = (ub * H[1][0] + vb * H[1][1] + H[1][2]) / z;
std::cout << "Estimated pixel position of point 3 frame a: " << "(" << ua << ", " << va << ")" << std::endl;
}

Create a new method with the homography computation from visp.

- (void)viewDidLoad
{
[super viewDidLoad];
// Do any additional setup after loading the view, typically from a nib.
[self processTutorialHomography];
}

Call the method in the viewDidLoad of your ViewController.

You can now Build and Run your code (Simulator or device does not bother because we are just executing code).

img-getting-started-iOS-log.png

You should obtain these logs showing that visp code was correctly executed by your iOS project.