Introduction
This tutorial shows how to use the vpPclViewer class.
In the next section you will find an example that shows how to display two point clouds, with one having attached confidence weights, either in blocking-mode or threaded-mode display.
The program first generate a polynomial surface, whose coordinates are expressed in the object frame. Then, a second surface is generated. It corresponds to the first surface, moved in another coordinates frame. Some noise is added to this second surface, to simulate sensor innacuracy. Then, M-estimation based on Tukey M-estimator is performed using the vpRobust class in order not to display the noisy points in the viewer. Finally, the point clouds are displayed using the vpPclViewer.
Requirements
To enable vpPclViewer class usage, and thus use this tutorial, you need to have a version of ViSP build with PCL. To see how to install PCL library, please refer to the Point Cloud Library (PCL) section.
How to run the tutorial
To see the different options of the tutorial, please run the following commands:
cd $VISP_WS/
visp-build/tutorial/gui/pcl-visualizer/
$ ./tutorial-pcl-visualizer -h
To run the tutorial in a blocking mode, i.e. the display pauses the program, please run the following command:
$ ./tutorial-pcl-visualizer --
display-mode blocking
void display(vpImage< unsigned char > &I, const std::string &title)
Display a gray-scale image.
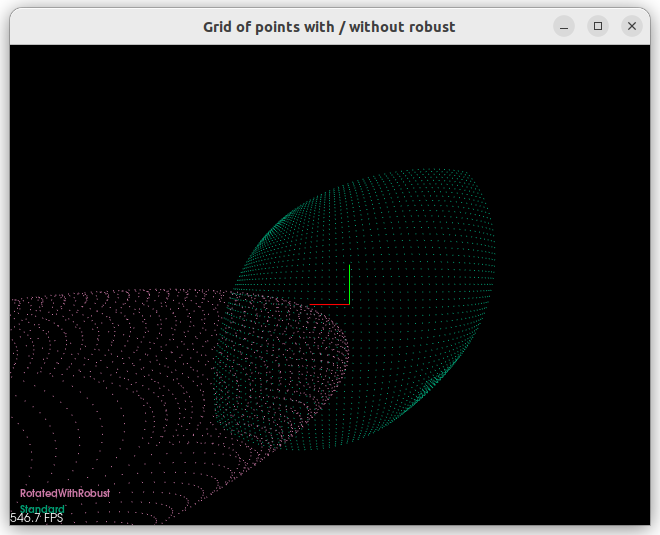
You should see a new windows that shows something similar to. It shows our two point clouds.
To stop the program, please click in the viewer window and press the q key.
It is also possible to run the viewer in a separate thread. To do so, please run the following command:
$ ./tutorial-pcl-visualizer --
display-mode threaded
Here again to stop the program, please click in the console and press the q key.
Point clouds visualization example explained
For this tutorial, we use the main program tutorial-pcl-viewer.cpp.
It uses the following class, which generates 3D coordinates and relies on the vpPclViewer to visualize data.
#ifndef _ClassUsingPclVisualizer_h_
#define _ClassUsingPclVisualizer_h_
#include <visp3/core/vpConfig.h>
#if defined(VISP_HAVE_PCL) && defined(VISP_HAVE_PCL_VISUALIZATION)
#include<visp3/core/vpColVector.h>
#include<visp3/gui/vpPclViewer.h>
class ClassUsingPclViewer
{
private:
double m_minX;
double m_maxX;
unsigned int m_n;
double m_dX;
double m_minY;
double m_maxY;
unsigned int m_m;
double m_dY;
vpPclViewer m_visualizer;
std::pair<vpPclViewer::pclPointCloudPointXYZRGBPtr, vpPclViewer::pclPointCloudPointXYZRGBPtr> generateControlPoints(
const double &addedNoise,
const unsigned int &order,
vpColVector &confidenceWeights);
public:
ClassUsingPclViewer(std::pair<double, double> xlimits = { -2.5,2.5 }, std::pair<double, double> ylimits = { -2.5,2.5 }, std::pair<unsigned int, unsigned int> nbPoints = { 50,50 });
~ClassUsingPclViewer();
void blockingMode(const double &addedNoise, const unsigned int &order);
void threadedMode(const double &addedNoise, const unsigned int &order);
};
#endif
#endif
Implementation of column vector and the associated operations.
Implementation of an homogeneous matrix and operations on such kind of matrices.
Implementation of a rotation matrix and operations on such kind of matrices.
Class that consider the case of a translation vector.
Main code explained
Let us first have a look at the main program.
First, we include the class that uses the vpPclViewer object to display different point clouds:
#include "ClassUsingPclViewer.h"
Then, we define a C++ enum in order to permit to the user to chose between the blocking-mode display, the threaded-mode display or running both of them consecutively.
typedef enum DisplayMode
{
BLOCKING = 0,
THREADED = 1,
BOTH = 2,
MODE_COUNT = 3
} DisplayMode;
std::string displayModeToString(const DisplayMode &mode)
{
switch (mode) {
case BLOCKING:
return "blocking";
case THREADED:
return "threaded";
case BOTH:
return "both";
default:
break;
}
return "unknown";
}
DisplayMode displayModeFromString(const std::string &name)
{
DisplayMode res = DisplayMode::MODE_COUNT;
bool wasFound = false;
for (unsigned int i = 0; i < DisplayMode::MODE_COUNT && !wasFound; i++) {
DisplayMode candidate = (DisplayMode)i;
if (lowerCaseName == displayModeToString(candidate)) {
res = candidate;
wasFound = true;
}
}
return res;
}
std::string getAvailableDisplayMode(const std::string &prefix = "< ", const std::string &sep = " , ", const std::string &suffix = " >")
{
std::string modes(prefix);
for (unsigned int i = 0; i < DisplayMode::MODE_COUNT - 1; i++) {
DisplayMode candidate = (DisplayMode)i;
modes += displayModeToString(candidate) + sep;
}
DisplayMode candidate = (DisplayMode)(DisplayMode::MODE_COUNT - 1);
modes += displayModeToString(candidate) + suffix;
return modes;
}
Then, we define the default value of the program arguments.
const double def_addedNoise = 0.;
const unsigned int def_order = 2;
const std::pair<double, double> def_xlim = std::pair<double, double>(-2.5, 2.5);
const std::pair<double, double> def_ylim = std::pair<double, double>(-2.5, 2.5);
const std::pair<unsigned int, unsigned int> def_reso = std::pair<unsigned int, unsigned int>(50, 50);
const DisplayMode def_mode = DisplayMode::BLOCKING;
The following program arguments are available:
std::cout << "NAME" << std::endl;
std::cout << "\t" << argv[0] << " Test programm for the PCL-based point-cloud visualizer." << std::endl
<< std::endl;
std::cout << "SYNOPSIS" << std::endl;
std::cout << "\t" << argv[0]
<< "\t[--noise <stdev_noise>] (default: " + std::to_string(def_addedNoise) << ")\n"
<< "\t[--order <surface-order>](default: " + std::to_string(def_order) << ")\n"
<< "\t[--x-lim <xmin xmax>](default: [" + std::to_string(def_xlim.first) + ";" + std::to_string(def_xlim.second) << "])\n"
<< "\t[--y-lim <ymin ymax>](default: [" + std::to_string(def_ylim.first) + ";" + std::to_string(def_ylim.second) << "])\n"
<< "\t[--reso <x_resolution y_resolution>](default: [" + std::to_string(def_reso.first) + ";" + std::to_string(def_reso.second) << "])\n"
<< "\t[--display-mode " << getAvailableDisplayMode() << "](default: " << displayModeToString(def_mode) << ")\n"
<< "\t[--help] [-h]" << std::endl
<< std::endl;
Let us look with more details into these arguments:
noise represents the intensity of noise along the Z-axis, expressed in the object frame, has to be added to the original surface.order represents the order of the polynomial surface the user wants to use running the demo.x-lim and y-lim represents reciproquely the X-axis and Y-axis minimum and maximum values of the polynomial surface, expressed in the object frame.reso represents the number of points along the X-axis and Y-axis, expressed in the object frame, are used to generate the first surface.display-mode represents which mode of display the user wants to use: blocking-mode only, threaded-mode only or both modes successively.
Then, we parse the program arguments that permit to the user to change part of the behavior of the program.
double opt_addedNoise = def_addedNoise;
unsigned int opt_order = def_order;
std::pair<double, double> opt_xlim = def_xlim;
std::pair<double, double> opt_ylim = def_ylim;
std::pair<unsigned int, unsigned int> opt_reso = def_reso;
DisplayMode opt_mode = def_mode;
for (int i = 1; i < argc; i++) {
if (std::string(argv[i]) == "--noise" && i + 1 < argc) {
opt_addedNoise = atof(argv[i + 1]);
i++;
}
else if (std::string(argv[i]) == "--order" && i + 1 < argc) {
opt_order = atoi(argv[i + 1]);
i++;
}
else if (std::string(argv[i]) == "--x-lim" && i + 2 < argc) {
opt_xlim.first = atof(argv[i + 1]);
opt_xlim.second = atof(argv[i + 2]);
i += 2;
}
else if (std::string(argv[i]) == "--y-lim" && i + 2 < argc) {
opt_ylim.first = atof(argv[i + 1]);
opt_ylim.second = atof(argv[i + 2]);
i += 2;
}
else if (std::string(argv[i]) == "--reso" && i + 2 < argc) {
opt_reso.first = atoi(argv[i + 1]);
opt_reso.second = atoi(argv[i + 2]);
i += 2;
}
else if (std::string(argv[i]) == "--display-mode" && i + 1 < argc) {
opt_mode = displayModeFromString(std::string(argv[i + 1]));
i++;
}
else if (std::string(argv[i]) == "--help" || std::string(argv[i]) == "-h") {
std::cout << "NAME" << std::endl;
std::cout << "\t" << argv[0] << " Test programm for the PCL-based point-cloud visualizer." << std::endl
<< std::endl;
std::cout << "SYNOPSIS" << std::endl;
std::cout << "\t" << argv[0]
<< "\t[--noise <stdev_noise>] (default: " + std::to_string(def_addedNoise) << ")\n"
<< "\t[--order <surface-order>](default: " + std::to_string(def_order) << ")\n"
<< "\t[--x-lim <xmin xmax>](default: [" + std::to_string(def_xlim.first) + ";" + std::to_string(def_xlim.second) << "])\n"
<< "\t[--y-lim <ymin ymax>](default: [" + std::to_string(def_ylim.first) + ";" + std::to_string(def_ylim.second) << "])\n"
<< "\t[--reso <x_resolution y_resolution>](default: [" + std::to_string(def_reso.first) + ";" + std::to_string(def_reso.second) << "])\n"
<< "\t[--display-mode " << getAvailableDisplayMode() << "](default: " << displayModeToString(def_mode) << ")\n"
<< "\t[--help] [-h]" << std::endl
<< std::endl;
return EXIT_SUCCESS;
}
}
Then, the blocking-mode example is run if the user chose to run it or both modes.
if (opt_mode == DisplayMode::BLOCKING || opt_mode == DisplayMode::BOTH) {
ClassUsingPclViewer demo(opt_xlim, opt_ylim, opt_reso);
demo.blockingMode(opt_addedNoise, opt_order);
}
Finally, the threaded-mode example is run if the user chose to run it or both modes.
if (opt_mode == DisplayMode::THREADED || opt_mode == DisplayMode::BOTH) {
ClassUsingPclViewer demo(opt_xlim, opt_ylim, opt_reso);
demo.threadedMode(opt_addedNoise, opt_order);
}
Code of the example class explained
Generation of the polynomial surfaces used in this example
For this example, we decided to modelize a polynomial 3D surface. The Z coordinate is computed from the X and Y coordinates thanks to the following method.
double zFunction(const double &x, const double &y, const unsigned int order)
{
const double offset(0.5);
double z(0.);
for (unsigned int n = 0; n <= order; n++) {
for (unsigned int k = 0; k <= order - n; k++) {
if (k + n > 0) {
z += std::pow(x, n) * std::pow(y, k);
}
else {
z += offset;
}
}
}
return z;
}
The constructor initializes the minimum and maximum X and Y coordinates of the polynomial surface, along with the number of points in each direction it contains. It also constructs the vpPclViewer object, naming the window that will open.
ClassUsingPclViewer::ClassUsingPclViewer(std::pair<double, double> xlimits, std::pair<double, double> ylimits, std::pair<unsigned int, unsigned int> nbPoints)
: m_t(0.1, 0.1, 0.1)
, m_R(M_PI_4, M_PI_4, M_PI_4)
, m_cMo(m_t, m_R)
, m_minX(xlimits.first)
, m_maxX(xlimits.second)
, m_n(nbPoints.first)
, m_minY(ylimits.first)
, m_maxY(ylimits.second)
, m_m(nbPoints.second)
, m_visualizer("Grid of points with / without robust")
{
m_dX = (m_maxX - m_minX) / (static_cast<double>(m_n) - 1.);
m_dY = (m_maxY - m_minY) / (static_cast<double>(m_m) - 1.);
}
The following method generate two polynomial surface. If the user asked to, noise will be added to the displaced surface. The confidence weights are estimated thanks to Tukey M-estimator from the difference between the noise-free position of the point and the actual one. In an actual situation, it could for instance correspond to the distance between a model of an object surface and the observed points thanks to a depth sensor.
std::pair<vpPclViewer::pclPointCloudPointXYZRGBPtr, vpPclViewer::pclPointCloudPointXYZRGBPtr> ClassUsingPclViewer::generateControlPoints(
const double &addedNoise,
const unsigned int &order,
vpColVector &confidenceWeights)
{
std::pair<vpPclViewer::pclPointCloudPointXYZRGBPtr, vpPclViewer::pclPointCloudPointXYZRGBPtr> result;
vpPclViewer::pclPointCloudPointXYZRGBPtr unrotatedControlPoints(new vpPclViewer::pclPointCloudPointXYZRGB(m_n, m_m));
vpPclViewer::pclPointCloudPointXYZRGBPtr rotatedControlPoints(new vpPclViewer::pclPointCloudPointXYZRGB(m_n, m_m));
confidenceWeights.
resize(m_m * m_n);
for (unsigned int j = 0; j < m_m; j++) {
for (unsigned int i = 0; i < m_n; i++) {
double oX = m_minX + (double)i * m_dX;
double oY = m_minY + (double)j * m_dY;
double oZ = zFunction(oX, oY, order);
std::vector<double> point = { oX, oY, oZ,1. };
(*unrotatedControlPoints)(i, j).x = oCoords[0];
(*unrotatedControlPoints)(i, j).y = oCoords[1];
(*unrotatedControlPoints)(i, j).z = oCoords[2];
(*rotatedControlPoints)(i, j).x = cCoords[0];
(*rotatedControlPoints)(i, j).y = cCoords[1];
double noise = r();
(*rotatedControlPoints)(i, j).z = cCoords[2] + noise;
confidenceWeights[j * m_n + i] = 1.;
residuals[j * m_n + i] = noise;
}
}
if (std::abs(addedNoise) > 0.) {
}
result.first = unrotatedControlPoints;
result.second = rotatedControlPoints;
return result;
}
void resize(unsigned int i, bool flagNullify=true)
Class for generating random number with normal probability density.
void setSigmaMean(double sigma_val, double mean_val)
Contains an M-estimator and various influence function.
@ TUKEY
Tukey influence function.
void MEstimator(const vpRobustEstimatorType method, const vpColVector &residues, vpColVector &weights)
void setMinMedianAbsoluteDeviation(double mad_min)
VISP_EXPORT double measureTimeMicros()
How to use the vpPclViewer class to display the point clouds
To use the vpPclViewer class, you must first add the surfaces you want to display. You can do it by adding a surface for which you do not particularly care of the color and thus decide to use a generated one :
unsigned int id_ctrlPts = m_visualizer.addSurface(grids.first, "Standard");
You could also choose the color to use in order to have an uniformly colored surface:
unsigned int id_robust = m_visualizer.addSurface(grids.second, confWeights, "RotatedWithRobust", color.to_RGB());
Class that furnishes a set of colors that color blind people should be able to distinguish one from a...
In this second example, confidence weights are also attached to each points to the surface. It permits to display only the points for which the weight is greater than the ignorance threshold.
Finally, you can display in a blocking fashion the different surfaces added to the viewer:
Alternatively, you can start a non-blocking display thread in order to continuously update the surfaces.
m_visualizer.launchThread();
To update the surfaces over time, please use the following lines of codes:
m_visualizer.updateSurface(grids.first, id_ctrlPts);
m_visualizer.updateSurface(grids.second, id_robust, confWeights);
Known issues
Known issue on MacOS
On MacOS, you can face the following error:
tutorial-pcl-viewer *** Terminating app due to uncaught exception 'NSInternalInconsistencyException', reason: 'NSWindow drag regions should only be invalidated on the Main Thread!'
libc++abi: terminating due to uncaught exception of type NSException
This problem seems to be due to VTK library that does not like to be run in a non-main thread on MacOS. You can use the vpPclViewer class in blocking mode using the method vpPclViewer::display. See the PCL issue for more details.
Known issue on Ubuntu 22.04
On Ubuntu 22.04, you can face the following error:
Thread 2 "tutorial-pcl-vi" received signal SIGSEGV, Segmentation fault.
0x00007ffff7304b10 in _XEventsQueued () from /lib/x86_64-linux-gnu/libX11.so.6
0x00007ffff7304b10 in _XEventsQueued () at /lib/x86_64-linux-gnu/libX11.so.6
0x00007ffff72f11a1 in XPending () at /lib/x86_64-linux-gnu/libX11.so.6
0x00007fffecf65b8f in vtkXRenderWindowInteractor::StartEventLoop() () at /lib/x86_64-linux-gnu/libvtkRenderingUI-9.1.so.1
0x00007ffff6ee3f8c in pcl::visualization::PCLVisualizer::spinOnce(int, bool) () at /lib/x86_64-linux-gnu/libpcl_visualization.so.1.12
0x00007ffff7fa5c49 in vpPclVisualizer::loopThread() (this=0x7fffffffd720) at /usr/include/c++/11/bits/shared_ptr_base.h:1295
This is a known compatibility issue between PCL library and VTK library.
The vpPclViewer can be used in blocking mode, or you may try to install PCL from source and then recompile ViSP.