ViSP  2.9.0
Tutorial: Image filtering

This tutorial supposes that you have followed the Tutorial: Getting started.

Introduction

In this tutorial you will learn how to use ViSP filtering functions implemented in vpImageFilter class.

Let us consider the following source code that comes from tutorial-image-filter.cpp.

#include <visp/vpDisplayD3D.h>
#include <visp/vpDisplayGDI.h>
#include <visp/vpDisplayGTK.h>
#include <visp/vpDisplayX.h>
#include <visp/vpDisplayOpenCV.h>
#include <visp/vpImageIo.h>
#include <visp/vpImageFilter.h>
void display(vpImage<unsigned char> &I, const std::string &title);
void display(vpImage<double> &D, const std::string &title);
void display(vpImage<unsigned char> &I, const std::string &title)
{
#if defined(VISP_HAVE_X11)
vpDisplayX d(I);
#elif defined(VISP_HAVE_OPENCV)
#elif defined(VISP_HAVE_GTK)
#elif defined(VISP_HAVE_GDI)
#elif defined(VISP_HAVE_D3D9)
vpDisplayD3d d(I);
#else
std::cout << "No image viewer is available..." << std::endl;
#endif
vpDisplay::setTitle(I, title.c_str());
vpDisplay::displayCharString(I, 15,15, "Click to continue...", vpColor::red);
}
void display(vpImage<double> &D, const std::string &title)
{
vpImage<unsigned char> I; // Image to display
display(I, title);
}
int main(int argc, char** argv )
{
try {
if(argc != 2) {
printf( "Usage: %s <image name.[pgm,ppm,jpeg,png,bmp]>\n", argv[0] );
return -1;
}
try {
vpImageIo::read(I, argv[1]);
}
catch(...) {
std::cout << "Cannot read image \"" << argv[1] << "\"" << std::endl;
return -1;
}
display(I, "Original image");
display(F, "Blur (default)");
display(F, "Blur (var=2)");
display(dIx, "Gradient dIx");
display(dIy, "Gradient dIy");
#if (VISP_HAVE_OPENCV_VERSION >= 0x020100)
vpImageFilter::canny(I, C, 5, 15, 3);
display(C, "Canny");
#endif
vpMatrix K(3,3); // Sobel kernel along x
K[0][0] = 1; K[0][1] = 0; K[0][2] = -1;
K[1][0] = 2; K[1][1] = 0; K[1][2] = -2;
K[2][0] = 1; K[2][1] = 0; K[2][2] = -1;
display(Gx, "Sobel x");
size_t nlevel = 3;
std::vector< vpImage<unsigned char> > pyr(nlevel);
pyr[0] = I;
for (size_t i=1; i < nlevel; i++) {
display(pyr[i], "Pyramid");
}
return 0;
}
catch(vpException &e) {
std::cout << "Catch an exception: " << e << std::endl;
return 1;
}
}

Once build, you should have tutorial-image-filter binary. It shows how to apply different filters on an input image. Here we will consider lena.pgm as input image.

img-lena-gray.png

To see the resulting filtered images, just run:

./tutorial-image-filter lena.pgm

The following sections give a line by line explanation of the source code dedicated to image filtering capabilities.

Gaussian blur

Lena input image is read from disk and is stored in I which is a gray level image declared as

To apply a Gaussian blur to this image we first have to declare a resulting floating-point image F. Then the blurred image could be obtained using the default Gaussian filter:

The resulting image is the following:

img-lena-blured-default.png

It is also possible to specify the Gaussian filter kernel size and the Gaussian standard deviation (sigma) using:

vpImageFilter::gaussianBlur(I, F, 7, 2); // Kernel size: 7, sigma: 2

We thus obtain the following image:

img-lena-blured-var2.png

Gradients computation

To compute the gradients or the spatial derivative along X use:

Gradients along Y could be obtained using:

The resulting floating-point images dIx, dIy are the following:

img-lena-dIxy.png

Canny edge detector

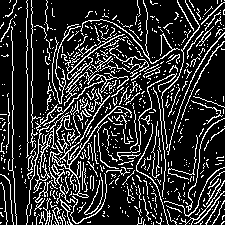
Canny edge detector function is only available if ViSP was build with OpenCV 2.1 or higher.

After the declaration of a new image container C, Canny edge detector is applied using:

#if (VISP_HAVE_OPENCV_VERSION >= 0x020100)
vpImageFilter::canny(I, C, 5, 15, 3);
#endif

Where:

  • 5: is the low threshold
  • 15: is the high threshold set in the program as three times the lower threshold (following Canny’s recommendation)
  • 3: is the size of the Sobel kernel used internally.

The resulting image C is the following:

img-lena-canny.png

Convolution

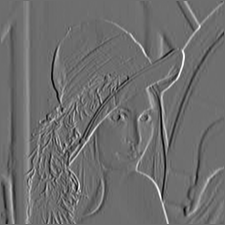
To apply a convolution to an image, we first have to define a kernel. For example, let us consider the 3x3 Sobel kernel defined in K.

\[ {\bf K} = \begin{tabular}{|c|c|c|} \hline 1 & 0 & -1 \\ \hline 2 & 0 & -2 \\ \hline 1 & 0 & -1 \\ \hline \end{tabular} \]

vpMatrix K(3,3); // Sobel kernel along x
K[0][0] = 1; K[0][1] = 0; K[0][2] = -1;
K[1][0] = 2; K[1][1] = 0; K[1][2] = -2;
K[2][0] = 1; K[2][1] = 0; K[2][2] = -1;

After the declaration of a new floating-point image Gx, the convolution is obtained using:

The content of the filtered image Gx is the following.

img-lena-sobel.png

Gaussian image pyramid

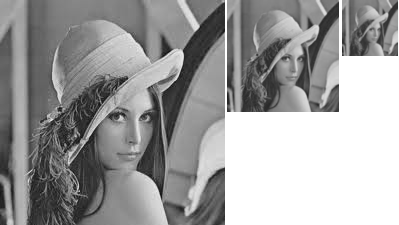
To construct a pyramid of Gaussian filtered images as a vector of images implemented in pyr[] you may use:

size_t nlevel = 3;
std::vector< vpImage<unsigned char> > pyr(nlevel);
pyr[0] = I;
for (size_t i=1; i < nlevel; i++) {
display(pyr[i], "Pyramid");
}

The content of pyr[0], pyr[1], pyr[2] is the following:

img-lena-pyr.png

You are now ready to see the next Tutorial: Blob tracking.