ViSP  2.8.0
Tutorial: Blob tracking

Blob tracking

With ViSP you can track a blob using either vpDot or vpDot2 classes.

#include <visp/vp1394CMUGrabber.h>
#include <visp/vp1394TwoGrabber.h>
#include <visp/vpDisplayGDI.h>
#include <visp/vpDisplayX.h>
#include <visp/vpDot2.h>
int main()
{
#if (defined(VISP_HAVE_DC1394_2) || defined(VISP_HAVE_CMU1394))
vpImage<unsigned char> I; // Create a gray level image container
#if defined(VISP_HAVE_DC1394_2)
vp1394TwoGrabber g(false);
#elif defined(VISP_HAVE_CMU1394)
#endif
g.open(I);
g.acquire(I);
#if defined(VISP_HAVE_X11)
vpDisplayX d(I, 0, 0, "Camera view");
#elif defined(VISP_HAVE_GDI)
vpDisplayGDI d(I, 0, 0, "Camera view");
#else
std::cout << "No image viewer is available..." << std::endl;
#endif
vpDot2 blob;
blob.setGraphics(true);
blob.initTracking(I);
while(1) {
g.acquire(I); // Acquire an image
blob.track(I);
if (vpDisplay::getClick(I, false))
break;
}
#endif
}

The videos show the result of the tracking on two different objects:

Here after we explain the new lines that are introduced.

First an instance of the blob tracker is created.

Then we are modifying some default settings to allow drawings in overlay the contours pixels and the position of the center of gravity with a thickness of 2 pixels.

blob.setGraphics(true);

Then we are waiting for a user initialization throw a mouse click event in the blob to track.

blob.initTracking(I);

The tracker is now initialized. The tracking can be performed on new images:

blob.track(I);

Blob auto detection and tracking

The following example shows how to detect blobs in the first image and then track all the detected blobs. This functionality is only available with vpDot2 class.

#include <visp/vpDisplayGDI.h>
#include <visp/vpDisplayX.h>
#include <visp/vpDot2.h>
#include <visp/vpImageIo.h>
int main()
{
bool learn = false;
vpImage<unsigned char> I; // Create a gray level image container
vpImageIo::read(I, "./target.pgm");
#if defined(VISP_HAVE_X11)
vpDisplayX d(I, 0, 0, "Camera view");
#elif defined(VISP_HAVE_GDI)
vpDisplayGDI d(I, 0, 0, "Camera view");
#else
std::cout << "No image viewer is available..." << std::endl;
#endif
vpDot2 blob;
if (learn) {
// Learn the characteristics of the blob to auto detect
blob.setGraphics(true);
blob.initTracking(I);
blob.track(I);
std::cout << "Blob characteristics: " << std::endl;
std::cout << " width : " << blob.getWidth() << std::endl;
std::cout << " height: " << blob.getHeight() << std::endl;
#if VISP_VERSION_INT > VP_VERSION_INT(2,7,0)
std::cout << " area: " << blob.getArea() << std::endl;
#endif
std::cout << " gray level min: " << blob.getGrayLevelMin() << std::endl;
std::cout << " gray level max: " << blob.getGrayLevelMax() << std::endl;
std::cout << " grayLevelPrecision: " << blob.getGrayLevelPrecision() << std::endl;
std::cout << " sizePrecision: " << blob.getSizePrecision() << std::endl;
std::cout << " ellipsoidShapePrecision: " << blob.getEllipsoidShapePrecision() << std::endl;
}
else {
// Set blob characteristics for the auto detection
blob.setWidth(50);
blob.setHeight(50);
#if VISP_VERSION_INT > VP_VERSION_INT(2,7,0)
blob.setArea(1700);
#endif
blob.setGrayLevelMin(0);
blob.setGrayLevelMax(30);
blob.setSizePrecision(0.65);
}
std::list<vpDot2> blob_list;
blob.searchDotsInArea(I, 0, 0, I.getWidth(), I.getHeight(), blob_list);
if (learn) {
// The blob that is tracked by initTracking() is not in the list of auto detected blobs
// We add it:
blob_list.push_back(blob);
}
std::cout << "Number of auto detected blob: " << blob_list.size() << std::endl;
std::cout << "A click to exit..." << std::endl;
while(1) {
for(std::list<vpDot2>::iterator it=blob_list.begin(); it != blob_list.end(); ++it) {
(*it).setGraphics(true);
(*it).setGraphicsThickness(3);
(*it).track(I);
}
if (vpDisplay::getClick(I, false))
break;
}
}

Here is a screen shot of the resulting program :

img-blob-auto-detection.png

And here is the detailed explanation of the source :

First we create an instance of the tracker.

vpDot2 blob;

Then, two cases are handled. The first case, when learn is set to true, consists in learning the blob characteristics. The user has to click in a blob that serves as reference blob. The size, area, gray level min and max, and some precision parameters will than be used to search similar blobs in the whole image.

if (learn) {
// Learn the characteristics of the blob to auto detect
blob.setGraphics(true);
blob.initTracking(I);
blob.track(I);
std::cout << "Blob characteristics: " << std::endl;
std::cout << " width : " << blob.getWidth() << std::endl;
std::cout << " height: " << blob.getHeight() << std::endl;
std::cout << " area: " << blob.getArea() << std::endl;
std::cout << " gray level min: " << blob.getGrayLevelMin() << std::endl;
std::cout << " gray level max: " << blob.getGrayLevelMax() << std::endl;
std::cout << " grayLevelPrecision: " << blob.getGrayLevelPrecision() << std::endl;
std::cout << " sizePrecision: " << blob.getSizePrecision() << std::endl;
std::cout << " ellipsoidShapePrecision: " << blob.getEllipsoidShapePrecision() << std::endl;
}

If you have an precise idea of the dimensions of the blob to search, the second case consists is settings the reference characteristics directly.

else {
// Set blob characteristics for the auto detection
blob.setWidth(50);
blob.setHeight(50);
blob.setArea(1700);
blob.setGrayLevelMin(0);
blob.setGrayLevelMax(30);
blob.setSizePrecision(0.65);
}

Once the blob characteristics are known, to search similar blobs in the image is simply done by:

std::list<vpDot2> blob_list;
blob.searchDotsInArea(I, 0, 0, I.getWidth(), I.getHeight(), auto_detected_blob_list);

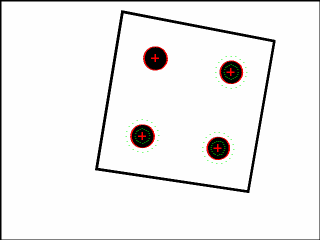
Here blob_list contains the list of the blobs that are detected in the image I. When learning is enabled, the blob that is tracked is not in the list of auto detected blobs. We add it to the end of the list:

if (learn) {
// The blob that is tracked by initTracking() is not in the list of auto detected blobs
// We add it:
blob_list.push_back(blob);
}

Finally, when a new image is available we do the tracking of all the blobs:

for(std::list<vpDot2>::iterator it=blob_list.begin(); it != blob_list.end(); ++it) {
(*it).setGraphics(true);
(*it).setGraphicsThickness(3);
(*it).track(I);
}

You are now ready to see the next Tutorial: Keypoint tracking.