Introduction
This tutorial shows how to detect one or more barcodes with ViSP. To this end we provide two classes that are wrapper over 3rd party libraries:
These classes inherit from vpDetectorBase class, a generic class dedicated to detection. For each detected bar code, it allows to retrieve some characteristics such as the bar code message if it exists, and in the image the polygon that contains the bar code, the bounding box or the center of gravity of the bar code.
In the next sections you will find examples that show how to detect codes in a single image and or in images acquired from a camera connected to your computer.
Note that all the material (source code and image) described in this tutorial is part of ViSP source code (in tutorial/detection/barcode folder) and could be found in https://github.com/lagadic/visp/tree/master/tutorial/detection/barcode.
Print your QR code
To generate and print your own QR code compatible with vpDetectorQRCode use a QR code generator like: https://www.qr-code-generator.com/. Download the corresponding image and use your favorite tool like Gimp to rescale the image without interpolation if needed.
Print your DataMatrix code
To generate and print your own DataMatrix code compatible with vpDetectorDataMatrixCode use a DataMatrix code generator like: http://datamatrix.kaywa.com/. Save the corresponding image and use your favorite tool like Gimp to rescale the image without interpolation if needed.
Bar code detection (single image)
The following example also available in tutorial-barcode-detector.cpp allows to detect either a QR code or Data Matrix on a single image. The user can select with --code-type option which code to detect.
Source code explained
Below you will find tutorial-barcode-detector.cpp source code.
#include <visp3/detection/vpDetectorDataMatrixCode.h>
#include <visp3/detection/vpDetectorQRCode.h>
#include <visp3/gui/vpDisplayGDI.h>
#include <visp3/gui/vpDisplayOpenCV.h>
#include <visp3/gui/vpDisplayX.h>
#include <visp3/io/vpImageIo.h>
int main(int argc, const char **argv)
{
#if (defined(VISP_HAVE_ZBAR) || defined(VISP_HAVE_DMTX)) && \
(defined(VISP_HAVE_X11) || defined(VISP_HAVE_GDI) || defined(VISP_HAVE_OPENCV))
try {
#ifdef VISP_HAVE_X11
#elif defined(VISP_HAVE_GDI)
#elif defined(HAVE_OPENCV_HIGHGUI)
#endif
#if (defined(VISP_HAVE_ZBAR) && defined(VISP_HAVE_DMTX))
int opt_barcode = 0;
for (int i = 0; i < argc; i++) {
if (std::string(argv[i]) == "--code-type")
opt_barcode = atoi(argv[i + 1]);
else if (std::string(argv[i]) == "--help" || std::string(argv[i]) == "-h") {
std::cout << "Usage: " << argv[0] << " [--code-type <0 for QR code | 1 for DataMatrix code>] [--help] [-h]"
<< std::endl;
return EXIT_SUCCESS;
}
}
if (opt_barcode == 0)
else
#elif defined(VISP_HAVE_ZBAR)
(void)argc;
(void)argv;
#elif defined(VISP_HAVE_DMTX)
(void)argc;
(void)argv;
#endif
bool status = detector->
detect(I);
std::ostringstream legend;
if (status) {
std::vector<vpImagePoint> p = detector->
getPolygon(i);
for (size_t j = 0; j < p.size(); j++) {
std::ostringstream number;
number << j;
}
}
}
delete detector;
std::cout <<
"Catch an exception: " << e.
getMessage() << std::endl;
}
#else
(void)argc;
(void)argv;
#endif
}
static const vpColor blue
static const vpColor green
std::vector< std::vector< vpImagePoint > > & getPolygon()
vpRect getBBox(size_t i) const
size_t getNbObjects() const
std::vector< std::string > & getMessage()
virtual bool detect(const vpImage< unsigned char > &I)=0
Display for windows using GDI (available on any windows 32 platform).
The vpDisplayOpenCV allows to display image using the OpenCV library. Thus to enable this class OpenC...
Use the X11 console to display images on unix-like OS. Thus to enable this class X11 should be instal...
static bool getClick(const vpImage< unsigned char > &I, bool blocking=true)
static void display(const vpImage< unsigned char > &I)
static void displayCross(const vpImage< unsigned char > &I, const vpImagePoint &ip, unsigned int size, const vpColor &color, unsigned int thickness=1)
static void flush(const vpImage< unsigned char > &I)
static void displayRectangle(const vpImage< unsigned char > &I, const vpImagePoint &topLeft, unsigned int width, unsigned int height, const vpColor &color, bool fill=false, unsigned int thickness=1)
static void displayText(const vpImage< unsigned char > &I, const vpImagePoint &ip, const std::string &s, const vpColor &color)
error that can be emitted by ViSP classes.
const char * getMessage() const
static void read(vpImage< unsigned char > &I, const std::string &filename, int backend=IO_DEFAULT_BACKEND)
Class that defines a 2D point in an image. This class is useful for image processing and stores only ...
unsigned int getHeight() const
Defines a rectangle in the plane.
Now we explain the main lines of the source.
First we have to include the header of the two classes that allow to detect either the QR code or the Data Matrix code.
#include <visp3/detection/vpDetectorDataMatrixCode.h>
#include <visp3/detection/vpDetectorQRCode.h>
Then in the main() function before going further we need to check if at least one of the third party (zbar or dmtx libraries) were used to build ViSP. We also check if ViSP is able to display images using either X11, or the Graphical Device Interface (GDI) under Windows, or OpenCV.
#if (defined(VISP_HAVE_ZBAR) || defined(VISP_HAVE_DMTX)) && \
(defined(VISP_HAVE_X11) || defined(VISP_HAVE_GDI) || defined(VISP_HAVE_OPENCV))
After reading the input image bar-code.pgm and creation of a display device in order to visualize the image, we create a NULL pointer to a detector base class.
Since the classes that allow to detect QR codes and Data Matrix codes inherit from vpDetectorBase, using the variable opt_barcode we are able to construct the requested detector.
if (opt_barcode == 0)
else
We are now ready to detect the bar code in the image.
bool status = detector->
detect(I);
If one or more bar codes are detected, the variable status is set to true. In that case, we can retrieve the number of detected bar codes in order to create a for loop over the codes.
For each code, we can then get the location of the 4 points that define the polygon that contains the code, but also the bounding box.
std::vector<vpImagePoint> p = detector->
getPolygon(i);
And finally, if it exists, we are also able to get the message that is coded in the bar code.
Run binary
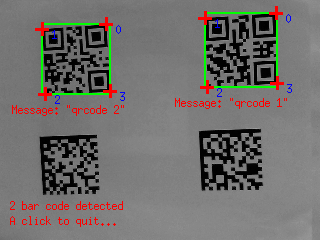
To detect a QR code just run:
$ ./tutorial-barcode-detector --code-type 0
You will get the following result:
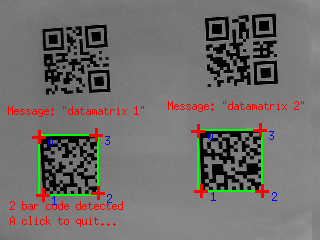
To detect a Data Matrix code just run:
$ ./tutorial-barcode-detector --code-type 1
You will get the following result:
Bar code detection (live camera)
This other example also available in tutorial-barcode-detector-live.cpp shows how to couple the bar code detector to an image grabber in order to detect bar codes on each new image acquired by a camera connected to your computer.
Source code explained
Below you will find tutorial-barcode-detector-live.cpp source code.
#include <visp3/core/vpConfig.h>
#include <visp3/core/vpImageConvert.h>
#include <visp3/detection/vpDetectorDataMatrixCode.h>
#include <visp3/detection/vpDetectorQRCode.h>
#include <visp3/gui/vpDisplayGDI.h>
#include <visp3/gui/vpDisplayOpenCV.h>
#include <visp3/gui/vpDisplayX.h>
#ifdef VISP_HAVE_MODULE_SENSOR
#include <visp3/sensor/vpV4l2Grabber.h>
#endif
#if defined(HAVE_OPENCV_VIDEOIO)
#include <opencv2/videoio.hpp>
#endif
int main(int argc, const char **argv)
{
#if (defined(VISP_HAVE_V4L2) || defined(HAVE_OPENCV_VIDEOIO)) && (defined(VISP_HAVE_ZBAR) || defined(VISP_HAVE_DMTX))
int opt_device = 0;
int opt_barcode = 0;
for (int i = 0; i < argc; i++) {
if (std::string(argv[i]) == "--device")
opt_device = atoi(argv[i + 1]);
else if (std::string(argv[i]) == "--code-type")
opt_barcode = atoi(argv[i + 1]);
else if (std::string(argv[i]) == "--help" || std::string(argv[i]) == "-h") {
std::cout << "Usage: " << argv[0]
<< " [--device <camera number>] [--code-type <0 for QR code | "
"1 for DataMatrix code>] [--help] [-h]"
<< std::endl;
return EXIT_SUCCESS;
}
}
std::cout << "Use device: " << opt_device << std::endl;
try {
#if defined(VISP_HAVE_V4L2)
std::ostringstream device;
device << "/dev/video" << opt_device;
#elif defined(HAVE_OPENCV_VIDEOIO)
cv::VideoCapture cap(opt_device);
if (!cap.isOpened()) {
std::cout << "Failed to open the camera" << std::endl;
return EXIT_FAILURE;
}
cv::Mat frame;
cap >> frame;
#endif
#if defined(VISP_HAVE_X11)
#elif defined(VISP_HAVE_GDI)
#elif defined(HAVE_OPENCV_HIGHGUI)
#endif
#if (defined(VISP_HAVE_ZBAR) && defined(VISP_HAVE_DMTX))
if (opt_barcode == 0)
else
#elif defined(VISP_HAVE_ZBAR)
(void)opt_barcode;
#elif defined(VISP_HAVE_DMTX)
(void)opt_barcode;
#endif
for (;;) {
#if defined(VISP_HAVE_V4L2)
#elif defined(HAVE_OPENCV_VIDEOIO)
cap >> frame;
#endif
bool status = detector->
detect(I);
std::ostringstream legend;
if (status) {
std::vector<vpImagePoint> p = detector->
getPolygon(i);
for (size_t j = 0; j < p.size(); j++) {
std::ostringstream number;
number << j;
}
}
}
break;
}
delete detector;
}
std::cout << "Catch an exception: " << e << std::endl;
}
#else
(void)argc;
(void)argv;
#endif
}
static void setTitle(const vpImage< unsigned char > &I, const std::string &windowtitle)
static void convert(const vpImage< unsigned char > &src, vpImage< vpRGBa > &dest)
Class that is a wrapper over the Video4Linux2 (V4L2) driver.
void setScale(unsigned scale=vpV4l2Grabber::DEFAULT_SCALE)
void setDevice(const std::string &devname)
void acquire(vpImage< unsigned char > &I)
The source code of this example is very similar to the previous one except that here we use camera framegrabber devices (see Tutorial: Image frame grabbing). Two different grabber may be used:
- If ViSP was build with Video For Linux (V4L2) support available for example on Fedora or Ubuntu distribution, VISP_HAVE_V4L2 macro is defined. In that case, images coming from an USB camera are acquired using vpV4l2Grabber class.
- If ViSP wasn't build with V4L2 support, but with OpenCV we use cv::VideoCapture class to grab the images. Notice that when images are acquired with OpenCV there is an additional conversion from cv::Mat to vpImage.
#if defined(VISP_HAVE_V4L2)
std::ostringstream device;
device << "/dev/video" << opt_device;
#elif defined(HAVE_OPENCV_VIDEOIO)
cv::VideoCapture cap(opt_device);
if (!cap.isOpened()) {
std::cout << "Failed to open the camera" << std::endl;
return EXIT_FAILURE;
}
cv::Mat frame;
cap >> frame;
#endif
Then in the while loop, at each iteration we acquire a new image
#if defined(VISP_HAVE_V4L2)
#elif defined(HAVE_OPENCV_VIDEOIO)
cap >> frame;
#endif
This new image is then given as input to the bar code detector.
Run binary
The usage of this example is similar to the previous one:
- with option
--code-type you select if you want to detect a QR code (use --code-type 0) or a Data Matrix (use --code-type 1).
- if more than one camera is connected to you computer, with option
--device you can select which camera to use. The first camera that is found has number 0.
To detect QR codes on images acquired by a second camera connected to your computer use:
$ ./tutorial-barcode-detector-live --code-type 0 --device 1
Next tutorial
Now you can follow Tutorial: Pose estimation from points that explains how to compute a 3D pose from points. This tutorial could be useful if you want to compute the pose of a QR code from it’s 4 corner coordinates in the image that could be retrieved using getPolygon(), it’s 3D size and camera parameters.
You are now also ready to see Tutorial: AprilTag marker detection, that illustrates how to detect AprilTag patterns in an image and compute the 3D pose of each pattern.