Introduction
This tutorial is designed to help you build ViSP Android SDK which can be used to create Android Apps supporting ViSP Java functionalities.
Prerequisites
This tutorial assumes you have the following software installed and configured: Java Development Kit (JDK), Android SDK and NDK, Python Interpreter, Apache Ant, CMake, Ninja and ccache.
On Ubuntu or debian
- Install Java Development Kit (JDK) following Install Java Development Kit (JDK) tutorial.
- Note
- At the time this tutorial was written
Java SE Development Kit 17 was incompatible with gradle. If you encounter build issues running python3 build_sdk.py ... as described in Build ViSP Android SDK section, you may install Java SE Development Kit 16.
- To install Android SDK and NDK follow the link to Android Studio, download and install Android Studio. Once installed start Android Studio using default settings. This allows to download Android SDK that will be installed in
$HOME/Android/Sdk on Ubuntu. Now to install Android NDK, with Android Studio start a new Native C++ Android project using the default configuration. From this new project enter "File > Settings... > Appearence > System Settings > Android SDK" menu. Select the "SDK Tools" tab and check the boxes next to CMake, and NDK (Side by side). Once all the tools are downloaded, you can exit Android Studio.
- Now to install Python Interpreter (prefer version 3.x), CMake, Ninja and ccache (a compiler cache for a faster build) run the following:
$ sudo apt-get install python3 ant cmake-curses-gui ninja-build ccache
- At the time this tutorial was written, on Ubuntu 20.04 LTS we got Android Studio BumbleBee 2021.1.1 Patch 1, NDK 23.1 (see How to know Android NDK version) and the following other tools versions:
$ java --version
java 16.0.2 2021-07-20
$ python3 --version
Python 3.8.10
$ ant -version
Apache Ant(TM) version 1.10.7 compiled on October 24 2019
$ cmake -version
cmake version 3.23.0-rc1
$ ninja --version
1.10.0
$ ccache --version
ccache version 3.7.7
On Mac OSX
- Install Java Development Kit (JDK) following Install Java Development Kit (JDK) tutorial.
- To install Android SDK and NDK follow the link to Android Studio, download and install Android Studio from dmg. Once installed start Android Studio using default settings. This allows to download Android SDK that will be installed in
$HOME/Library/Android/sdk folder on OSX. Now to install Android NDK, with Android Studio start a new Native C++ Android project using the default configuration. From this new project enter "Android Studio > Preferences > Appearence > System Settings > Android SDK" menu. Select the "SDK Tools" tab and check the boxes next to LLDB, CMake, and NDK (Side by side). Once all the tools are downloaded, you can exit Android Studio.
- Now to install Python Interpreter (prefer versions 3.x), CMake, Ninja and ccache (a compiler cache for a faster build) run the following:
$ brew install python3 ant cmake ninja ccache
- At the time this tutorial was written, on macOS Catalina 10.15.7 we got Android Studio 3.5.1, NDK 22.0 (see How to know Android NDK version) and the following other tools versions:
$ java --version
openjdk 15.0.1 2020-10-20
$ python3 --version
Python 3.9.1
$ ant -version
Apache Ant(TM) version 1.10.9 compiled on September 27 2020
$ cmake -version
cmake version 3.19.5
$ ninja --version
1.10.2
$ ccache --version
ccache version 4.2
On Windows
- Install Java Development Kit (JDK) following Install Java Development Kit (JDK) tutorial.
- To install Android SDK and NDK follow the link to Android Studio, download and install Android Studio for Windows 64-bit. Once installed start Android Studio using default settings. This allows to download Android SDK. Now to install Android NDK, with Android Studio create a new Android project. From this new project enter
"File > Settings... > Appearence & Behavior > System Settings > Android SDK" menu. Select the "SDK Tools" tab and check the boxes next to LLDB, CMake, and NDK (Side by side). Once all the tools are downloaded, you can exit Android Studio.
- Now install Python Interpreter without forgetting to add Python to environment variables.
- Download and install latest CMake release using Windows win64-x64 installer without forgetting to add CMake to the system PATH for all users.
- Download Ninja for windows. Place
ninja.exe in a suitable spot. For example, in %VISP_WS%\Ninja. Now make sure that CMake can find ninja.exe by adding %VISP_WS%\Ninja to your %PATH%.
- Download
ccache for Windows from github and add its location (%VISP_WS%\ccache-win64) to your %PATH% C:\> cd %VISP_WS%
C:\> git clone https:
- At the time this tutorial was written, on macOS Mojave 10.14.2 we got Android Studio 3.2.1, NDK 20.0 (see How to know Android NDK version) and the following other tools versions:
C:\>java -version
java version 11.0.4 2019-07-16 LTS
C:\>python --version
Python 3.7.4
C:\>cmake -version
cmake version 3.15.2
C:\>ninja --version
1.9.0
C:\>ccache --version
ccache version 3.7.2
Create a workspace
Create a workspace in $HOME/visp-ws that will contain ViSP sources, build and dataset.
$ export VISP_WS=$HOME/
visp-ws
$ mkdir -p $VISP_WS
Get ViSP source code
There are different ways to get ViSP source code:
- You can download the latest release as a zip or a tarball. Once downloaded, uncompress the file using either
$ tar xvzf
visp-x.y.z.tar.gz -C $VISP_WS
$ unzip
visp-x.y.z.zip -d $VISP_WS
- You can also download a daily snapshot. Once downloaded, uncompress the file using
$ tar xvzf
visp-snapshot-yyyy-mm-dd.tar.gz -C $VISP_WS
- Or you get the cutting-edge ViSP from GitHub repository using the following command
$ cd $VISP_WS
$ git clone https:
We suppose now that ViSP source is in the directory $VISP_WS/visp. The following should be adapted if you downloaded ViSP from a zip or tarball. In that case, the source is rather in something like $VISP_WS/visp-x.y.z.
Build ViSP Android SDK
Note that the scripts for building the SDK are included in the source code.
In the workspace create a build folder
$ mkdir $VISP_WS/
visp-build-android-sdk
Enter the directory $VISP_WS/platforms/android having the python build script and check which are the command line options that are available.
$ cd $VISP_WS/
visp/platforms/android
$ python3 build_sdk.py --help
Generally the script has to be used like:
$ python3 build_sdk.py --config <ndk-*.config.py> --sdk_path <path-to-Android-Sdk> --ndk_path <path-to-Android-Sdk>/ndk-bundle <installation-directory> <
visp-source-code-directory>
In $VISP_WS/visp/platforms/android folder we provide different NDK config files:
$ ls ndk-*.config.py
ndk-10.config.py ndk-17.config.py ndk-18.config.py ndk-22.config.py
ndk-16.config.py ndk-18-api-level-21.config.py ndk-20.config.py ndk-23.config.py
The file that should be used after --config option should match your NDK version (see How to know Android NDK version).
Above command will build SDK for multiple Android architectures. If you're aware on what Android architecture you'll be working on (refer here), say x86_64, you can do a minimal build by changing contents of ndk-*.config.py file
ABIs = [
ABI("5", "x86_64", None)
]
This will speed up the installation process.
Once build ViSP Android SDK will be available in $VISP_WS/visp-build-android-sdk/ViSP-android-sdk/sdk folder. Its content should be similar to the following:
$ cd $VISP_WS/
visp-build-android-sdk/ViSP-android-sdk/sdk
$ find . -maxdepth 3 -type d
./native
./native/3rdparty
./native/3rdparty/libs
./native/staticlibs
./native/staticlibs/x86_64
./native/staticlibs/arm64-v8a
./native/staticlibs/x86
./native/staticlibs/armeabi-v7a
./native/libs
./native/libs/x86_64
./native/libs/arm64-v8a
./native/libs/x86
./native/libs/armeabi-v7a
./native/jni
./native/jni/abi-armeabi-v7a
./native/jni/include
./native/jni/abi-x86_64
./native/jni/abi-arm64-v8a
./native/jni/abi-x86
./java
./java/src
./java/src/org
./java/javadoc
./java/res
./java/res/values
./etc
./etc/data
./etc/data/robot-simulator
./etc/data/wireframe-simulator
On Linux or Debian
For example, on Ubuntu 20.04 the command might look like
$ mkdir $VISP_WS/
visp-build-android-sdk
$ cd $VISP_WS/
visp/platforms/android
$ python3 build_sdk.py --config ndk-23.config.py --sdk_path $HOME/Android/Sdk --ndk_path $HOME/Android/Sdk/ndk/23.1.7779620 $VISP_WS/
visp-build-android-sdk $VISP_WS/
visp
On Mac OSX
For example, on OSX the command might rather look like
$ mkdir $VISP_WS/
visp-build-android-sdk
$ cd $VISP_WS/
visp/platforms/android
$ python3 build_sdk.py --config ndk-23.config.py --sdk_path $HOME/Library/Android/sdk --ndk_path $HOME/Library/Android/sdk/ndk-bundle $VISP_WS/
visp-build-android-sdk $VISP_WS/
visp
On Windows
For example, on Windows the command might rather look like
C:\> mkdir %VISP_WS%\visp-build-android-sdk
C:\> cd %VISP_WS%\visp\platforms\android
C:\> python3 build_sdk.py --config ndk-23.config.py --sdk_path %USERPROFILE%\AppData\Local\Android\Sdk --ndk_path %USERPROFILE%\AppData\Local\Android\Sdk\ndk\23.1.7779620 %VISP_WS%\visp-build-android-sdk %VISP_WS%\visp
Known issue
If you're experiencing problems with ccache or if you don't install ccache, you can try a build without it adding --no_ccache command line option like the following on Ubuntu:
$ python3 build_sdk.py --no_ccache --config ndk-18.config.py --sdk_path $HOME/Android/Sdk --ndk_path $HOME/Android/Sdk/ndk-bundle $VISP_WS/
visp-build-android-sdk $VISP_WS/
visp
Tips & tricks
How to know Android NDK version
- Start Android Studio
- on Ubuntu enter
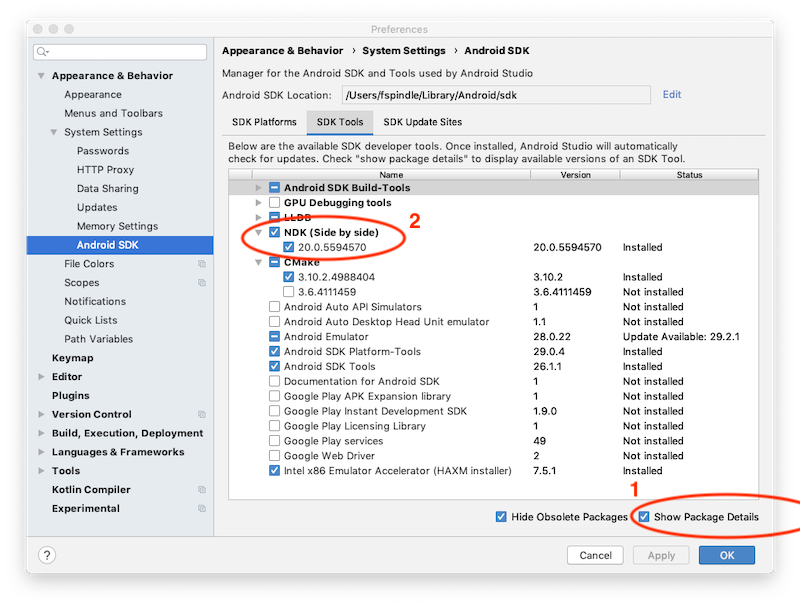
"File > Settings... > Appearance > System Settings" menu, while on Mac OSX enter "Android Studio > Preferences... > Appearance & Behavior > System Settings" menu, then select Android SDK in the left part and select "SDK Tools" tab to see which is the NDK version that you are using. The following swnapshot shows that NDK 18.1 is used:
This other snapshot shows that NDK 20.0 is used:
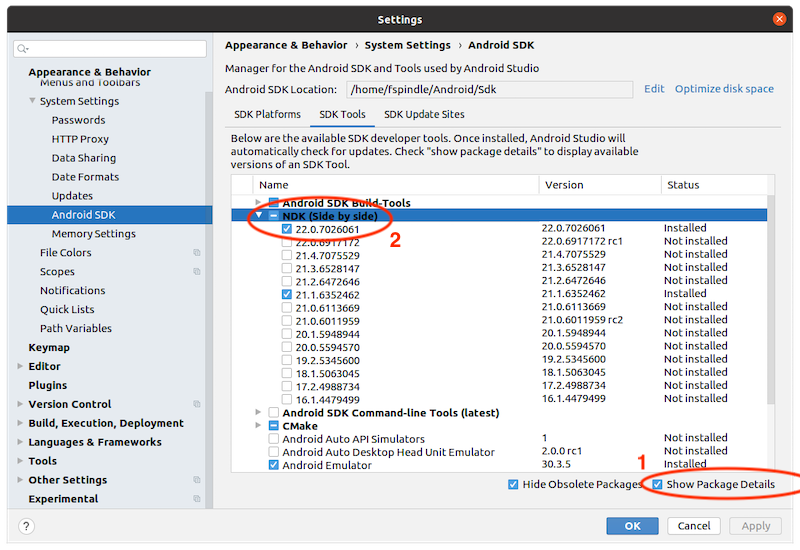
This other snapshot taken on Ubuntu 20.04 with Android Studio 4.1.2 shows that NDK 22.0 is used:
Next tutorial
You are now ready to follow Tutorial: Creating a simple Android App with ViSP where you'll be creating a sample Android App using ViSP SDK.