|
Visual Servoing Platform
version 3.1.0
|
|
Visual Servoing Platform
version 3.1.0
|
In this tutorial you will learn how to use ViSP either on Unix-like systems (including OSX, Fedora, Ubuntu, Debian, ...) or on Windows.
The easiest way of using ViSP in your project is to use CMake. If you are not familiar with CMake, you can check the tutorial.
Note also that all the material (source code and images) described in this tutorial is part of ViSP source code and could be downloaded using the following command:
Let's start to write our first program to see how to read an image and open a window to display the image. This simple program is provided in tutorial-viewer.cpp example and given below:
Here is the detailed explanation of the source, line by line :
Include all the headers for image viewers. The two first one are for Windows systems. They require that Direct 3D or the Graphical Device Interface (GDI) coming with the installation of Visual Studio are available. The third one needs GTK that is cross-platform. The fourth is for unix-like systems and requires that libX11 is available. The last one is also cross-platform and requires that OpenCV is available.
Include the header that allows to read/write PGM, PPM, PNG and JPEG images from the disk using vpImageIo class.
Create an instance of a color image where each pixel is coded in RGBa.
The image I is initialized by reading an image file from the disk. If the image format is not supported we throw an exception.
Create an instance of an image display window for image I. The first viewer that is available is used. Here we create the link between the image I and the display d. Note that an image can only have one display.
The title of the display is then set to "My image".
First we display the content of the image I, then we flush the display to render the image.
Here we handle mouse events. We are waiting for a blocking mouse click to end the program.
Now you have to create your CMakeLists.txt file. It should look like this:
The find_package() CMake command searches for a VISPConfig.cmake file that will define the corresponding variables:
VISP_INCLUDE_DIRS : ViSP and third-party headers locationVISP_LIBRARIES : ViSP and third-party libraries name and locationNote that the previous CMakeLists.txt file can also be:
where VISP_USE_FILE variable is set to the full path to VISPUse.cmake file that contains all the CMake material that allow to build your project with ViSP. In other terms, the line
will include the following lines to your CMakeFile.txt
Proceed as with any other project using CMake:
By default cmake searches VISPConfig.cmake file in folders like /usr/share or /usr/local/share. If ViSP was not installed in /usr or /usr/local it is possible that you get the following error:
To help cmake to find VISPConfig.cmake file, just set VISP_DIR environment variable and call cmake again:
or run cmake with the additional VISP_DIR definition
Depending on the platform <multi-arch-folder> can be empty (OSX) or for example equal to x86_64-linux-gnu on Ubuntu.
make install step and set VISP_DIR to the build location instead of the install location.Just run:
By now you should have an executable called tutorial-viewer. You just have to run it giving an image location as an argument:
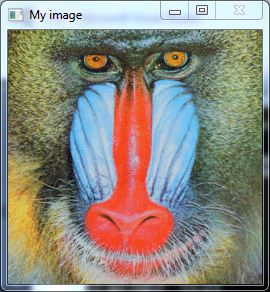
Here is a screen shot of the resulting output window :

We suppose from now, that you have created a folder (let say C:/ViSP/ViSP-started) that contains the following files: CMakeLists.txt, tutorial-viewer.cpp and monkey.ppm. These files are also provided in ViSP source code, in tutorial/image folder.
C:/ViSP/ViSP-started. Here we set the build location to the same folder.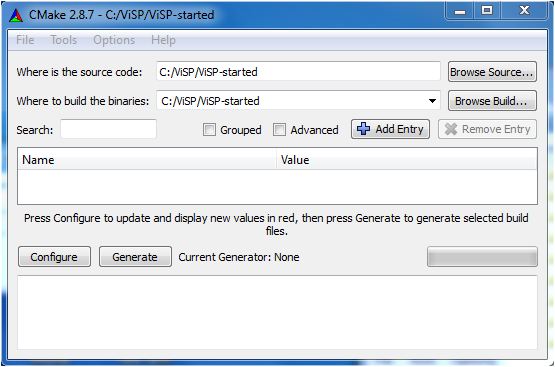
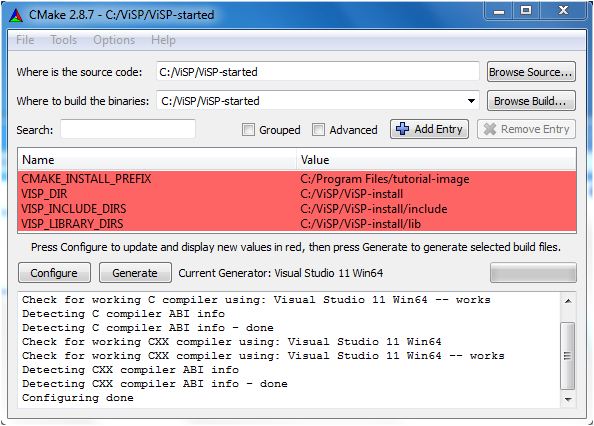
C:/ViSP/ViSP-install.
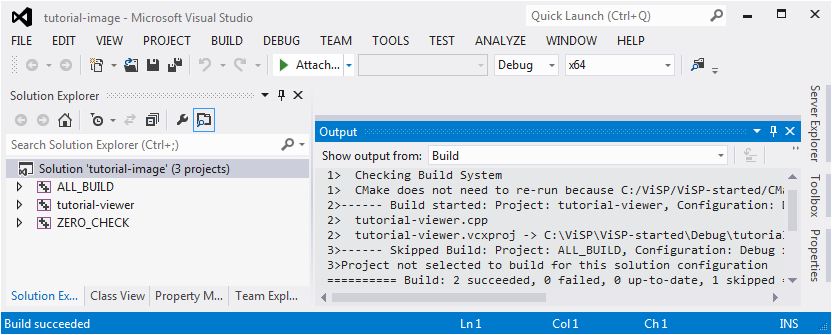
C:/ViSP/ViSP-started you should have tutorial-image.sln Visual Studio solution file.C:/ViSP/ViSP-started/tutorial-image.sln solution file.
C:/ViSP/ViSP-started/Debug folder you have now tutorial-image.exe executable.cmd.exe to run a terminal.C:/ViSP/ViSP-started/Debug folder, and run tutorial-viewer.exe with an image location as argument:
Here is a screen shot of the resulting output window :
You are now ready to see the Tutorial: How to display an image. There is also the Tutorial: How to extend ViSP creating a new contrib module that could be useful to understand how to introduce new developments in ViSP.
 1.8.13