Introduction
This tutorial shows how to detect one or more AprilTag marker with ViSP. To this end, we provide vpDetectorAprilTag class that is a wrapper over Apriltag 3rd party library. Notice that there is no need to install this 3rd party, since AprilTag source code is embedded in ViSP.
The vpDetectorAprilTag class inherits from vpDetectorBase class, a generic class dedicated to detection. For each detected tag, it allows to retrieve some characteristics such as the tag id, and in the image, the polygon that contains the tag and corresponds to its 4 corner coordinates, the bounding box or the center of gravity of the tag.
Moreover vpDetectorAprilTag class allows to estimate the 3D pose of the tag. To this end, the camera parameters as well as the size of the tag are required.
In the next sections you will find examples that show how to detect tags in a single image or in images acquired from a camera connected to your computer.
Note that all the material (source code and image) described in this tutorial is part of ViSP source code and could be downloaded using the following command:
Print an AprilTag marker
You can directly download on the Apriltag website some pre-generated tag families:
In each archive you will find a PNG image of each tag, a mosaic in PNG containing every tag and a ready-to-print postscript file with one tag per page. If you want to print an individual tag, you can manually scale the corresponding PNG image using two methods:
- on Unix with ImageMagick, e.g.:
$ convert tag36_11_00000.png -scale 5000% tag36_11_00000_big.png
- or open the image with Gimp:
- then from the pulldown menu, select Image > Scale Image
- set the unit and the size
- set the Interpolation mode to None
- click on the Scale button
- From the pulldown menu, select File > Export As
- Save the image as a new PNG image, e.g.,
/tmp/tag36_11_00000-rescaled.png
- Send the PNG file to your printer
AprilTag detection and pose estimation (single image)
The following example also available in tutorial-apriltag-detector.cpp allows to detect a tag on a single image.
#include <visp3/detection/vpDetectorAprilTag.h>
#include <visp3/gui/vpDisplayGDI.h>
#include <visp3/gui/vpDisplayOpenCV.h>
#include <visp3/gui/vpDisplayX.h>
#include <visp3/io/vpImageIo.h>
#ifdef VISP_HAVE_XML2
#include <visp3/core/vpXmlParserCamera.h>
#endif
int main(int argc, const char **argv)
{
#if defined(VISP_HAVE_APRILTAG) && (defined(VISP_HAVE_X11) || defined(VISP_HAVE_GDI) || defined(VISP_HAVE_OPENCV))
std::string input_filename = "AprilTag.pgm";
double tagSize = 0.053;
float quad_decimate = 1.0;
int nThreads = 1;
std::string intrinsic_file = "";
std::string camera_name = "";
bool display_tag = false;
for (int i = 1; i < argc; i++) {
if (std::string(argv[i]) == "--pose_method" && i + 1 < argc) {
} else if (std::string(argv[i]) == "--tag_size" && i + 1 < argc) {
tagSize = atof(argv[i + 1]);
} else if (std::string(argv[i]) == "--input" && i + 1 < argc) {
input_filename = std::string(argv[i + 1]);
} else if (std::string(argv[i]) == "--quad_decimate" && i + 1 < argc) {
quad_decimate = (float)atof(argv[i + 1]);
} else if (std::string(argv[i]) == "--nthreads" && i + 1 < argc) {
nThreads = atoi(argv[i + 1]);
} else if (std::string(argv[i]) == "--intrinsic" && i + 1 < argc) {
intrinsic_file = std::string(argv[i + 1]);
} else if (std::string(argv[i]) == "--camera_name" && i + 1 < argc) {
camera_name = std::string(argv[i + 1]);
} else if (std::string(argv[i]) == "--display_tag") {
display_tag = true;
} else if (std::string(argv[i]) == "--tag_family" && i + 1 < argc) {
} else if (std::string(argv[i]) == "--help" || std::string(argv[i]) == "-h") {
std::cout << "Usage: " << argv[0]
<< " [--input <input file>] [--tag_size <tag_size in m>]"
" [--quad_decimate <quad_decimate>] [--nthreads <nb>]"
" [--intrinsic <intrinsic file>] [--camera_name <camera name>]"
" [--pose_method <method> (0: HOMOGRAPHY_VIRTUAL_VS, 1: "
"DEMENTHON_VIRTUAL_VS,"
" 2: LAGRANGE_VIRTUAL_VS, 3: BEST_RESIDUAL_VIRTUAL_VS)]"
" [--tag_family <family> (0: TAG_36h11, 1: TAG_36h10, 2: "
"TAG_36ARTOOLKIT,"
" 3: TAG_25h9, 4: TAG_25h7)]"
" [--display_tag] [--help]"
<< std::endl;
return EXIT_SUCCESS;
}
}
#ifdef VISP_HAVE_XML2
if (!intrinsic_file.empty() && !camera_name.empty())
#endif
std::cout << "cam:\n" << cam << std::endl;
std::cout << "poseEstimationMethod: " << poseEstimationMethod << std::endl;
std::cout << "tagFamily: " << tagFamily << std::endl;
try {
#ifdef VISP_HAVE_X11
#elif defined(VISP_HAVE_GDI)
#elif defined(VISP_HAVE_OPENCV)
#endif
dynamic_cast<vpDetectorAprilTag *
>(detector)->setAprilTagPoseEstimationMethod(poseEstimationMethod);
std::vector<vpHomogeneousMatrix> cMo_vec;
std::stringstream ss;
ss <<
"Detection time: " << t <<
" ms for " << detector->
getNbObjects() <<
" tags";
std::vector<vpImagePoint> p = detector->
getPolygon(i);
for (size_t j = 0; j < p.size(); j++) {
std::ostringstream number;
number << j;
}
}
for (size_t i = 0; i < cMo_vec.size(); i++) {
}
delete detector;
std::cerr <<
"Catch an exception: " << e.
getMessage() << std::endl;
}
return EXIT_SUCCESS;
#else
(void)argc;
(void)argv;
return 0;
#endif
}
The default behavior is to detect 36h11 marker in AprilTag.pgm image, but –tag_family <family> option allows to consider other tags. To see which are the options, just run:
$ ./tutorial-apriltag-detector --help
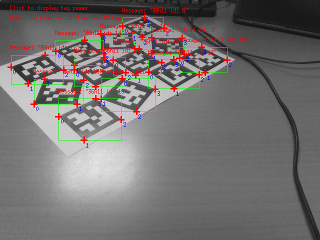
To detect multiple 36h11 tags in the AprilTag.pgm image that is provided just run:
$ ./tutorial-apriltag-detector
You will get the following result:
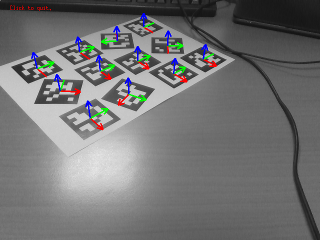
After a user click in the image, you will get the following image where the frames correspond to the 3D pose of each tag.
Now we explain the main lines of the source.
First we have to include the header corresponding to vpDetectorAprilTag class that allow to detect one or multiple tags.
#include <visp3/detection/vpDetectorAprilTag.h>
Then in the main() function before going further we need to check if ViSP was built with AprilTag 3rd party. We also check if ViSP is able to display images using either X11, or the Graphical Device Interface (GDI) under Windows, or OpenCV.
#if defined(VISP_HAVE_APRILTAG) && (defined(VISP_HAVE_X11) || defined(VISP_HAVE_GDI) || defined(VISP_HAVE_OPENCV))
After reading the input image AprilTag.pgm and the creation of a display device in order to visualize the image, since vpDetectorAprilTag class inherits from vpDetectorBase we are able to construct the requested detector (you can also use directly vpDetectorAprilTag).
Then we are applying some settings. There is especially vpDetectorAprilTag::setAprilTagQuadDecimate() function that could be used to decimate the input image in order to speed-up the detection.
dynamic_cast<vpDetectorAprilTag *
>(detector)->setAprilTagPoseEstimationMethod(poseEstimationMethod);
We are now ready to detect any 36h11 tags in the image. There is the vpDetectorAprilTag::detect(const vpImage<unsigned char> &) function that allows to simply detect any tags in the image, but since here we want also to estimate the 3D pose of the tags, we call rather vpDetectorAprilTag::detect(const vpImage<unsigned char> &, const double, const vpCameraParameters &, std::vector<vpHomogeneousMatrix> &) that returns the pose of each tag as a vector of vpHomogeneousMatrix in cMo_vec var.
std::vector<vpHomogeneousMatrix> cMo_vec;
If one or more tags are detected, we can retrieve the number of detected tags in order to create a for loop over the tags.
For each tag, we can then get the location of the 4 points that define the polygon that contains the tag and the corresponding bounding box.
std::vector<vpImagePoint> p = detector->
getPolygon(i);
And finally, we are also able to get the tag id calling vpDetectorAprilTag::getMessage().
Next in the code we display the 3D pose of each tag as a RGB frame.
for (size_t i = 0; i < cMo_vec.size(); i++) {
}
- Note
- To get absolute pose (not relative to a scale factor), you have to provide the real size of the marker (length of a marker side).
- To calibrate your camera, you can follow this tutorial: Tutorial: Camera calibration
AprilTag detection and pose estimation (live camera)
This other example also available in tutorial-apriltag-detector-live.cpp shows how to couple the AprilTag detector to an image grabber in order to detect tags on each new image acquired by a camera connected to your computer.
#include <visp3/detection/vpDetectorAprilTag.h>
#include <visp3/gui/vpDisplayGDI.h>
#include <visp3/gui/vpDisplayOpenCV.h>
#include <visp3/gui/vpDisplayX.h>
#ifdef VISP_HAVE_XML2
#include <visp3/core/vpXmlParserCamera.h>
#endif
#ifdef VISP_HAVE_V4L2
#include <visp3/sensor/vpV4l2Grabber.h>
#endif
#include <visp3/io/vpImageIo.h>
int main(int argc, const char **argv)
{
#if defined(VISP_HAVE_APRILTAG) && (defined(VISP_HAVE_X11) || defined(VISP_HAVE_GDI) || defined(VISP_HAVE_OPENCV)) && \
(defined(VISP_HAVE_V4L2) || defined(VISP_HAVE_OPENCV))
int opt_device = 0;
double tagSize = 0.053;
float quad_decimate = 1.0;
int nThreads = 1;
std::string intrinsic_file = "";
std::string camera_name = "";
bool display_tag = false;
for (int i = 1; i < argc; i++) {
if (std::string(argv[i]) == "--pose_method" && i + 1 < argc) {
} else if (std::string(argv[i]) == "--tag_size" && i + 1 < argc) {
tagSize = atof(argv[i + 1]);
} else if (std::string(argv[i]) == "--input" && i + 1 < argc) {
opt_device = atoi(argv[i + 1]);
} else if (std::string(argv[i]) == "--quad_decimate" && i + 1 < argc) {
quad_decimate = (float)atof(argv[i + 1]);
} else if (std::string(argv[i]) == "--nthreads" && i + 1 < argc) {
nThreads = atoi(argv[i + 1]);
} else if (std::string(argv[i]) == "--intrinsic" && i + 1 < argc) {
intrinsic_file = std::string(argv[i + 1]);
} else if (std::string(argv[i]) == "--camera_name" && i + 1 < argc) {
camera_name = std::string(argv[i + 1]);
} else if (std::string(argv[i]) == "--display_tag") {
display_tag = true;
} else if (std::string(argv[i]) == "--tag_family" && i + 1 < argc) {
} else if (std::string(argv[i]) == "--help" || std::string(argv[i]) == "-h") {
std::cout << "Usage: " << argv[0]
<< " [--input <camera input>] [--tag_size <tag_size in m>]"
" [--quad_decimate <quad_decimate>] [--nthreads <nb>]"
" [--intrinsic <intrinsic file>] [--camera_name <camera name>]"
" [--pose_method <method> (0: HOMOGRAPHY_VIRTUAL_VS, 1: "
"DEMENTHON_VIRTUAL_VS,"
" 2: LAGRANGE_VIRTUAL_VS, 3: BEST_RESIDUAL_VIRTUAL_VS)]"
" [--tag_family <family> (0: TAG_36h11, 1: TAG_36h10, 2: "
"TAG_36ARTOOLKIT,"
" 3: TAG_25h9, 4: TAG_25h7, 5: TAG_16h5)]"
" [--display_tag] [--help]"
<< std::endl;
return EXIT_SUCCESS;
}
}
#ifdef VISP_HAVE_XML2
if (!intrinsic_file.empty() && !camera_name.empty())
#endif
std::cout << "cam:\n" << cam << std::endl;
std::cout << "poseEstimationMethod: " << poseEstimationMethod << std::endl;
std::cout << "tagFamily: " << tagFamily << std::endl;
try {
#if defined(VISP_HAVE_V4L2)
std::ostringstream device;
device << "/dev/video" << opt_device;
#elif defined(VISP_HAVE_OPENCV)
cv::VideoCapture cap(opt_device);
if (!cap.isOpened()) {
std::cout << "Failed to open the camera" << std::endl;
return EXIT_FAILURE;
}
cv::Mat frame;
cap >> frame;
#endif
#ifdef VISP_HAVE_X11
#elif defined(VISP_HAVE_GDI)
#elif defined(VISP_HAVE_OPENCV)
#endif
dynamic_cast<vpDetectorAprilTag *
>(detector)->setAprilTagPoseEstimationMethod(poseEstimationMethod);
std::vector<double> time_vec;
for (;;) {
#if defined(VISP_HAVE_V4L2)
#elif defined(VISP_HAVE_OPENCV)
cap >> frame;
#endif
std::vector<vpHomogeneousMatrix> cMo_vec;
time_vec.push_back(t);
std::stringstream ss;
ss <<
"Detection time: " << t <<
" ms for " << detector->
getNbObjects() <<
" tags";
for (size_t i = 0; i < cMo_vec.size(); i++) {
}
break;
}
std::cout << "Benchmark computation time" << std::endl;
delete detector;
std::cerr <<
"Catch an exception: " << e.
getMessage() << std::endl;
}
return EXIT_SUCCESS;
#else
(void)argc;
(void)argv;
return 0;
#endif
}
The usage of this example is similar to the previous one:
- with option
–tag_family you select the kind of tag that you want to detect.
- if more than one camera is connected to you computer, with option
–input you can select which camera to use. The first camera that is found has number 0.
To detect 36h11 tags on images acquired by a second camera connected to your computer use:
$ ./tutorial-apriltag-detector-live --tag_family 0 --input 1
The source code of this example is very similar to the previous one except that here we use camera framegrabber devices (see Tutorial: Image frame grabbing). Two different grabber may be used:
- If ViSP was built with Video For Linux (V4L2) support available for example on Fedora or Ubuntu distribution, VISP_HAVE_V4L2 macro is defined. In that case, images coming from an USB camera are acquired using vpV4l2Grabber class.
- If ViSP wasn't built with V4L2 support but with OpenCV, we use cv::VideoCapture class to grab the images. Notice that when images are acquired with OpenCV there is an additional conversion from cv::Mat to vpImage.
#if defined(VISP_HAVE_V4L2)
std::ostringstream device;
device << "/dev/video" << opt_device;
#elif defined(VISP_HAVE_OPENCV)
cv::VideoCapture cap(opt_device);
if (!cap.isOpened()) {
std::cout << "Failed to open the camera" << std::endl;
return EXIT_FAILURE;
}
cv::Mat frame;
cap >> frame;
#endif
Then in the while loop, at each iteration we acquire a new image
#if defined(VISP_HAVE_V4L2)
#elif defined(VISP_HAVE_OPENCV)
cap >> frame;
#endif
This new image is then given as input to the AprilTag detector.
Next tutorial
You are now ready to see the Tutorial: Bar code detection, that illustrates how to detect QR codes in an image.
 1.8.13