This tutorial will show you how to use keypoints to detect and estimate the pose of a known object using his cad model. The first step consists in detecting and learning keypoints located on the faces of an object, while the second step makes the matching between the detected keypoints in the query image with those previously learned. The pair of matches are then used to estimate the pose of the object with the knowledge of the correspondences between the 2D and 3D coordinates.
The next section presents a basic example of the detection of a teabox with a detailed description of the different steps.
Object detection using keypoints
Preamble
You are advised to read the following tutorials Tutorial: Model-based tracking and Tutorial: Keypoints matching if you are not aware of these concepts.
Principle of object detection using keypoints
A quick overview of the principle is summed-up in the following diagrams.
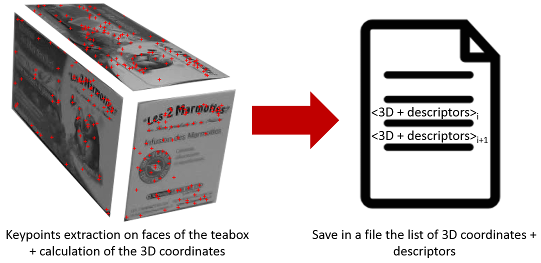
Learning step.
The first part of the process consists in learning the characteristics of the considered object by extracting the keypoints detected on the different faces. We use here the model-based tracker initialized given a known initial pose to have access to the cad model of the object. The cad model is then used to select only keypoints on faces that are visible and to calculate the 3D coordinates of keypoints.
- Note
- The calculation of the 3D coordinates of a keypoint is based on a planar location hypothesis. We assume that the keypoint is located on a planar face and the Z-coordinate is retrieved according to the proportional relation between the plane equation expressed in the normalized camera frame (derived from the image coordinate) and the same plane equation expressed in the camera frame, thanks to the known pose of the object.
In this example the learned data (the list of 3D coordinates and the corresponding descriptors) are saved in a file and will be used later in the detection part.
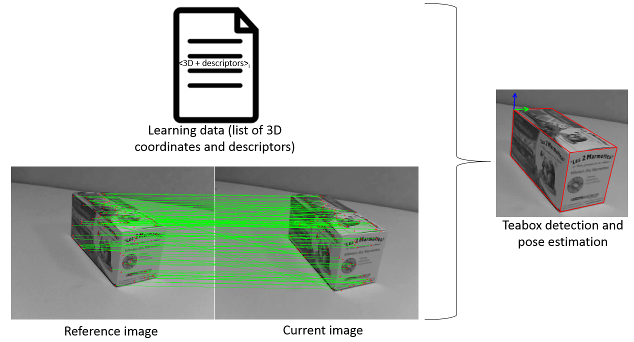
Detection step.
In a query image where we want to detect the object, we find the matches between the keypoints detected in the current image with those previously learned. The estimation of the pose of the object can then be computed with the 3D/2D information.
The next section presents an example of the detection and the pose estimation of a teabox.
Teabox detection and pose estimation
The following example comes from tutorial-detection-object-mbt.cpp and shows the different steps to detect and get the pose of a teabox.
#include <visp/vpConfig.h>
#include <visp/vpDisplayX.h>
#include <visp/vpDisplayGDI.h>
#include <visp/vpDisplayOpenCV.h>
#include <visp/vpMbEdgeTracker.h>
#include <visp/vpVideoReader.h>
#include <visp/vpKeyPoint.h>
int main(int argc, char ** argv) {
#if defined(VISP_HAVE_OPENCV) && ((VISP_HAVE_OPENCV_VERSION >= 0x020100) || defined(VISP_HAVE_FFMPEG))
try {
std::string videoname = "teabox.mpg";
for (int i=0; i<argc; i++) {
if (std::string(argv[i]) == "--name")
videoname = std::string(argv[i+1]);
else if (std::string(argv[i]) == "--help") {
std::cout << "\nUsage: " << argv[0] << " [--name <video name>] [--help]\n" << std::endl;
return 0;
}
}
if(! parentname.empty())
objectname = parentname + "/" + objectname;
std::cout << "Video name: " << videoname << std::endl;
std::cout << "Tracker requested config files: " << objectname
<< ".[init,"
#ifdef VISP_HAVE_XML2
<< "xml,"
#endif
<< "cao or wrl]" << std::endl;
std::cout << "Tracker optional config files: " << objectname << ".[ppm]" << std::endl;
#if defined(VISP_HAVE_X11)
#elif defined(VISP_HAVE_GDI)
#elif defined(VISP_HAVE_OPENCV)
#else
std::cout << "No image viewer is available..." << std::endl;
return 0;
#endif
display.
init(I, 100, 100,
"Model-based edge tracker");
bool usexml = false;
#ifdef VISP_HAVE_XML2
usexml = true;
}
#endif
if (! usexml) {
}
tracker.
initClick(I, objectname +
".init",
true);
std::string detectorName = "FAST";
std::string extractorName = "ORB";
std::string matcherName = "BruteForce-Hamming";
std::string configurationFile = "detection-config.xml";
#if (defined(VISP_HAVE_OPENCV_NONFREE) || defined(VISP_HAVE_OPENCV_XFEATURES2D))
detectorName = "SIFT";
extractorName = "SIFT";
matcherName = "BruteForce";
configurationFile = "detection-config-SIFT.xml";
#endif
if(usexml) {
#ifdef VISP_HAVE_XML2
#endif
} else {
}
std::vector<cv::KeyPoint> trainKeyPoints;
double elapsedTime;
keypoint_learning.
detect(I, trainKeyPoints, elapsedTime);
std::vector<vpPolygon> polygons;
std::vector<std::vector<vpPoint> > roisPt;
std::pair<std::vector<vpPolygon>, std::vector<std::vector<vpPoint> > > pair = tracker.
getPolygonFaces(
false);
polygons = pair.first;
roisPt = pair.second;
std::vector<cv::Point3f> points3f;
for(std::vector<cv::KeyPoint>::const_iterator it = trainKeyPoints.begin(); it != trainKeyPoints.end(); ++it) {
}
if(usexml) {
#ifdef VISP_HAVE_XML2
#endif
} else {
}
double error;
bool click_done = false;
if(keypoint_detection.
matchPoint(I, cam, cMo, error, elapsedTime)) {
}
click_done = true;
break;
}
}
if (! click_done)
#ifdef VISP_HAVE_XML2
#endif
#if defined(VISP_HAVE_COIN) && (COIN_MAJOR_VERSION == 3)
SoDB::finish();
#endif
}
std::cout << "Catch an exception: " << e << std::endl;
}
#else
(void)argc;
(void)argv;
std::cout << "Install OpenCV or ffmpeg and rebuild ViSP to use this example." << std::endl;
#endif
return 0;
}
You may recognize with the following lines the code used in tutorial-mb-edge-tracker.cpp to initialize the model-based tracker at a given pose and with the appropriate configuration.
try {
std::string videoname = "teabox.mpg";
for (int i=0; i<argc; i++) {
if (std::string(argv[i]) == "--name")
videoname = std::string(argv[i+1]);
else if (std::string(argv[i]) == "--help") {
std::cout << "\nUsage: " << argv[0] << " [--name <video name>] [--help]\n" << std::endl;
return 0;
}
}
if(! parentname.empty())
objectname = parentname + "/" + objectname;
std::cout << "Video name: " << videoname << std::endl;
std::cout << "Tracker requested config files: " << objectname
<< ".[init,"
#ifdef VISP_HAVE_XML2
<< "xml,"
#endif
<< "cao or wrl]" << std::endl;
std::cout << "Tracker optional config files: " << objectname << ".[ppm]" << std::endl;
#if defined(VISP_HAVE_X11)
#elif defined(VISP_HAVE_GDI)
#elif defined(VISP_HAVE_OPENCV)
#else
std::cout << "No image viewer is available..." << std::endl;
return 0;
#endif
display.
init(I, 100, 100,
"Model-based edge tracker");
bool usexml = false;
#ifdef VISP_HAVE_XML2
usexml = true;
}
#endif
if (! usexml) {
}
tracker.
initClick(I, objectname +
".init",
true);
The modifications made to the code start from now.
First, we have to choose about which type of keypoints will be used. SIFT keypoints are a widely type of keypoints used in computer vision, but depending of your version of OpenCV and due to some patents, certain types of keypoints will not be available. Here, we will use SIFT if available, otherwise a combination of FAST keypoint detector and ORB descriptor extractor.
std::string detectorName = "FAST";
std::string extractorName = "ORB";
std::string matcherName = "BruteForce-Hamming";
std::string configurationFile = "detection-config.xml";
#if (defined(VISP_HAVE_OPENCV_NONFREE) || defined(VISP_HAVE_OPENCV_XFEATURES2D))
detectorName = "SIFT";
extractorName = "SIFT";
matcherName = "BruteForce";
configurationFile = "detection-config-SIFT.xml";
#endif
The following line declares an instance of the vpKeyPoint class :
If libxml2 is available, you can load the configuration (type of detector, extractor, matcher, ransac pose estimation parameters) directly with an xml configuration file :
#ifdef VISP_HAVE_XML2
#endif
Otherwise, the configuration must be made in the code.
We then detect keypoints in the reference image with the object we want to learn :
std::vector<cv::KeyPoint> trainKeyPoints;
double elapsedTime;
keypoint_learning.
detect(I, trainKeyPoints, elapsedTime);
But we need to keep keypoints only on faces of the teabox. This is done by using the model-based tracker to first eliminate keypoints which do not belong to the teabox and secondly to have the plane equation for each faces (and so to be able to compute the 3D coordinate from the 2D information).
std::vector<vpPolygon> polygons;
std::vector<std::vector<vpPoint> > roisPt;
std::pair<std::vector<vpPolygon>, std::vector<std::vector<vpPoint> > > pair = tracker.
getPolygonFaces(
false);
polygons = pair.first;
roisPt = pair.second;
std::vector<cv::Point3f> points3f;
The next step is the building of the reference keypoints. The descriptors for each keypoints are also extracted and the reference data consist of the lists of keypoints / descriptors and the list of 3D points.
We save the learning data in a binary format (the other possibilitie is to save in an xml format but which takes more space) to be able to use it later.
We then visualize the result of the learning process by displaying with a cross the location of the keypoints:
for(std::vector<cv::KeyPoint>::const_iterator it = trainKeyPoints.begin(); it != trainKeyPoints.end(); ++it) {
}
We declare now another instance of the vpKeyPoint class dedicated this time to the detection of the teabox. If libxml2 is available, the configuration is directly loaded from an xml file, otherwise this is done directly in the code.
if(usexml) {
#ifdef VISP_HAVE_XML2
#endif
} else {
}
The previously saved binary file corresponding to the teabox learning data is loaded:
We are now ready to detect the teabox in a query image. The call to the function vpKeyPoint::matchPoint() returns true if the matching was successful and permits to get the estimated homogeneous matrix corresponding to the pose of the object. The reprojection error is also computed.
if(keypoint_detection.
matchPoint(I, cam, cMo, error, elapsedTime)) {
In order to display the result, we use the tracker initialized at the estimated pose and we display also the location of the world frame:
The pose of the detected object can then be used to initialize a tracker automatically rather then using a human initialization; see Tutorial: Model-based tracking and Tutorial: Template tracking.
Quick explanation about some parameters used in the example
The content of the configuration file named detection-config-SIFT.xml and provided with this example is described in the following lines :
<?xml version="1.0"?>
<conf>
<detector>
<name>SIFT</name>
</detector>
<extractor>
<name>SIFT</name>
</extractor>
<matcher>
<name>BruteForce</name>
<matching_method>ratioDistanceThreshold</matching_method>
<matchingRatioThreshold>0.8</matchingRatioThreshold>
</matcher>
<ransac>
<useRansacVVS>1</useRansacVVS>
<useRansacConsensusPercentage>1</useRansacConsensusPercentage>
<ransacConsensusPercentage>20.0</ransacConsensusPercentage>
<nbRansacIterations>200</nbRansacIterations>
<ransacThreshold>0.005</ransacThreshold>
</ransac>
</conf>
In this configuration file, SIFT keypoints are used.
Let us explain now the configuration of the matcher:
- a brute force matching will explore all the possible solutions to match a considered keypoints detected in the current image to the closest (in descriptor distance term) one in the reference set, contrary to the other type of matching using the library FLANN (Fast Library for Approximate Nearest Neighbors) which contains some optimizations to reduce the complexity of the solution set,
- to eliminate some possible false matching, one technique consists of keeping only the keypoints whose are sufficienly discriminated using a ratio test.
Now, for the Ransac pose estimation part :
- two methods are provided to estimate the pose in a robust way: one using OpenCV, the other method uses a virtual visual servoing approach using ViSP,
- basically, a Ransac method is composed of two steps repeated a certain number of iterations: first we pick randomly 4 points and estimate the pose, the second step is to keep all points which sufficienly "agree" (the reprojection error is below a threshold) with the pose determinated in the first step. These points are inliers and form the consensus set, the other are outliers. If enough points are in the consensus set (here 20 % of all the points), the pose is refined and returned, otherwise another iteration is made (here 200 iterations maximum).
Below you will also find the content of detection-config.xml configuration file, also provided in this example. It allows to use FAST detector and ORB extractor.
<?xml version="1.0"?>
<conf>
<detector>
<name>FAST</name>
</detector>
<extractor>
<name>ORB</name>
</extractor>
<matcher>
<name>BruteForce-Hamming</name>
<matching_method>ratioDistanceThreshold</matching_method>
<matchingRatioThreshold>0.8</matchingRatioThreshold>
</matcher>
<ransac>
<useRansacVVS>1</useRansacVVS>
<useRansacConsensusPercentage>1</useRansacConsensusPercentage>
<ransacConsensusPercentage>20.0</ransacConsensusPercentage>
<nbRansacIterations>200</nbRansacIterations>
<ransacThreshold>0.005</ransacThreshold>
</ransac>
</conf>
 1.8.9.1
